Saturday 27 July 2013

Cookies & Cream Cupcakes

Have you ever had a moment where you just can't choose what to eat to satisfy your sweet tooth? All the options look too good to pass up, and you wish you could just have all the desserts in the world at the same time (for those who might be wondering, no, I don't have a case of the munchies: I just get naturally really hungry)! Well this recipe is awesome, because you don't have to choose between having a cupcake or having a cookie: you CAN have them both at the same time!

I originally came across the idea of mashing those two desserts together while flipping through "Vegan Cupcakes Take Over the World", and I remember thinking that it was sheer brilliance. (As a side-note, you should totally get this book: the recipes are very original and inspiring, and they are easy!! Everything I have tried from it so far has been yummy, and didn't even really require the use of my stand mixer. If you are terrified of baking, this book will cure your fears!)

What is it about Oreo cookies that is so awesome? It really seems to bring the inner child out of everyone! Perhaps it's because kids have been dipping them in their milk for over a hundred years. Whatever the reason, they have been sneaked in many dessert recipes: brownies, ice cream sandwiches, pie crust, puddings, milk shakes... I occasionally indulge in Hershey's infamous Cookies & Cream candy bar, and I almost lost my mind when my boyfriend brought home a container of Nestle's Cookies & Cream ice cream... I can't get enough of those damn cookies in every form, so I just had to try the cupcake version...

I worked with the book's recipe, so those cupcakes are fully vegan, but if you have any basic, reliable chocolate cupcake and buttercream recipes you love, you should feel free to simply get yourself a bag of Oreos and tweak your own recipes just a little bit so you can get this spectacular dessert!

Start by getting 1 bag of Oreos, or other cream-sandwich cookies you like.

  • Coarsely chop about 10 cookies, for the batter (you need about 1 cup of coarse crumbs).
  • Separate the cookie from the cream of 5 more cookies, and finely mash the cookies, for the frosting (you need about 1/2 cup of those fine crumbs). This done really easily by putting your cookies in a plastic bag and mashing them with a rolling pin. Roll the rolling pin on the bag until the cookies are reduced to a fine crumb.
  • Slice 6 whole sandwich cookies in half-moons, for the final touch


1 cup unsweetened non-dairy milk (I usually use soy milk)
1 teaspoon apple cider vinegar
3/4 cup cane sugar
1/3 cup canola oil
1 teaspoon vanilla extract
1/2 teaspoon almond extract
1 cup all-purpose flour
1/3 cup cocoa powder
3/4 teaspoon baking soda
1/2 teaspoon baking powder
1/4 teaspoon salt

Preheat the oven to 350 degrees, and line a 12-muffins pan with cupcake liners. Whisk together the milk and vinegar in a large bowl, and set aside to curdle for a few minutes. Add the sugar, oil, vanilla extract and almond extract to the milk and beat until foamy.


In a separate bowl, sift together the flour, cocoa powder, baking soda, baking powder and salt. Add the coarse cookie crumbs to the dry ingredients, and mix.


Add the dry mixture in 2 batches to the wet ingredients, and beat until there are no large lumps left (a few tiny lumps is OK). Divide the batter into the liners, filling them about 3/4 of the way.


Bake for 18 to 20 minutes, until a toothpick inserted in the middle comes out clean. Transfer to a cooling rack and let the cupcakes cool completely before frosting.


1/2 cup non-hydrogenated vegetable shortening, at room temperature
1/2 cup non-hydrogenated margarine, at room temperature
3 1/2 cup confectioners' sugar (you may need a little bit more or less, depending on how stiff you want your buttercream)
1 1/2 teaspoon vanilla extract
1/4 cup unsweetened soy milk

Beat the shortening and margarine together until well combined and fluffy.


Add the sugar and beat for 3 more minutes, add the vanilla extract and soy milk, and beat for another 5 to 7 minutes, until fluffy.


Add the fine cookie crumbs, and mix until they are uniformly combined to the frosting.


When the cupcakes have cooled, generously pile on some frosting (a rubber spatula is your best friend for this step), and crown each cupcake with half a sandwich cookie (don't try to pipe that frosting down: the little cookie bits make that rather complicated and frustrating).


I have to say, even if I usually prefer using real butter in baking, this cupcake recipe really does make a perfect, moist and tender chocolate cake that will fool a traditionalist' palate: no one would ever guess this is egg and dairy-free! And while the words "vegan buttercream" make me roll my eyes, this icing is thick, fluffy, sweet and indulgent. The assembled cupcakes are also the cutest thing.


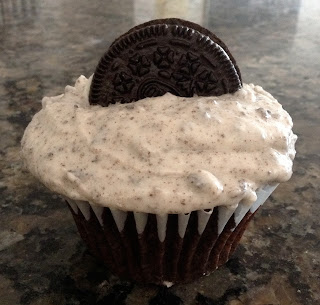
And they taste exactly like cookies & cream ice cream... Make sure to a have a nice big glass of (non-dairy... let's keep this vegan, shall we?) milk to wash all that delicious sweetness down.

Friday 19 July 2013

Old-Fashionned Strawberry Shortcakes

At last, at last, we have a summer worthy of it's name! There is lots of sunshine, it's wonderfully hot and sticky (I happen to love warm weather, even if it means covering my pasty skin in about an inch of sunscreen), terraces are full, people brought out their barbecues and ice cream parlors are sprouting like mushrooms.

It is not the ideal weather to bake fancy stuff, unless you have a really powerful air conditioning in your house (I don't), but a simple shortcake is very forgiving and almost impossible to mess up, even during a heatwave. It is a traditional Southern sweet, after all! It is also a very versatile, easy to assemble dessert that will look fancy and impressive when you serve it at your next garden (or balcony, whatever the case may be) party.

A shortcake is basically a layering of sweet biscuit, fruits macerated in sugar and whipped cream. It can be made as one big cake, but I find much cuter (and more practical) to make little individual shortcakes: you can prepare the biscuits in advance, freeze them and then garnish them as you need. Let's face it, shortcakes are tricky to slice, so a huge one is more likely to become messy than a bunch of small ones your guests can destroy as they see fit. This recipe will give you enough dough for 8 little helpings of happiness.

It's also a dessert that can be easily converted to a vegan treat: use a non-hydrogenated margarine instead of butter, non-sweetened almond milk and coconut milk whipped cream (this is my favorite recipe for the stuff), and voila! All the decadent, buttery pastry and the fluffy, dream-like whip... and none of the dairy!

The local strawberries are in season, so that's what I used, but any kind of berry or fruit can be used in a shortcake. You could also mix and match your favorite fruits, or be really naughty and add chocolate chips to your shortcakes!

Biscuits:
2 cups all-purpose flour
1 tablespoon baking powder
1/2 teaspoon salt
3 tablespoons sugar
1/2 cup (1 stick butter), chilled
2/3 to 3/4 cup milk

Filling:
1 quart strawberries
1/3 cup sugar 

Garnish:
1 1/2 cups whipping cream

Rinse the berries under cold water; drain well. Hull and slice the berries and put them in a bowl. Sprinkle with the sugar, cover and let stand at room temperature for about 1 hour. This will sweeten the berries and also make them release some moisture, which will give you a lovely strawberry syrup at the bottom of the bowl.


Whip the cream (add 2 or 3 tablespoons of sugar, if desired) until it holds a soft peak. Cover and refrigerate until ready to serve. Preheat the oven to 425 degrees. Set the rack at center level. Whisk together the flour, baking powder, salt and sugar in a large bowl or food processor. Cut the butter into about 8 pieces and add to the mixture.


Pulse in a food processor (or work with a pastry cutter or clean fingertips - I personally prefer to prepare my dough completely by hand) until the mixture resembles coarse meal, but with few pea-size chunks of butter left in the mixture.


If you were using the food processor, transfer the mixture to a large bowl and make a well in the center. With a fork, stir in the milk, until the dough is just moist. Be very careful not to overwork. The dough doesn't have to hold together well at this point. Let the dough stand for a minute. Turn the dough out onto a lightly floured surface. Knead the dough 4 or 5 times, until it is holding together and is less sticky, sprinkling with flour as needed.

 
Gently pat the dough into a 6 by 12-inch rectangle about 3/4-inch thick and cut into 8 (3-inch) biscuits with a floured round cutter (you can use an old-fashioned glass if you do not have a cookie cutter). This can be tricky if your dough is not holding together well. Don't be shy to work it a little bit more until you can cut out your biscuits properly.


Carefully transfer to a cookie sheet lined with parchemin paper. Brush on a little milk and sprinkle with some sugar. Bake for 10 to 15 minutes, until the biscuits have risen and are golden brown. Remove to a platter and split each biscuit horizontally with a serrated knife.

Once the biscuits have cooled, top the lower half of each with a generous tablespoon of the berry mixture and a dollop of whipped cream. Replace the tops and finish with a tablespoon or so of berries and more whipped cream.


The pastry was light and buttery, but firm enough to be the vessel for piles of sweet strawberries and luscious whipped cream. We drizzled a bit of the strawberry syrup on top of each shortcake and they were stunning!


These are messy to eat, but messy in the best possible way! Home-made whipped cream is so easy to make, and the decadent taste and texture is totally worth the trouble. With the light, delicious pastry and the fresh fruit, this is quite a heavenly end to a nice summer meal. It's the perfect dessert to make for those who feel like they suck at baking and can't do fancy icing flowers: a shortcake should not look too perfect. The rustic look is definitely part of the charm, in my opinion.

Friday 12 July 2013

Chana Masala

Being on vacation makes me hungry. I don't know why, but I feel like I can never wait for the next meal, and since I have plenty of time to cook on my hands, I hunt down new ideas and new recipes that I can play with at my leisure. That's my favorite way to cook: glass of wine in hand, with Gogol Bordello blasting in the background. THAT is the good life!

One of the recipes I couldn't wait to try was some chana masala. I love chickpeas: they are so cute, tasty and versatile! I also love Indian cuisine, so when I found some recipes for chickpea curry, I started to drool. My beloved beans in a spicy stew with ginger and tomatoes?! Heaven!

I combined elements from a couple of recipes I found. It's a bit of a lazy version: I used canned beans and tomatoes, because I am not nearly patient enough to soak and cook dry chickpeas, and because I was fresh out of local tomatoes. Damn. If you have the time and the tomatoes, by all means, use them! Also, some traditionalists call for the tomatoes, onions, ginger and garlic to be pureed together before being cooked. I personally like my curries to be chunky and rustic, so I simply cut everything really small, so that it would still be saucy, but I would get the lovely tasty bits of onion and ginger...

With dishes like this one, that require the adding of a large variety of spices at the same time, I like to measure all my spices and mix them together in a small bowl so that I can literally add them all to the pot of a flick of the wrist. No time wasted scrambling about with measuring spoons while the onions burn and stick to the bottom of the pan!


One last note! If you can find amchoor powder (dry mango powder), you need to do 2 things:
1- tell me where you bought it: I couldn't find any at my usual bulk spices haunts...
2- use 1 tablespoon of it in your spice mix, and only use the juice of 1/2 lemon: amchoor powder adds a citrusy taste so will you need less lemon juice if you use it.

Without further ado, here is the recipe I came up with (with a little help from Madhur Jaffrey and Smitten Kitchen)!

1 tablespoon peanut oil
2 medium onions, finely diced
2 cloves garlic, finely chopped
2 tablespoons fresh ginger, finely chopped
1 fresh chile, chopped small
1 tablespoon ground coriander
2 teaspoons ground cumin
1/2 teaspoon cayenne pepper
1 teaspoon turmeric
2 teaspoons paprika
1 teaspoon garam masala
1 (15-ounce) can of diced tomatoes, with their juice (or 2 cups of fresh tomatoes, cut small)
2/3 cup water
2 (15-ounce) cans chickpeas, drained and rinsed (or 4 cups of soaked and cooked chickpeas)
1/2 teaspoon salt
1 lemon, juiced
1 tablespoon yoghurt, preferably Balkan-style (optional)
Lemon quarters, for garnish
2 tablespoons fresh cilantro, chopped, for garnish

Heat the oil in a large skillet. Add the onion, garlic, ginger and chili pepper and sauté over medium heat until the onion begins to brown, about 5 minutes.


Turn heat down to medium-low and add the coriander, cumin, cayenne, turmeric, paprika and garam masala.


Cook the onion mixture with the spices for a minute or two, then add the tomatoes.


Add the chickpeas and carefully pour the water in so it just covers the other ingredients.


Simmer uncovered for 10 minutes, then stir in the salt, lemon juice and yoghurt (if using). Serve with basmati rice, lemon wedges and a sprinkling of chopped cilantro.


The smell of this curry is amazing! And it comes together in a snap; the hardest part if definitely the chopping. Though I admit that not sneaking spoonfuls of the stuff out of the pot while it was cooking was a challenge. It just smelled so damn good...


And it tasted as good as it smelled! Hot and spicy, but not too much, with the lovely sour kick of the lemon. A good balance between the heat and the sourness is often the make-or-break factor of a good curry, and the proportions in this recipe are really flawless.

I enjoyed a nice glass of C'est La Vie rose wine with my plate, and it was a perfect refreshing match for the sharp flavors of the curry.

There is a Pakistani version of chana masala called aloo chole, which is essentially the same recipe, with the addition of 2 medium potatoes, peeled, boiled and diced, and added to the curry along with the chickpeas (some people fry the potatoes instead of boiling them... how naughty!). Who doesn't love potatoes? You can certainly add them if you want to, but personally, I prefer chana masala in the summer, and aloo chole in the winter, when a nice starchy root veg adds a "comfort food" vibe to a simmered dish.

This curry reheats very well, so the leftovers are perfect for the next day's lunch. If anything, waiting a bit makes the taste of the spices more defined and delicious!

Saturday 6 July 2013

Sangria... Which is French for "Summer Afternoon Drink in Montreal"

Actually, it's a play on the Spanish word for "blood" (sangre), because of the dark red color. But in Montreal, we like to bastardize language...

We did not really have the luxury of spring this year, did we? We had winter, and then it was so hot one could barely deal with their clothes... I used to feel weirdly girly about all those sun dresses in my closet, but at this specific moment, I have never been so grateful for them! The weather is so insane that if they weren't there, I'd be running around naked. Yeah for sun dresses!

Now, I am sure everyone reading this has drank some sangria on a sun-soaked terrace at some point in their lives. If not, please, come to Montreal and do it. Like now. If you have been a sangria drinker, you have probably experienced both delicious sangria, and nasty sangria. Obviously, the best way to avoid the nasty stuff is to make it yourself! Sangria is a very easy beverage to make, and let's face it, everyone loves a nice glass of cold sangria!

This recipe is just about as healthy and tasty as you get considering it's wine punch. I made it up on a particularly hot and sticky Montreal summer day with my friend Paul (for whom I made jerk chicken on his birthday). We wanted a drink, but neither of us could stand the idea of heavy beer or room-temperature red wine, so we got everything we needed to whip up some sangria and experimented...

The first thing I realized was that ice cubes are a bad idea: they will dilute your sangria until it tastes bland, so avoid it and simply refrigerate your magic wine potion until it's cool enough to enjoy! Also, do not waste your money on a high grade red wine: you will be mixing it with all kinds of stuff, so it's actual taste will be lost. Just make sure it's dry red wine: the mix of sugar, sweet alcohol and citrus fruit requires a strongly flavored wine to avoid your sangria turning into an excessively sweet syrup.

Also, I highly recommend that you use carbonated water (flavored or not); that way, you have a better control of how much sugar you are ingesting, because the typical blends, which include lemonade mix and/or Sprite, 7Up or other sodas, will also include the corn syrup and other unspeakable horrors those beverages contain to your sangria. This is also why I use cane sugar, and not confectioner's sugar... I like to know what I put in my body, even if that stuff ends up getting me tipsy.

It turns out the bar-tending classes I took about 5 years ago are occasionally very useful! I kinda eyeballed the whole thing and it turned out so tasty we just... drank the whole thing... *whistles innocently* Technically, this should make enough to get 4 people tipsy, but yeah, Paul and I are... weird that way... We DID share a couple of glasses with his boyfriend... Anyhoo, here is the recipe!

1 orange, finely sliced
1 lemon, finely sliced
1 lime, finely sliced
1 cup cane sugar
1 to 1 1/2 cup spiced rum (but you could use other hard alcohol you like, such as brandy, gin, Southern Comfort, etc.)
1 cup orange juice (preferably freshly squeezed, but high-quality juice with pulp also works beautifully)
1 bottle dry red wine (preferably Spanish wine)
2 cup carbonated water (flavored to taste; we used lime flavored carbonated water, but lemon, tangerine or berry flavored would also work)


Optional: a handful of any kind of berries you might want to add to this: strawberries, raspberries, cherries, etc.

Put the sliced citrus fruits in a 3 liters-pitcher or punch bowl (you can save a few slices to garnish your glasses).


Add the cane sugar and rum and mix well with a wooden spoon.


Let it rest for approximately 5 minutes, for the flavors to mix and for the fruits to get soaked in the rum. Add the orange juice, red wine and carbonated water (and berries, if using) and refrigerate until cold. Serve with some citrus fruit slices and fresh berries.


Some people add sliced apples or peaches, or melon or mango chunks to their sangria. That's fine, if it floats your boat, but if you prefer those fruits to citrus, try using white wine instead of red, and adding a stick of cinnamon and a whole star anise to your pitcher, for some sangria blanca!

This sangria tasted really lovely: the sweetness of the sugar and rum was perfectly balanced with the acidity of the orange juice and red wine. It was very refreshing, but be warned! It's very potent, and you do not taste the alcohol in it... which really makes it the ultimate summer drink, if you ask me!


Paul and I sat on his balcony, sipping away and listening to the Civil Wars, and it was glorious. And since the weather is finally properly summer-y, I am sure you will find plenty of occasions to share a pitcher of this delicious sangria with your friends! It would be the perfect drink to go with some juicy burgers (made with meat or portobello mushrooms) or some fajitas.

Have a great summer everyone!