Saturday, 7 April 2012

Vegetable Madras Curry

I recently had the urge to go vegetarian when I went to the supermarket and everything in the meat section was overpriced. And I mean even the lousiest imaginable cuts. I am not counting pennies, but I do respect my budget, and these prices were completely absurd. Besides, I can't deny the health and ecological benefits of reducing meat consumption (I may enjoy meat, but I am nowhere near deluded enough to think we can keep eating it at the rate we do without causing serious harm to the planet). And while I am lucky that my boyfriend eats tofu willingly, there is only so much soy curd I can cook in the same week before he'll start asking for a bit of variety, which is perfectly understandable.

I had a lovely eggplant in the fridge and a can of giant fava beans that had been sitting in my pantry for a while, so I improvised a vegetarian curry that contained no tofu whatsoever. A vegetarian curry does not have to contain a meat substitute to be delicious and nutritive. After all, isn't the word "vegetarian" derived from the word "veggie"? Time to make them the star of the show, don't you think?

A Madras curry is a thick, red stew, spiced with chile, tumeric and ginger, and given a sour kick with lemon or lime juice, or vinegar (but not both!). It turns out that although Madras curry was not invented in the south of India, but in the kitchens of England, it respects the culinary traditions of the region it's named after: it's hot! In fact, it seems to me that the further south you go in India, the spiciest the local cuisine gets. That region is also mostly Hindu, so it's safe to say that they would cook vegetarian curries.

I am not sure whether or not they have eggplants in southern India, but a veggie curry generally contains one (for lack of a better word) beefy vegetable, such as sweet potatoes, turnips, etc., that will take well to being slowly cooked in a spicy sauce, and other veggies to complement it. Eggplant is great in curry because it gets very tender and silky, and it absorbs the flavors of the sauce (but if you do not like eggplants, use carrots, or other firm root vegetables, like parsnip). You can either leave the skin on or peel them; if you do peel them, they will break apart and make your curry very saucy.

I added beans because I wanted a bit of protein in this dish. Giant fava beans were what I had on hand, and they are definitely meaty, but red kidney beans would have worked great here as well (though you can skip the beans entirely if you wish: I just loved the toothy-bite in contrast to the eggplant's texture).

1 pound eggplant
1 red bell pepper, diced
1 (19 ounce) can fava or red kidney beans, drained and rinsed
2 medium yellow onions, diced
1 (18 ounce) can diced or crushed tomatoes
1/2 cup Madras curry paste
3 or 4 cloves garlic, chopped
1 thumb-sized piece of fresh ginger root, finely chopped
1/2 fresh chile, finely chopped
1 lemon or lime, juiced
Peanut oil or ghee
Plain yogurt
1 small bunch fresh cilantro leaves
Lemon wedges

Cube the eggplant and place in a colander. Sprinkle with salt, toss around and let sit for about 30 minutes. Rinse under cold water and set aside. Preheat a large pan over medium-heat. Fry the garlic, ginger and chile in some peanut oil or ghee, until the garlic is lightly colored, about 3 minutes. Add the onions and the bell pepper, and fry until the onion is translucent, about 5 minutes. Add the curry paste and mix well to get everything coated. Add the eggplant and cook, tossing around, until lightly browned on a few sides, about 5 minutes. Pour in the tomatoes, stir in the beans and add 1 cup of water and the lemon juice. Give a few good stirs to mix and bring to a boil. Lower the heat to simmer, and cook, covered, for 20 to 30 minutes, stirring occasionally, until the eggplant is tender. Serve over basmati rice, garnished with cilantro leaves and lemon wedges, dotted with plain yogurt to taste.


I do not usually expect get a success on the first try of a recipe I create in the spur of the moment. But this curry was heavenly! Spicy (but not too hot), tangy, with an awesome mix of textures.

I read that you can also use 1 can of coconut milk instead of the water, if you want a creamier version of the curry; something I shall experiment with as soon as I get a chance. I tried it, and though it makes the curry softer on the palate, it doesn't change much to the overall taste. Personally, I prefer my original version, but adding the coconut milk might be a good idea for those of you who are more sensitive to the spicy heat.

I tried it with tofu and with chicken (both versions were delicious, especially with chickpeas!), but the eggplant was so melt-in-your-mouth tender and tasty that it is still my favorite version. It actually makes me quite curious to try my other curries with this veg!

Like with most curries, I find something cold and slightly fruity is the best kind of drink to wash the spicy bites down with. Try a light beer, or a surprisingly nice Italian white wine I recently discovered: Soave. Awesome funky bottle and it tastes great with almost everything!

Tuesday, 3 April 2012

Lavender-Iced Brownie Cupcakes

I am a very anxious person. One could probably pull out a lot of clichés about how dysfunctional urban lifestyles can wreck your nerves, but sadly, I've been dragging that problem since I was in grade school. Finding ways to relax is extremely important if I want to keep my zen without running to a bottle of (strictly medicinal) red wine. Reading and cooking are two of my favorite ways to un-wind. The first, because it gives me a break from the reality that's shredding my nerves and it occupies my mind with something else, so said-mind doesn't spin out of control. The second, because it also keeps my mind and my hands busy, and I get the reward of delicious, lovingly-prepared food at the end.

As my very wise and elegant friend Valerie likes to remind me, "stressed" is "desserts" spelled backwards. Have you ever seen one of those little notebooks that says "Keep calm and make cupcakes" on the cover? Well, that's my mantra. I should probably get it tattooed on somewhere, come to think of it.

When I saw this recipe in "Martha Stewart's Cupcakes", it struck me as a beautiful and tasty way to soothe my delicate nerves. After all, chocolate is a wonderful way to remind oneself that life is definitely worth biting into ferociously. I had tried a few recipes involving flower essences before, and I had felt that even when dosed extremely carefully, stuff like rose water made my cookies taste a bit like perfume. But this recipe calls for the flowers to steep in milk, providing a natural and subtle flavor (instead of feeling like you are eating a bottle of Chanel #5). And since lavender is a time-proven relaxant, icing fudgy-chocolate cupcakes with pretty lavender icing sounds like the key to serenity to me.

3/4 cup plus 2 tablespoons all-purpose flour
1/2 teaspoon baking powder
1/2 teaspoon salt
1/2 cup (1 stick) plus 2 1/2 tablespoons butter, cut into pieces, room temperature
3 1/2 ounce unsweetened chocolate, finely chopped
1 1/2 cup sugar
2 large eggs, room temperature
1 teaspoon vanilla extract

For the icing:
1/3 cup milk
1/2 teaspoons dried lavender
3 cups confectioner sugar
violet gel-paste food color

Preheat oven to 350 degrees and line muffin pans with paper liners. Whisk together the flour, baking powder and salt. Melt the butter and chocolate in a heatproof bowl set over a pan of simmering water; stir until smooth. Remove from the heat and let cool slightly. Beat the chocolate mixture and the sugar until combined. Add eggs, one at the time, beating each until incorporated, scraping down the sides of the bowl as needed. Beat in the vanilla. Add flour mixture and mix until just combined. Divide batter evenly in the liners, filling each 1/2 full (do not overfill the liners! the cupcakes will rise, but they will not dome). Bake for 17 minutes, until a cake-tester comes out clean. Leave to cool in the pan for 5 minutes, then transfer to a wire rack to cool completely. They will look a bit mushy, but the cooling will make then firmer.

Bring the milk and lavender to a boil in a sauce pan. Remove from the heat and cover; let steep for 10 minutes. Strain through a fine sieve into a bowl and discard the lavender. Whisk in confectioner’s sugar until smooth. Strain again. Add food color, a little at the time, until the desired shade is achieved. Use a small spoon to coat the cupcakes with the icing, covering the tops completely. Let set, about 1 hour. Store at room temperature.

This recipe wields 24, elegant little mini-cakes. Being me, I slightly over-filled my liners, and not only did the cake not dome, they also caved in a bit. I filled the little gaps with the icing. They were a bit messy to eat, but the cakes had a rich, fudgy texture and a strong chocolate flavor. The lavender taste was subtle and complemented the rich chocolate cake so well. Next time, I am gonna be a good girl and follow my instructions and my cakes will be firmer!

Wow, that kinda sounded wrong...

Saturday, 31 March 2012

(Healthy) Breakfast on the Run!

Work has been kind of crazy lately (hence fewer recipes posted... I apologize) and I generally get home completely beat, so I have been trying to maximize my hours of sleep as much as I can. I noticed that if I set up the coffee machine to get it's magic done while I shower, and if breakfast is something I can grab and eat (none of that fancy toasting business - no time to waste!), I can get up almost an entire half hour later!

Being a grown-up with a grown-up job is tough sometimes. Silly office clothes are merely the tip of the iceberg, but let's not change subject. Breakfast food that's quick and awesome is the subject. Focus. I'll bitch about office attire later.

Muffins are a great solutions when mornings are a race against the clock because you literally just pick it up and eat it. But the quality of store-bought muffins always being something highly questionable, I decided to go on a little muffin baking spree, and have delicious and nutritious breakfast food that I can just grab and devour while wrestling with my pencil-skirt.

The two recipes below are from "Vegan with a Vengeance", and they are almost variations on a theme: healthy and raisins. Eating breakfast is important, but eating it on your way to the bus stop is bad. So if you are gonna follow my horrible example, you should at least eat healthy stuff as you chase public transportation around in high-heels (don't forget to throw a fruit in your bag for the bus ride and fill your thermos bottle with OJ!).

Both recipes call for you to soak the raisins in hot water. That step is not mandatory though highly recommended. It resurrects the raisins from dried and insignificant fruits to plump and chewy wonders. It won't take any time at all: fill a bowl with hot water and leave the raisins in there while you measure and mix your other ingredients.

I also generally double the recipes, keeping only 6 muffins out and defrosting them overnight as needed, but bake and freeze according to your needs (e.g. if you are one of my brother's friends who eats his weight in food twice a day, don't bother freezing the extra muffins).

Carrot-Raisin Muffins (12)

1/2 cup raisins
1 1/2 cup all-purpose flour
2 teaspoons baking powder
1/2 teaspoon baking soda
1/2 teaspoon ground cinnamon
14 teaspoon grated nutmeg
1/4 cup sugar
1/2 teaspoon salt
1 cup soy milk
1/4 cup canola oil
1 teaspoon vanilla extract
2 cups grated carrots

Preheat the oven to 400 degrees. Spray a muffin pan with non-stick cooking spray, or grease lightly with canola oil. Soak the raisins in a bowl of hot water. In a large mixing bowl, sift together the flour, baking powder, baking soda, cinnamon, nutmeg and salt. Create a well in the center and add the milk, oil and vanilla extract; mix with a wooden spoon until just combined. Fold in the grated carrots. Remove the raisins from the water and fold in as well. Fill the muffin tins 3/4 full and bake for 18 to 22 minutes, until a toothpick inserted in the center comes out clean. Cool on a wire-rack.


The longest part of this recipe is grating the carrots, but it's worth the effort! These muffins are moist, chewy and delicious.

Ginger-Raisin Bran Muffins (12)

1/2 cup raisins
1 1/2 cup all-purpose flour
2 teaspoons baking powder
1/2 teaspoon baking soda
1/2 cup sugar
2 teaspoons ground ginger
1 teaspoon ground cinnamon
1/2 teaspoon salt
3/4 cup bran
1 1/4 cup rice or soy milk
1/3 cup canola oil
1 teaspoon vanilla extract
1/4 cup crystallized ginger

Preheat oven to 400 degrees. Lightly grease a twelve-muffin pan. Soak the raisins in hot water to cover, set aside. In a large mixing bowl, sift together the flour, baking powder, baking soda, sugar, ginger, cinnamon and salt. Mix in the bran. Create a well in the center and add the rice milk, oil and vanilla. Mix with a wooden spoon just until combined. Drain the raisins and fold them in along with the crystallized ginger. Fill each muffin cup most of the way full and bake for 20 to 22 minutes, until a toothpick or knife inserted in the center comes out clear. Cool on a wire-rack.


This one is slightly more adventurous, with the sweet and zesty crystallized ginger pieces.

Both recipes fill the kitchen with a lovely smell, and though the carrots and the bran make them wholesome, they also taste delicious enough to eat just because they are yummy. Enjoy, but do try to sit down when eating your breakfast!

Sunday, 25 March 2012

We Are Gonna Need a Bigger Knife

I pride myself on being a fearless eater: I'll try anything once, and I like exotic flavors. So when my boyfriend brought shark steaks home from the grocery store, I was thrilled! I'd never had shark before, and I loves me a nice piece of fish!

It may sound weird, but many species of shark are edible, and are commonly eaten as typical seafood all over the world, as steaks, fillet, soups and stews. They make shark fish and chip in Australia! How cool is that!

It was recommended to me that I not spice it too much, since we were trying it out for the first time. A bit of research also showed that grilling was the ideal way of cooking shark steaks. So I whipped up a simple marinade, soaked my beautiful pieces of fish in it and cooked them in the grilling pan.

2 shark steaks
2 tablespoons soy sauce
2 tablespoons balsamic vinegar
1 lemon, juiced
2 tablespoons olive oil
2 tablespoons chopped parsley
1 clove minced garlic
1/2 teaspoon black ground pepper

Combine soy sauce, vinegar, lemon juice, oil, parsley, garlic and pepper. Pour over the steaks. Marinate for at least 30 minutes, turning once half way through. Remove the fish and reserve the marinade. Grill on medium heat, about 5 minutes per side. Brush with the marinade before turning.


My first surprise was how cool it looked as it cooked: when I flipped the steaks, I could see all the little layers of meat! Cool and kinda freaky! The taste and texture are also completely unusual: it is not flaky like salmon or trout. The only word I can think of is meaty. The steaks were thick and chewy, but not rubbery (as I dreaded). The flesh was very firm, and the actual steak knives were necessary to cut nice juicy pieces. That pathetic little butter knife simply wasn't up to cutting through a shark!

While this will not turn into my favorite fish (fresh salmon and tuna still win that contest), it's definitely enjoyable. You can keep the flavor neutral as I did with this simple marinade, or you can season it more strongly, as shark does not have a overwhelming taste by itself. To make the marinade more Asian, use lime juice instead of lemon, add 2 tablespoons of grated fresh ginger root and substitute the balsamic vinegar for 1 tablespoon of sesame oil. Can't wait to give that version a try!

Saturday, 17 March 2012

Home-Made Hamburgers

Who doesn't love a nice, juicy hamburger? I love them, and resisting the urge to order one when eating at a pub (or any restaurant that serves a decent burger) is incredibly difficult. Fast-food burgers have stopped being satisfying a long time ago: tiny, thin and flavorless meat patties are possibly the most underwhelming thing one can eat. And no should have to eat them! Not when it's so easy to make your own and season them exactly the way you want.

A pound of ground beef should wield 6 burger patties. Unless I have people over, I freeze 4 patties in pairs, with a piece of parchemin paper between the patties to make sure they don't stick too hard once frozen.

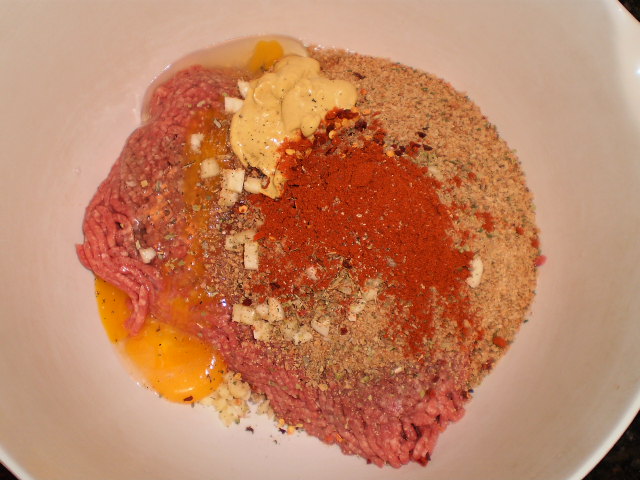
There are a million ways to season burger patties, and the recipe below is simply my favorite. Use the amount of garlic you want and switch the spices to your taste (sage is awesome, especially if you like mushrooms in your burgers!). I like the subtle, smoky taste paprika gives the meat, and a bit of garlic-bite is never a bad thing. The only ingredients I suggest keeping in at all time are the bread crumbs, the egg and the mustard. These will help your patties keep their shape during the cooking process. Nothing is messier or more frustrating than a burger that crumbles and falls to pieces as you grill it.

1 cup of bread crumbs
8 sprigs of fresh Italian parsley
1 teaspoon of Italian herbs
1 teaspoon of chili flakes
1 teaspoon paprika
3 cloves garlic
2 heaping teaspoon of Dijon mustard
1 pound of lean ground beef
1 large egg
sea salt and ground pepper
olive oil

Put the crumbs in a large mixing bowl. Finely chop the parsley, including the stalks and add to the bowl, along with the mustard and the beef. Peel and finely chop the garlic and add to the meat mixture. Crack the egg and add along with a good pinch of salt and about a teaspoon of freshly ground black pepper. Scrunch and mix everything together until well combined. Divide into six balls and form each into a patty, about 3/4 inch thick.


This is the part where you either freeze your patties or eat them right away. If you freeze them, use small freezer bags and parchemin paper. They can stay frozen a month or two. I recommend defrosting them in the fridge instead of in the microwave (I hate defrosting stuff in the microwave) because the diabolical contraption can cook the meat before you throw it in the grilling pan, and that's just not the point.

If you are gonna cook your burgers right away, drizzle the patties with olive oil, put them on a plate and refrigerate for 30 minutes to an hour. Pre-heat a grilling pan over high heat for 4 minutes, then lower the heat to medium. Place the burgers on the grill and using a spatula, press down on them lightly to make sure the whole patty is in full contact with the heat. Cook them for 3 to 4 minutes on each side, until cooked to your liking. If using cheese as a garnish, add the cheese on top of the patty for the last minute of grilling, to let it melt a bit. Serve on burger or ciabatta buns, with garnish of your choice.


I am a die-hard fan of caramelized onions and goat cheese or Brie, but so many delicious things can go in a burger besides the old classics of tomato and lettuce. It's all about complementary tastes: Swiss cheese and sautéed mushrooms, strong Cheddar and finely sliced apples, Monterey Jack and bacon.


I suggest not over-crowding your burgers: the buns may get soggy and the whole thing will fall apart before you've had time to finish it! Carefully pick 2 or 3 garnishes and condiments. You'll enjoy the ensemble much more if you don't have to eat the whole thing in several pieces.

Wednesday, 14 March 2012

Chicken Korma

Lately, I came to observe that the world's population can be split into 2 categories: coconut-lovers and coconut-haters. Neither side is right or wrong, but they both have very strong opinions. I am a coconut-lover, but I am also a food-lover; there are very few things I won't eat, or at least try. But I figured I'd warn coconut-haters: this curry is not for you. It's uber-coconuty, spicy, creamy and delicious.

It's also a classic mild curry, so you can try it even if heat scares you. This one builds up it's spices nice and slow. Just like butter chicken, Korma has become a very popular Indian dish that's enjoyed all over the world. As with most popular recipes, it means that "real" chicken Korma is described differently by everyone who has a favorite way of making it. Being a fan of the Patak's curry pastes, I use it here instead of making my own spice mix (yes, yes, I need to get around to trying to make my own curry pastes!), but adding extra coriander and tumeric will heighten the flavors and the beautiful sunny color!

1 3/4 pound chicken breast, cubed
1 cup plain yoghurt, preferably balkan-style
2 tablespoons fresh ginger, chopped
3 cloves garlic, chopped
2 medium onions, finely sliced
1 fresh green chile, seeded and sliced
1 small bunch fresh cilantro, leaves picked
1 (15 ounce) can chickpeas, drained and rinsed
Peanut oil
1 pat of butter
1/2 cup korma paste
1 (14 ounce) can coconut milk
2 tablespoons ground almonds
2 heaped teaspoons unsweetened shredded coconut (optional)
Sea salt and ground pepper
1 lemon

Mix the yoghurt with the chopped ginger and garlic. Add the chicken to the yoghurt mixture and marinate for 3 hours, up to overnight. Put a large casserole-type pan on a medium-high heat and add a couple of lugs of oil. Add the onion, chile and chopped cilantro stalks to the pan, along with the butter. Cook for about 10 minutes, until the onions are golden. Add the curry paste, the chicken and the yoghurt marinade, the coconut milk, the chickpeas, the ground almonds and the shredded coconut (if using). Add a bit of water to just cover the meat, and give the mixture a good stir. Bring to a boil, then turn the heat down to simmer for 30 minutes with the lid on. When the chicken is tender and cooked, taste and season with salt and pepper. Serve with basmati rice, garnish with a few cilantro leaves and lemon wedges.


Dose the chili and ginger to taste; the coconut milk will keep everything nice and smooth, but the underlying spicy bite can be a bit stronger, if you swing that way. Ground almonds and shredded coconut are optional, but they give the sauce a nice body and a very interesting texture. As for the chickpeas, they make the curry a bit more bulky, and add a toothy bite to the tender, marinated chicken.

If there is no korma curry paste handy, you can use the following spices blend:

1 tablespoon ground coriander
1 pinch of ground white pepper
1 teaspoon turmeric
1 teaspoon garam masala

Simply add the spices when you would add the curry paste, and voila!

I love the blend of smooth coconut milk and the hint of heat from the chile and ginger: it's a very satisfying and complex flavor mix. For a vegetarian version, forget the yoghurt marinade: add the ginger and the garlic to the pan along with the onion and chile, and replace the chicken with 1 pound extra-firm tofu, drained, pressed and cut into bite-sized cubes. You can also go full-veg with a combination of the following:

1 head cauliflower, cut into small florets
1 head broccoli, cut into small florets
1 medium zucchini, cut on a bias in 1/4-inch slices
1/2 pound carrots, peeled and cut on a bias in 1/4-inch slices

All the delicious flavor and texture, 100% plant-based! Enjoy!

Sunday, 11 March 2012

Chili Challenged

My first few attempts at making chili (con carne and sin carne) had been rather epic failures. I used a pot that was way too small, I didn't add enough water so it reduced way too much and it was a bit bland. In other words, a mess and a disaster. But it takes more than one failed experiment to get me down! I tried again and again until I found a way to make a chili that looked and tasted exactly the way I wanted it to!

There has always been great controversy among chili purists about ingredients (generally, the argument revolves around the presence of beans and tomatoes). I wanted to keep my chili simple and colorful, because a plate full of festive food is really a necessity when that last leg of winter is so grey and boring.

For the chili pictured below, I only had red bell peppers in the fridge, which is fine, but to make it more festive, I usually mix up the colors, with one green and one orange (the first pic - of one of the failed attempts - captures that burst of color). That's purely aesthetics, so I leave the color scheme to you. However, I find that mixing two different kinds of beans is nice. It adds variety in the meaty bites. I love the red kidney and black turtle beans (so those are the ones that I wrote in the ingredients list below), but use any kind that you like. Pinto beans and chickpeas work very well! On my quest to making the perfect chili, I also discovered that tomato paste is essential to get the thick, saucy texture I wanted. Dose water carefully, mixing as you add until you get to the right consistency, or it will be too runny and more like a chunky soup than like a thick stew.

The spice issue was also challenging, because I do live with a spice-freak. I love spicy, but I don't like to sweat when eating, so it had to be carefully regulated to make sure it was piquant enough... but not so much so that it would kill me. If you don't like your lips to tingle, only use 1/2 a fresh red chile and forget the chili flakes. Don't be shy to taste as you cook and adjust your quantities!

This chili is also ridiculously easy to veganize. Simply use 1 pound extra-firm tofu, drained and pressed. Either cut it into bite-sized piece (like the little tofu triangles in the second set of pictures) or crumble it, if you want it to look like you used ground beef. You can reduce your simmering time to 30 to 40 minutes instead of an hour if using tofu instead of beef.

Enough talking: here is the product of a long and sometimes frustrating experimental cooking labor! It makes a good 6 to 8 servings, so make sure you use the largest pot you have.

2 medium yellow onions, finely chopped
3 cloves of garlic, finely chopped
1 fresh chile, finely chopped (I used scotch bonnets, but jalapenos and habaneros are perfect here, too)
2 bell peppers, roughly chopped
1 bunch fresh scallions, sliced (optional)
Olive oil
1 tablespoon chili powder
1 tablespoon ground cumin
1 tablespoon chili flakes
1 tablespoon dried oregano
1 teaspoon paprika
1 teaspoon ground coriander
1 teaspoon cayenne
Sea salt and ground pepper
1 (15 ounce) can red kidney beans, drained and rinsed
1 (15 ounce) can black turtle beans, drained and rinsed
1 (28 ounce) can diced tomatoes
1 (13 ounce) can tomato paste
1 pound ground beef (or 1 pound extra-firm tofu prepared to your taste)
1 to 2 cups water
2 tablespoons balsamic vinegar

Preheat a large (at least 6-quart) pot on medium-high heat. Add 2 lugs of olive oil and add all the chopped vegetables. Add the spices along with a pinch of salt and pepper. Stir every few seconds for 7 minutes, until softened and lightly colored. Add the beans, diced tomatoes and tomato paste. Mix well. Add the ground beef, breaking up the large chunks with a wooden spoon. Carefully add the water to the pan. Add the balsamic vinegar and season with a bit more salt and pepper. Mix again until all the ingredients are well blended. Bring to a boil, then turn the heat down to a simmer, and cover with the lid slightly askew for about an hour; stir occasionally to stop it catching. Serve with rice or tortillas, sprinkled with shredded Cheddar cheese and a spoonful of sour cream, to taste.

Chili con carne:


And chili sin carne!


I knew I'd finally hit gold after the first bite from this bowl. Thick, spicy, chewy, filling: the perfect chili! And both beef and tofu versions are equally delicious. Of course, if you make the tofu version, you can omit the cheese and sour cream. It's a lot of chopping, but oh so worth it if you need a big bowl of filling comfort food! The leftovers freeze and reheat very nicely, so don't be afraid to make a full recipe even if you are cooking just for yourself. It's also ideal if you have tons of hungry folks coming over for dinner.