Monday, 24 December 2012

Friday Night Garlic, Shrimp and Mushroom Pasta

Friday night was the first evening of a long awaited vacation: sixteen glorious days of rest, reading, cooking, eating and spending time with friends and family. I got home hungry, but tired, and I was about to prepare some very simple garlic pasta, but inspiration struck and I whipped up an improvised dish that rocked!

This is the sort of magic that can happen when you decide to throw all kinds of stuff you like in a pan and end up with a plate of goodness: the perfect start to my holidays, that I washed down with a glass of champagne (I am completely addicted to bubbles, and Asti sparkling wine is affordable and tasty for every imaginable occasion)!

1 package dry pasta
4 tablespoons olive oil
4 to 6 cloves garlic, finely chopped
1 teaspoon chili flakes
1 package cremini mushrooms, sliced
2 cups small cooked shrimps
1/2 lemon, juiced
Sea salt and freshly ground pepper
Parmagianno Reggiano

Bring a large pot of salted water to a boil. Cook the pasta according to the package instructions. Meanwhile, preheat the olive oil over medium heat in a large pan. Add the garlic and the chili flakes, and cook until fragrant, 2 minutes.


Add the mushrooms and cook until their have rendered their liquid and are shiny, about 5 minutes.


Add the shrimps and stir until they are heated up, about 3 minutes. Add the lemon juice, a pinch of salt and plenty of freshly ground pepper.


Reduce the heat to low and keep the mixture on simmer for 5 to 10 minutes. Toss the freshly cooked pasta to the pan and mix well.


Serve generously sprinkled with freshly grated Parmigianno Reggiano.


Just a bit of heat, a hint of lemon, the tickle of the pepper, the earthiness of the mushrooms and the screaming garlic-ness: delicious!!

This simple recipe was a wonderfully satisfying way to getting the vacations started: it took less than 20 minutes to make and combined a whole bunch of my favorite ingredients! I can now power through the holiday cooking and baking marathon!

Ta!

Sunday, 16 December 2012

General Tao Tofu

Oh my goodness, I realize it's been a while since my last post, and I must apologize: the end of the year turns my office into an asylum. There was also our big company Christmas party last Friday, an event which requires as much planning and organization as a rocket launch. Spoilers: it's basically like a huge prom for grown-ups!

When I got back to my humble little kitchen, I wanted some of MY traditional holiday grubs: General Tao. Yes, you read that right: I come from one of those weird families that hasn't had a traditional turkey for Christmas in over a decade. Our Nativity celebration generally involves take-out and a "Star Wars" marathon. I kinda like it! It's fun, totally uncomplicated and I can be shameless about wearing a geeky t-shirt and my Converse shoes. Don't get me wrong, it's a lot of fun to get dolled-up and eat fancy food with my colleagues, but the slouchiness is much more my style.

This little recipe is a treasure I found browsing on Appetite for China. I tweaked it a bit, but it's still very simple and quick to get on the table, and it tastes better than any restaurant General Tao I have ever tried. I have a chicken version of this recipe, but since it requires the chicken cubes to be rolled in batter and fried, this is the version I use when I don't want to wait too long, or make too huge a mess. It's also much lighter than (and nowhere near as greasy as) the chicken version: something to consider after all those rich Holiday meals you may have already started eating...

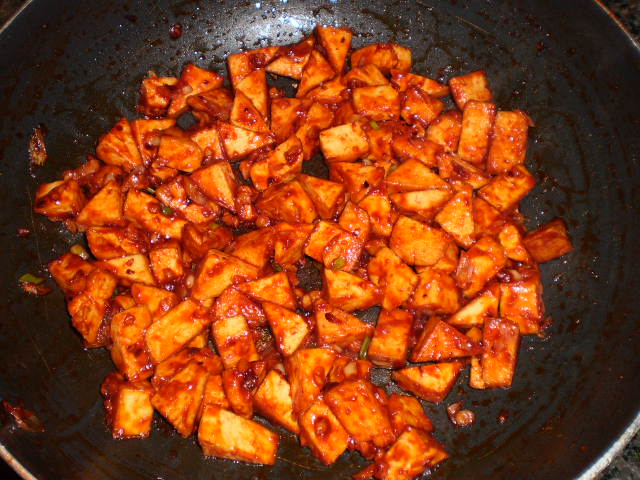
Remember to give your tofu plenty of time in the pan: a good General Tao needs a chewy bite, so you really want the soy curd to get golden and crispy to get the perfect texture.

1 pound extra-firm tofu
Peanut oil
1/2 to 1 teaspoon dried red chili flakes
2 cloves garlic, minced
1 tablespoon minced ginger,
2 to 4 scallions, white and green parts separated and thinly sliced
1 teaspoon white sesame seeds (for garnish)

Sauce:
3 tablespoons tomato paste (or substitute ketchup for a slightly sweeter sauce)
2 tablespoons soy sauce
2 tablespoons rice vinegar
2 teaspoons hoisin sauce
2 teaspoons Sri Racha sauce
2 teaspoons sesame oil
1 1/2 to 2 teaspoons sugar

Drain and press the tofu, then cut into 1-inch pieces. Prepare the sauce: in a small bowl, stir together the tomato paste, soy sauce, rice vinegar, hoisin sauce, chili sauce, sesame oil, and sugar (it won't look like a lot, but remember that this sauce should coat the pieces of tofu, and not drown them too much).


Heat 2 tablespoons of the peanut oil in a wok or large skillet over medium-high heat. Swirl to coat the bottom. Add the tofu in one layer (you may have to do this in batches) and allow it to sear on the first side undisturbed for about 1 minute.


Then use a spatula to move the tofu cubes around until they are golden on half or most of the sides, about 3 to 4 minutes.


Transfer to a plate and set aside. In the same pan, add the remaining 1 tablespoon of peanut oil. Add the dried chilis, garlic, ginger, and scallions and stir-fry until just fragrant, about 30 or 40 seconds.


Pour in the sauce and stir until thickened, about 1 minute. Add the tofu and carefully toss to coat with the sauce.


Transfer everything to a large serving dish. Sprinkle the sesame seeds and scallions greens on top and serve with rice and steamed vegetables on the side.


The sauce has the perfect blend of spicy, tangy and sweet you want from a good, satisfying General Tao. Honestly, this is quite literally an awesomesauce. The tofu gets perfectly coated in the mixture, giving you a chewy bite of piquant Asian yumminess. If you like it saucy, go ahead and double the sauce, especially if you want to throw some veggies in the wok along with your tofu, like some broccoli, snow peas or bell peppers.

I am looking forward to making a huge batch of this amazeballs recipe and sharing it with my urban family along with some Tzingtao beers! Have lovely Holidays everyone: enjoy food and drink, and don't forget to tell the people in your life that you love them!

Thursday, 6 December 2012

Roasted Tomato Soup

When you poke your nose out of the door in the morning and there's frost on the cars in the street and you can see your breath, it's soup season! Which, in Montreal, often feels like it lasts 8 months a year...

A good soup recipe is very precious: it can generally easily be doubled, frozen, taken to work as a light lunch, slurped as a midnight snack, nourish a poor cold-afflicted body and it generally tastes almost better reheated than it did fresh from the stockpot.

I had never made tomato soup before stumbling on this recipe on Hot Pink Apron, which is an aberration, really, given how much I love tomatoes. But this recipe was so simple and sounded so tasty that I felt compelled: November is finally over, and it has got to be the suckiest month of the year (long, dark, cold and we don't get Remembrance Day off in Quebec - what a sham), and a nice bowl of soup sounded like Heaven after a long work day. Bring on the comforting treat! We deserve it, if only because we survived November.

My grocery store carries lovely tomatoes on the vine; they are as tasty as tomatoes get (at least until I start growing my own on the balcony next summer!) so I got a nice bunch. I also had a new basil plant with gorgeous big green leaves that were just begging to be massively added to this soup. Is there a better food match than tomatoes and fresh basil? I think not! Note that I also added more garlic than the original Hot Pink Apron recipe: my man and I can never get enough garlic...

Olive oil
6 to 8 ripe tomatoes, roughly chopped
2 small red onions, roughly chopped
4 garlic cloves, roughly chopped
1 tablespoon dried oregano
1 (28 ounce) can of crushed tomatoes
4 cups vegetable broth
1 large bunch fresh basil leaves
Coarse sea salt and freshly ground pepper

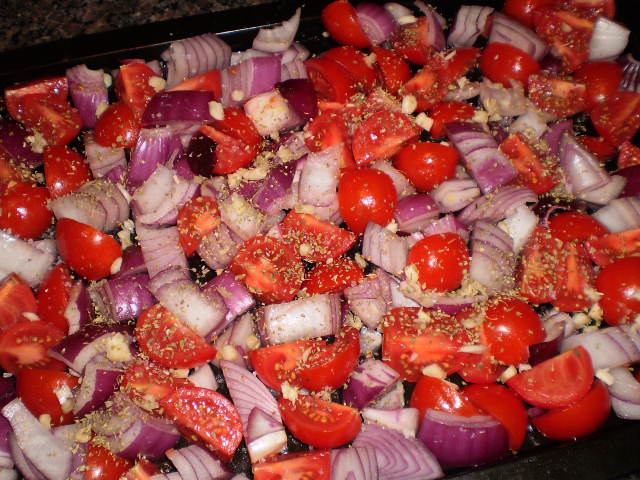
Set the oven to broil. Grease the baking pan with a couple of tablespoons of olive oil. Chop up the tomatoes, onions and garlic and toss on the baking pan. Sprinkle with a healthy dose of coarse sea salt and the dried oregano.

 
Broil the tomatoes and onions for 10 minutes. Rotate the tray. Lower the heat to 350 degrees and roast the tomato mixture for another 30 minutes.


Meanwhile, add the crushed tomatoes, broth and the basil to a large stock pot; bring to boil and simmer on medium-low heat.


Add the roasted tomato mixture to the stock pot and simmer for another 15 minutes.


Remove from the heat and using an immersion blender, purée the soup. Put back on low heat until the soup is reheated, add a pinch of salt and plenty of freshly ground black pepper, and serve with crusty bread and a sprinkle of grated sharp cheese (Parmigiano Reggiano rocks here).


I used fresh Campari tomatoes, very flavorful little fruits that taste good virtually everywhere you'd use tomatoes: they are quite small, so I used a lot more than 6. The trick seems to be keeping a ratio of 3/2 between the fresh tomatoes and the red onions. By the way, this is a great recipe to make if you have slightly mushy tomatoes that have been sitting in the crisper a bit too long!

Such an easy, straightforward recipe deserves a huge shout-out: the kitchen smelled absolutely heavenly while the tomatoes and onions were roasting. The basil keeps the soup from getting the bitter tomato aftertaste I was dreading, and the final texture is luxurious, just thick enough - yet silky.

I am so in love with this soup! Crusty bread is an absolute must: I usually stick to one slice per meal, but I just had to get a second one. Bread soaked in that lovely fragrant soup was just too darn irresistible. Garlic bread would be the ultimate side with which to clean up a bowl of this red wonder, unless you are as crazy as I am and enjoy dipping... grilled cheese sandwiches in your soup!! Oh yeah, baby!


Great minds think alike, by the way: check out Closet Cooking's grilled cheese croutons. Genius.

This recipe earned a spot on my favorite-soups roster: I am gonna whip up a batch every time I need a reminder that tomato season will be back... eventually...

Saturday, 1 December 2012

Alex's Ultimate Pancakes

I am very lucky to have amazing foodie friends. They are a great source of inspiration and I just love bouncing ideas off them and picking their brains for cooking tricks. My friend Alex is one such foodie; baking is his specialty, and he gets my mouth watering every time he mentions his latest experiments.

I am very honored to have his permission to reproduce this pancake recipe he spent years perfecting. When he announced he had created the ultimate version, I knew I had to try it.

This is literally a copy-paste of the recipe he sent me, so you'll find the narrative style a bit different from my usual prose; I thought that the best way to detail his recipe was to use his own words.

-----
Dry ingredients:
3 cups flour
1/2 cup sugar
3 teaspoons baking powder (do NOT put too much)
Dash of salt

Wet ingredients:
2 large eggs
3 cups of milk
6 tablespoons of vegetable oil
Splash of vanilla extract

Mix the dry in one bowl. Mix the wet in another bowl. Make a well in the dry ingredients and pour in the wet. DO NOT WHISK! DON'T EVEN USE ONE! Mix with... GASP! a SPATULA! Fold and gently mix until well incorporated but still with some lumps. Luuuuumps. We like dee LUUUUUMPS!


Let sit at room temperature for 30 minutes (no less, not too much more). LIGHTLY stir with the spatula. The flour will have expanded and the lumps should have moistened and will come apart. PRE-HEAT a pan to medium heat (4/10... 5/10... depends on your stove). I use an ice cream scoop to make sure my pancakes are the same size (I'm anal about pancake stacks). You need to flip when they bubble and the edges look dry.


They are soooooo fluffy they DRINK up butter/margarine. We get "Celeb" which is Maxi's house brand of Becel. 2$ less and tastes EXACTLY the same (buttery, with less guilt). I put a lot on them; it melts and the pancakes soak it up. Then I finish with the DARK maple syrup we found this spring at the Marché Jean-Talon. C'est de la tire en canne, c'est tellement bon!

Add 1/2 teaspoon ground cinnamon and half of that of nutmeg to the batter for a comforting yummy nutty kick!

*If they are not browned enough increase the heat and let the pan warm up.

*Note that a perfectly smooth batter means you over-mixed and hence developed gluten. SHAME! Your pancakes will not be miraculously fluffy, but they will still be delicious. Smile. Just be careful next time!
-----

I followed Alex's instructions very carefully. I used my stirring spatula to gently mix the batter, I preheated my crepe pan with a light psssht! of non-stick cooking spray, measured the batter with my ice cream scoop and used a thin slotted spatula to flip the pancakes. By the way, pancakes are very much like crepes: the first one is always a mess, so don't get upset. Just keep going, the second pancake will already be a huge improvement.

Besides 2 flipping incidents (my hand-eye coordination sucks early in the morning), making these pancakes was quite simple. They are ready to flip rather fast, so give them your full attention if you don't want to overcook them. If they start bubbling too quickly, lower the heat to medium-low: giving the pancakes time to set properly will make them easier to flip and will reduce batter splashing - they will also rise higher if they cook more slowly.

The fascinating part is that once flipped, you can see them rise before your eyes! They have the perfect texture and density to stack up high on a plate and drench in butter and maple syrup, just like in movies and 24-hour diners.


My ice cream scoop is small, so I used 2 scoops of batter per pancakes, and I got 16 little fluffy wonders. Alex usually makes bigger pancakes, and gets about 8.

And they really DO drink butter! A little nub of butter on one of these hot pancakes goes "slurp" and disappears. I am definitely a real butter kind of gal (my dad being French, I was brought up to think margarine was the devil's lube, and therefore, not something fit for human consumption), and when it comes to maple syrup, I like to use a lot. The pancakes drank up the butter and the maple syrup like little sponges, making each bite deliciously oozy.

Given the impressive quantity of pancakes wielded by this recipe, I suggest halving it if you are making them for 2. While they were delicious plain, I am sure a handful of fresh berries or banana slices would make them stellar.

Thank you so much for this wonderful recipe, Alex! You are ze baking-master!

Sunday, 25 November 2012

Kashmiri Masala Tofu, Take 2

Recipes are not static. They evolve, and they change as you learn about new ingredients and new cooking techniques. I've blogged about my favorite go-to curry before, but like any good old recipe, I ended up tired of always making it the same way and had fun throwing a few different things in it.

Recipes (mine, and everybody else's) are not gospels. Quantities can be changed, spices can be omitted, ingredients can be substituted. That's what's awesome about cooking: unless you are baking (and therefore conducting a chemical experiment requiring great precision), you can be as creative as you like. Make a recipe one way today, then make it with different veggies tomorrow. Just taste as you cook; trust your taste buds, nose and eyes.

No one's perfect, and everybody cooks duds every once in a while. Everybody burns food, cuts fingertips, ruins cooking pots. It is not a tragedy, and despite how I feel about it when it happens, no one dies from fucking up dinner. Cooking means learning from your mistakes as much as it means enjoying your success.

Enough philosophy! Here is my re-vamped Kashmiri Masala tofu!

2 tablespoons peanut oil
2 cloves garlic, minced
1 tablespoon fresh ginger, chopped
1 yellow onion, diced
1 red bell pepper, diced
1/2 cup Kashmiri Masala paste
1 pound tofu, pressed and diced or cut into small triangles
1 (28 ounce) can diced tomatoes
1 cup plain yogurt (optional)

Preheat a large pan over medium heat. Fry the garlic, ginger, onion and bell pepper in a glug of oil.


When the onion is soft and golden, add the curry paste, and mix well so that the onions and bell pepper are coated in the paste.


Add tofu, and cook for about 10 minutes, stirring frequently, until the tofu is slightly browned on a few sides.


Add the tomatoes, and mix well. Cook for about 5 minutes, stirring often, until the liquid has reduced a bit. Bring the mixture to a boil, give the mixture a good stir, and simmer for 15 minutes, stirring occasionally.


Remove from the heat, stir in the yogurt (if using) and serve with basmati rice.


This curry never fails to be satisfying and filling: big chunks of veggies and tofu in a fragrant, spicy sauce; can't go wrong there! This version has red bell peppers, giving it a lovely crunch, and the extra diced tomatoes make it super-saucy. With the cold days right at our door, the vitamin C from the bell peppers and the powerful immune boosters and anti-oxidants of the ginger, garlic and other spices will be much appreciated by your body! Use cubed chicken breasts instead of the tofu for a meaty bite; just let it simmer 25 minutes instead of 15, to make sure the chicken is tender and cooked through.

Have fun with your recipes: the only risk you are taking is being pleasantly surprised with the outcome!

Sunday, 18 November 2012

Meat and Mushroom Lasagne

I have been working on this lasagne recipe for a while. I had started experimenting with it in the spring, but when the hot weather arrived, I thought this monument of a recipe was a bit too heavy to cook. Who wants to slave over 3 different steaming pots when it's 35 degrees in the shade? The pesto lasagne was more weather appropriate, but now that the evenings are colder, I felt like trying my meat and mushroom sauce again.

Baked pasta dishes have an aura of intense comfort food to me. Filling, rich and covered in melty cheese. It can't get much better than that in my world, especially if I have a big glass of red wine to wash it down with. And just like non-baked pasta, it seems the possibilities are endless when it comes to combining flavors and textures. I wanted to replicate the signature sauce from my favorite little Italian restaurant, Napoli Pizzeria: meat and mushroom sauce. When I went to school a few block from that restaurant, I used to gorge myself on this delicious mixture. Now I wanted it at home!

By the way, if you are ever in Montreal and appreciate kitsch decor and perfectly done pasta, please run to this little family-owned restaurant on St-Denis street in the Quartier Latin. The prices are very reasonable, there is a about 100 different pizzas on the menu and if being serenaded by an odd Mariachi band is not a problem for you, you will have a blast.

Of course, I don't have the original Napoli Pizzeria meat and mushroom sauce recipe, so I improvised a bit, made a lovely mushroom bolognese (that I have preciously shared here), a ricotta mix laced with savory herbs and assembled a lasagne. Here is the result!

10 to 20 lasagne noodles, pre-cooked (or no-boil lasagne noodles)

Meat and mushroom bolognese:
2 tablespoons olive oil
1 teaspoon dried oregano
1 teaspoon dried thyme
1 teaspoon chili flakes
1 large yellow onion, chopped
3 garlic cloves, chopped
8 ounces fresh cremini mushrooms, thinly sliced
1 pound ground beef
1 (28 ounce) can crushed tomatoes
1 (14 ounce) can garlic tomato paste
1/3 cup red wine
Freshly ground black pepper

Ricotta blend:
1 pound fresh ricotta cheese, room temperature
1½ cups grated Parmesan cheese
¼ cup whole milk
¼ cup chopped fresh basil
1 tablespoon fresh thyme leaves or 1 teaspoon dried thyme
1 tablespoon chopped fresh rosemary leaves or 1 teaspoon dried rosemary

Topping:
1 (340 gram) package of pizza mozzarella, grated

Heat the olive oil in a large saucepan over medium-heat. Add the garlic and onion and sauté until the garlic is fragrant and the onions are soft and slightly golden, 5 to 7 minutes. Add the mushrooms and cook, stirring often, until they have released their liquid and are getting colored (they will also shrink and become nice and soft).


Add the ground beef, breaking up the big pieces with a spoon, and cook until the meat crumbles, about 7 minutes. Add the crushed tomatoes and tomato paste and mix well to blend everything. Add the red wine, stir and bring to a boil. Lower to a simmer, cover and cook for 30 minutes to 1 hour, stirring occasionally.


Preheat the oven to 375°F and grease a 9- by 13-inch pan. Combine the ricotta, Parmesan, milk, basil, thyme, and rosemary in a medium bowl; season with salt and pepper to taste. Spread about a ladleful of the bolognese sauce in the bottom of the greased pan. Arrange about 1 layer of noodles over the  sauce (it’s okay if they overlap slightly), then cover the noodles with more sauce, followed by about ½ of the cheese mixture. Repeat once. Add a final layer of noodles, cover them with the remaining tomato sauce, and arrange the mozzarella in a single layer on top. Wrap tightly with foil and bake for 30 to 45 minutes. Remove the foil and bake for another 10 minutes, until the noodles are cooked through and the cheese is golden.


I highly recommend you use pizza mozzarella to top your lasagne: it has the most awesome stretchy texture. The ground beef, while delicious, can be left out for a vegetarian mushroom-and-cheese pasta treat. Oh, and by the way, this recipe does makes a ton! Use the largest baking dish you have (or a few small ones); I got 8 helpings from this recipe.

As I explained in my previous lasagne recipe, the cooking time may vary depending on whether you use traditional or no-boil noodles. It always take a bit longer with no-boil noodles, but it is important to not over-cook a lasagne; check it after 30 minutes, testing the noodles by poking the lasagne with a fork. If it gets to soft, your beautiful pasta construction will collapse when you put it on a plate.

I was out of ricotta the night I decided to make this, so I switched the cheese and herb mixture for some creamy bechamel: that will take your lasagne to another level of richness!

4 (1/4 cup) tablespoons butter
4 cups milk
4 tablespoons all-purpose flour
1/4 teaspoon grated nutmeg
1/2 teaspoon white pepper

In a heavy medium saucepan, melt the butter, without letting it brown. Remove from the heat. Whisk in the flour, 1 tablespoon at the time until it is incorporated. Heat up the milk in another cooking pot until just about to boil. Add ladlefuls of the milk to the butter and flour mixture. Put this mixture back on medium heat and whisk. Add the nutmeg and white pepper. When the milk is absorbed, add more, a little at the time and stir until all the milk is used up. Keep whisking until the sauce is velvety. If the sauce doesn't thicken, add some flour, one scant tablespoon at the time, stirring constantly until the desired texture is achieved (I sometimes add up to 4 extra tablespoons of flour).

If you are going to use the bechamel, build your lasagne as follows: 1 layer bechamel, 1 layer bolognese, 1 layer noodles. Repeat until you run out of noddles, top with more bolognese and cover with grated mozzarella.

Sunday, 11 November 2012

Pan-Grilled Salmon with Asian Dressing

Home-made condiments are tragically underrated, and yet, they can make very simple meals spectacular. Why do those condiments not get the credit they deserve? They may not be as glamorous as other recipes, but they have their own subtle glory that needs to be acknowledged. Today, I am sharing one of my underdog recipes: my everything-tastes-awesome Asian dressing.

This little sauce/dressing/marinade can be used on salads, grilled meat and steamed vegetables. My favorite way to use it is with a lovely piece of salmon and some steamed veggies. It's the sort of super simple but utterly delicious stuff I like to whip up at the end of a long work week, when I want to feel like a top-notch cook without breaking a sweat.


Here is how to make a minimalist and tasty Asian-themed dinner:

2 (1/2 pound) salmon fillets, skin on
1 thumb-size piece of fresh ginger, grated
1 garlic clove, grated
1/2 to 1 fresh red chile, finely chopped
1 or 2 tablespoons sesame oil
3 tablespoons olive oil
1 or 2 tablespoons soy sauce
1 teaspoon balsamic vinegar
1 lime, juiced

Put the grated ginger and garlic in a small bowl. Add the sesame and olive oil, the soy sauce, lime juice and balsamic vinegar. Whisk together. Taste, and adjust as needed to balance the saltiness of the soy sauce, sweetness of the balsamic vinegar, tartness of the lime and heat of the chile.


Grilling fish in the pan is also very easy: preheat a grilling pan over medium heat and lightly spray with non-stick cooking spray. Put the fillets in the pan, skin-side down and baste with the Asian dressing. Cooking fish in the pan like that makes it easy to tell when it is ready to flip over, because you can literally see it cooking before your eyes. When it looks half-cooked, flip the fish fillets and let cook for another 3 or 4 minutes (depending on how thick the fillets are, and on how done you like your salmon). Serve the fillets with steamed veggies and rice, and use the leftover dressing on the fish and vegetables.

See? How easy it that! Here is how you can make it even easier: don't even think about grating garlic and ginger (or nutmeg and cinnamon, for that matter) or the small hole-side of a box grater. Just don't. Get a microplane grater: it will change your life.

Another good trick: ginger is much easier to grate if it's been frozen. I love ginger, so I always make sure to have tons of it around, and there is always a few big chunks in a freezer bag, just waiting to come out to be grated and added to recipes such as this one.

This recipe may be small and easily overlooked, but seriously, give it a shot; you won't believe how awesome it tastes!