Thursday, 7 February 2013

Pantry Pasta, or Chickpea and Tomato Rotinis

Do you remember my super-basic garlic pasta? This recipe also comes from a time when I had to scrape my brain to figure out ways to eat good food without busting an extremely tight budget. Listen up, students and artists: one of the tricks to accomplishing that feat is to have a well-stocked pantry, full of non-perishable items on which you can fall back safely when there is no more dough for fresh produce.

Pasta, canned tomatoes and a selection of canned beans are things you should always have within reach, no matter what your budget is, because they are inexpensive, versatile and can make tasty and healthy bases to many great meals. You can get endlessly creative with basic ingredients like that if you have a little imagination.

Since all the ingredients for this recipe are pantry-staples in my kitchen, I nicknamed it Pantry Pasta: it makes a really tasty and filling bowl of saucy beans and pasta (pasta e fagoli is a theme Italians get very creative with), and the ordinary ingredients combined give a very rich flavor to every bite, despite being relatively cheap.

I love making some Pantry Pasta from time to time: it brings back wonderful memories of cooking in my tiny yellow kitchen before going to a rock show with friends... It has the nostalgic taste of the carefree and fun days of punk rock lifestyle: yummy, inexpensive to make... and vegan, with a hint of booze!

A word here about cooking with wine: I've read somewhere you should never cook with wine you would not drink. I say meh! Cooking with wine is my favorite technique to get rid of a lousy bottle I don't WANT to drink. The alcohol evaporates during the cooking process, leaving only the highlight of the wine's taste in the dish, so the only thing you really need to be concerned with is whether your wine is dry or sweet, depending on the desired effect. For this particular dish, a drier red wine is ideal. So that wood-chipper vino you got at a lousy gift-exchange back in December; now is the time to start using it for good!

1 package dry rotinis (pennes also work great here)
1 tablespoon olive oil
1 small red onion, finely chopped
2 garlic cloves, chopped
1 tablespoon tomato paste
1/2 teaspoon chili flakes
1 teaspoon oregano
1 teaspoon thyme
1 teaspoon cumin
1 bay leaf
1 (28 ounces) can crushed tomatoes
1 (19 ounces) can chickpeas, drained and rinsed
1/3 cup dry red wine
Sea salt and freshly ground pepper
6 to 8 fresh basil leaves, ripped

Heat up the olive oil in a large pan, over medium heat. Cook the onion for 7 to 8 minutes, until softened.


Stir in the garlic, tomato paste, chili flakes, oregano, thyme and cumin. Cook for a few minutes, until fragrant.


Add the crushed tomatoes, chickpeas, red wine, the bay leaf and some sea salt and freshly ground black pepper. Bring to a boil, then turn the heat down and simmer for about 15 minutes, until the sauce is thickened.


In the meantime, bring a large pot of salted water to a boil, and cook the pasta according to package instructions, until al dente. Remove the bay leaf from the sauce and add the fresh basil leaves. Add the pasta to the sauce, mix well and serve immediately.


You can serve it with some Parmigianno-Reggiano, if you are a cheese-fiend like me, but it's just as tasty in all it's vegan glory. I love chickpeas and their lovely chewy texture, and a seasoned tomato sauce is really their best friend: the cumin adds a subtle Middle Eastern hint to the otherwise very Italian ingredients of the sauce, making it exotic and mysterious.


This dish is a simple and homey dinner, and the leftovers make for a great, filling and healthy lunch that will keep you powered until the end of the day. Of course, if the wine you used in the sauce is to your taste, I won't discourage you for having a glass along with your pasta...

Saturday, 2 February 2013

My Tomato-Basil Risotto

Since my best friend Véronique showed me how to make risotto, I was very eager to make more of the delicious, creamy, sticky rice dish. I made a very successful shrimp and lemon risotto this fall. Regular readers of this blog know how much I like the taste of tomato and basil, and when I was asked to bring a side-dish to a family meal, I decided to adapt the V-Wonder's recipe to make a big batch of gorgeous, gooey arborio to feed my in-laws.

The result was lip-smacking tasty, easy to pull-off and made a splendid and impressive offering to the big family meal. While it would be delicious devoured on it's own, it was also neutral enough to go along well with a wide range of main dishes.

Here is how to make this lovely and simple risotto, for 4 to 6 people:

1 (28 ounce) can whole tomatoes, drained, liquid reserved and tomatoes roughly chopped
Chicken or vegetable broth
6 tablespoons extra virgin olive oil
1 cup white wine
1 yellow onion, finely chopped
2 cloves garlic, finely chopped
2 cups arborio rice
1/2 tablespoon dried basil
1 small bunch fresh basil, leaves picked and finely chopped
Sea salt and freshly ground black pepper
2 tablespoons butter
1/2 cup freshly grated Parmigianno-Reggiano

Pour the juice from the can of tomatoes in a 4-cups measuring cup. Top with chicken broth until you have 4 cups of liquid. Pour that liquid in a small sauce pan, and heat over medium heat until it comes to a gentle boil. Reduce the heat to keep it simmering.


Pour 3 tablespoons of olive oil in a large pan, and on medium heat, sauté the onion and garlic until soft. Be careful not to brown the onion.


Sprinkle with the dried basil and add the tomatoes, being careful not to add any of the liquid from the can. Add the arborio rice and 3 tablespoons of olive oil, and stir so that all the grains of rice are coated in oil. Cook until the rice becomes translucent.


Add the wine and let it get fully absorbed by the rice, stirring constantly. Take a ladle-full of stock and add to the rice with a good pinch of salt. Stir to mix, and cook, stirring, until all the stock is absorbed.


Continue to add stock, one ladle at the time until the rice is al dente and creamy, 16 to 18 minutes. When adding the last ladle, also add the fresh basil leaves.


Take the rice off the heat, add butter, Parmigianno-Reggiano, pepper and mix well.


After trying it a few times, I have found that the trick to risotto is to use a wide pan (so that as much rice as possible gets heated up at the same time), an angled spatula to stir (to make sure no grain of arborio is left untouched - my stir-fry spatula is my favorite tool here), to taste often to test the rice's texture... and obviously to keep an eye on it. The change in texture and creaminess is visible as the cooking progresses and when you move the pan around and notice fluid waves of fragrant rice, you know you are on the right track. You also want to make sure nothing is sticking, so blast some good music, pour yourself a glass of wine and stir-away!

Thursday, 24 January 2013

Guinness and Ginger Coffee Cake

This week's weather has been horrible: Antarctica colds (minus 28 degrees Celsius!), bitter winds, ice pellet showers and other such unpleasantness. I didn't really dare poke my nose outside: I have a wonderful drawing room where I can read, drink tea and play with the cat all day long when Mother Nature gets crazy. But being cooped up inside eventually gets to my mood, and I ended up needing very serious cheering up...

Baking and cooking is always a balm on my nerves, so I put on my apron, slipped a "Sons of Anarchy" DVD in the PS3, and got whisks and mixing bowls ready! Baking therapy-mode engaged.

Marilla of Cupcake Rehab recently posted this little recipe for Guinness and ginger cake. I absolutely love stout, and ginger has got to be one of my favorite things in the world: I had to try it! I made Guinness cupcakes before, and the results were wonderful: stout adds a subtle but addictive taste to baked goods, so I knew it would be delicious. Also, I feel so bad ass when I bake with beer...

 I added some cocoa, because chocolate, stout and ginger sounded too good to pass up, and I threw some candied ginger in the batter. The result was a pick-me up cake that is just sweet enough, boozy and pleasantly spicy!

3/4 cup Guinness Irish stout
1/2 teaspoon baking soda
2/4 cup molasses
3/4 cup packed light brown sugar
1/4 cup granulated sugar
1 1/2 cups all-purpose flour
1/4 cup unsweetened cocoa
2 tablespoons ground ginger
1/2 teaspoon baking powder
1/2 teaspoon table salt
1/4 teaspoon ground cinnamon
1/4 teaspoon finely ground black pepper
2 large eggs, room temperature
1/3 cup vegetable oil
1/3 cup finely chopped candied ginger

Preheat oven to 350° F. Grease and flour an 8-inch square baking pan, and set aside. Over medium heat, bring the Guinness to a boil in a medium saucepan, stirring occasionally. Take off the heat and add the baking soda. The mixture will be frothy.


When the foaming subsides, stir in both sugars and molasses in until dissolved. Set aside.


In a large bowl, whisk together remaining dry ingredients.


In another large bowl, pour the Guinness mixture. Whisk in the eggs and oil until thoroughly combined.


Whisk the wet mixture into the dry mixture in thirds, stirring until completely smooth between each addition. Do not over-mix. Gently fold in the candied ginger.


Transfer the batter to the prepared pan and gently tap it on your counter to get rid of any air bubbles.


Bake for 45-55 minutes, or until the top of the cake is just firm and a toothpick comes out clean. Cool in the pan on a rack, about 1 1/2 – 2 hours. Cut into squares and serve.


I lightly dusted the cake with some confectioner's sugar before cutting it, but you could also decorate it with more candied ginger (I wanted to, but I ran out). You can get ready British about it and serve it with whipped or clotted cream when you have your Earl Grey at 4 o'clock, but I had it plain, and my mood was suddenly blissfully elevated.


It's not quite a dessert, but it's wonderful to nibble alongside a nice cup of coffee or tea, hence why I refer to it as a coffee cake. It would also make a great St-Patrick Day's snack, but don't wait for a special occasion to give it a try! The mix of rich stout, sharp ginger and the lovely hint of cocoa is heavenly! If you like any or all of those flavors, you will go mad for this cake.

My boyfriend loves Guinness, but he isn't as ginger-crazy as I am... so guess who had really happy co-workers? That would be moi!


It's the best way to bring a little sunshine to a cold, dreary morning (or coffee break!).

Wednesday, 16 January 2013

Tasty General Tao Chicken

I recently shared a recipe for my dangerously addictive General Tao tofu: it's the quickest (and low-fat) way to get the wonderfully piquant flavor of the famous dish, but everyone once in a while, it's totally worth it to take the time to make the more classic chicken version, which is marinated, deep-fried, then stir-fried in the savory sauce. I usually save it for weekends or vacation days, but I was home-sick for a few days, and when I felt better, I wanted a treat. Now.

General Tao (or General Tso) chicken is known as a classic Chinese dish, but in fact, it was invented in the United-States, after the Chinese diaspora, probably as a variant on a more traditional Hunan recipe and sweetened to accommodate North American palates (Hunan cuisine is very spicy, and General Tao usually has a sweet element to its flavor). There's now hardly any Chinese restaurant in North America that doesn't have this dish on their menu.

I found this recipe on Appetite for China, and adjusted it a little bit (I prefer using chicken breast instead of chicken thighs and I used Sri Racha in my sauce instead of the chili paste listed in the original recipe). Here is the scrumptious result!

1 pound boneless, skinless chicken breast, cut into 1-inch cubes

Marinade:
1 tablespoons soy sauce
1 tablespoon Chinese rice wine or dry sherry
2 egg whites

Sauce:
1/4 cup chicken stock
2 tablespoons tomato paste
1 tablespoon soy sauce
1 tablespoon rice vinegar
1 tablespoon hoisin sauce
1 tablespoon Sri Racha sauce
1 tablespoon sesame oil
1 tablespoon sugar
1 teaspoon cornstarch

1 1/2 cup cornstarch
1/2 teaspoon salt
1/2 teaspoon freshly ground black pepper
3 cups peanut or vegetable oil for frying, plus 1 tablespoon for stir-frying
1/2 to 1 tablespoon chili flakes
2 cloves garlic, minced
1 teaspoon white sesame seeds, for garnish
Scallions, green parts thinly sliced, for garnish

Prepare the marinade: in a large bowl, combine the soy sauce, rice wine, and egg whites. Coat the chicken in the marinade mixture and let sit for 10 minutes.


In the meantime, prepare the sauce: In a small bowl, combine the chicken stock, tomato paste, sugar, soy sauce, rice vinegar, hoisin sauce, Sri Racha sauce, sesame oil, sugar, and 1 teaspoon of cornstarch. Stir until the sugar and cornstarch are dissolved. Set the sauce aside. It doesn't look like a lot, but the sauce is meant to coat the chicken: if you like your General Tao very saucy, double the sauce recipe.


In a large bowl or deep plate, toss the 1 1/2 cups cornstarch with the salt and pepper. Coat the marinated chicken in the cornstarch and shake off any excess before frying (try to use only one hand for dredging the chicken in the cornstarch: the stuff clumps up and you will need to rinse off the built up a few times). Fill a wok or large, deep skillet with about 1 inch of peanut or vegetable oil; preheat it over medium-high heat, until a piece of garlic dropped in it starts sizzling instantly. Working in 2 or 3 batches, add the chicken cubes and fry until golden brown on the outside and cooked through, about 4 to 5 minutes. If you want your chicken to be crispy, avoid over-crowding your wok (like I did in the picture below... now I know better)!


Remove the chicken with a slotted spoon and drain on paper towels (I never buy paper towels, so I put the pieces of chicken on a wire grill over a piece of tin foil). Repeat with the rest of the chicken. Drain the oil into a heatproof container and save for discarding.


Wipe the wok to remove any brown bits, but don’t wash. Reheat the wok or skillet over medium-high heat. Add another 1 tablespoon of oil and swirl to coat the base and sides. Add the chili flakes and garlic to the wok and stir-fry until just fragrant, about 20 seconds. Pour in the sauce mixture and stir until thickened, about 1 to 2 minutes.


Return the chicken to the wok and stir well to coat with sauce. Stir-fry until reheated.


Serve garnished with the chopped scallion and sesame seeds, with some jasmine rice and steamed vegetables.


It gets a lot of dishes dirty and it takes good timing to get the chicken, the rice and the veggies all ready at the same time (don't let the fried chicken sit too long: the texture will loose it's crispiness), but it's worth the effort and the cleaning up! With a bit of practice, you can get the chicken to a perfect golden crisp and it will still be tender and chewy inside the batter.

I don't have to tell you that twice-fried chicken is something to be treated as an indulgence, but the cooking technique can also be used (in moderation) with sweet and sour sauce... So freaking good!

Santa Claus (a.k.a. Amazon.ca) gave me the wonderful "The Chinese Takeout Cookbook", 'cause I have been such a good girl this year, and it is full of amazing recipes! It really is your favorite Chinese take-out's menu made easy! It includes great tips on how to care for your wok, selecting traditional ingredients and making tasty food with no MSG and other horrible additives. If you enjoyed this General Tao, get your hands on a copy!

Wednesday, 9 January 2013

Pad Thai Salad with Peanut-Lime Dragon Dressing

I don't know about you, but I have taken advantage of the Holidays to stuff my face until all I could do was sit on the couch watching "Downton Abbey" and sip mint tea. I know good and well that it's not very healthy to eat until you need to unbutton your jeans, but being reasonable when it comes to good food is something that's always been a challenge for me. In the summer, I walk and bike a lot, so I feel free to indulge, but in winter, I turn into a house cat: lazy and overfed... Not good.

While I don't really believe in New Year's resolutions, which are too easily abandoned by spring, I think it's a good idea to look after yourself, take care of your health, move as much as you can and eat good food in reasonable helpings (less meat, more fruits and veggies, no processed horrors). But that doesn't mean you shouldn't enjoy what's on your plate!

I started my post-Holiday detox regimen with a few days of eating soups: it's a warm and comforting way to get your vegetables in. My favorite low-fat soups are borscht, carrot, orange and ginger, and roasted tomatoes. But there is something about the middle of winter that makes me crave fresh, crunchy vegetables. Greek salad is always wonderful, but my palate often craves the sharp and piquant flavors of my favorite Asian dishes... but minus the oil and frying.

This is where this lovely salad comes in! "Appetite for Reduction" is my go-to book for light-yet-flavorful meal ideas, and this recipe practically jumped off the page at me. I love me some Pad Thai, and the mix of lime, peanut, and fiery pepper is one of my favorite flavor blends. I tried it once, and it instantly became one of my favorite salads! I beefed it up by adding mushrooms and snow peas (I often add those to my Pad Thai), but you can keep it more minimalist if you wish.

I've sung the praises of my Cuisinart immersion blender and it's food processor attachment before, but there is really no better kitchen toy when it comes to making home-made salad dressings: an ordinary food-processor is too big and the mess is a pain to clean up. Take advantage of the Boxing Days special to get your hands on one of those babies!

Now, to the lovely salad! 

Dressing:
1/4 cup roasted peanuts
2 tablespoons chopped scallions (3 scallions)
1/4 cup freshly squeezed lime juice (3 or 4 limes)
1/2 cup water
2 tablespoons agave nectar
2 tablespoons soy sauce
1 tablespoon Sri Racha sauce

Pulse 2 tablespoons of the peanuts and all the scallions in a food processor.


Add the lime juice, water, agave, soy sauce and Sri Racha and blend until very smooth.


Use a rubber spatula to scrape down the sides a few times. Taste, and adjust as needed with more lime juice, agave, soy sauce or Sri Racha. Add the remaining 2 tablespoons of peanuts and pulse until they are chopped up small.


Salad:
8 cups chopped Romaine lettuce
4 cups bean sprouts
1 small red onion, thinly sliced
1 medium carrot, peeled and grated

1 cup thinly sliced button mushrooms
1 large handful snow peas
1/4 cup roasted peanuts
1/2 cup lightly packed fresh cilantro
1 lime, quartered in wedges


In a large mixing bowl, toss together the lettuce, sprouts, red onion, carrot, mushrooms and snow peas.


Add half of the dressing and toss to coat. Distribute the salad into 4 serving bowls and add the remaining dressing. Garnish with roasted peanuts, cilantro leaves and lime wedges.


The burst of flavor from the dressing is amazing, and the crispiness of the onions, snow peas and bean sprouts is wonderfully refreshing. As a side-dish, it is a great complement to some grilled tofu, white fish or almost any other Asian dish.

If you plan on eating better and exercising more in 2013, the cookbook where I found this recipe is at the top of my list of recommendations, but also check out "French Women Don't Get Fat" for tips on how to enjoy food without over-indulging and with a positive attitude, and "Punk Rock Aerobics" can get you bouncing around your living room with your Ramones records blasting even if you hate working out.

Take good care of your body: you only have one, so treat it like a temple, not a garbage disposal!

Thursday, 3 January 2013

Spaghetti and Meatballs

Sometimes, I think spaghetti and meatballs might be the ultimate food cliche. Who hasn't seen that ridiculous/adorable scene in "The Lady and the Tramp" where the two dogs share a plate and end up kissing because they have both been eating the same noodle?

Funnily enough, you'll hardly ever find that dish in restaurants in Italy: it's one of those American-Italian dishes people in Rome have never heard of, like pasta alla carbonara or Alfredo sauce. But who cares, really? It's delicious and filling, and quite versatile. I decided to make some spaghetti and meatballs after we were all but walled-in by a big snow storm: I thought we could use a nice bowl of comfort-food!

This recipe is for basic beef and pork meatballs in tomato sauce (inspired by David Rocco's recipe in "Made in Italy"): you begin by browning the meat in the pan before letting it cook through in the sauce. You can use any ground meat you can get your hands on: beef and pork are classic choices, but lamb is delicious! Add pine nuts or raisins to your meatballs for a change of pace: the texture and slight sweetness is surprisingly awesome!

Veg-heads need not despair: I also added Isa Chandra's "Appetite for Reduction"'s black-eyed pea and tempeh beanballs recipe, which is a super-tasty meatless alternative.

My friend Alex (the king of pancakes) suggested adding a bit of smoky paprika to a simple tomato sauce, and I do love paprika in red meat dishes, so I modified my usual sauce recipe a bit... Here is the result!

Meatballs:
1 pound ground beef
1 pound ground pork
1 cup bread crumbs
2 eggs
1 cup freshly grated Parmigiano-Reggiano cheese
1 tablespoon dried oregano
1 bunch flat-leaf parsley, chopped
Sea salt and freshly ground pepper

Sauce:
4 tablespoons olive oil
4 cloves garlic, finely chopped
1 small yellow onion, finely chopped
1/2 to 1 tablespoon chili flakes
1/2 to 1 tablespoon paprika
1 (28 ounce) can crushed tomatoes
Sea salt and freshly ground black pepper

1 package dry spaghetti


Put the ground meat in a large bowl along with the bread crumbs, eggs, Parmigiano, oregano, half the parsley and some salt and pepper.


Mix the ingredients together by hand until small meatballs that hold together can be formed. Aim for anywhere between 16 and 24 meatballs, depending on the size you make them (I try to make them ping-pong ball-sized). Keep in mind that the smaller the meatballs, the better they will hold while cooking, but don't make them too small either or they will overcook!


Heat up the olive oil in a large sauce pan over medium heat. Add the meatballs and slightly brown them on all sides (use tongs or a shallow cooking spoon - proceed in batches if you need to). This is the trickiest part of the recipe, and only practice (and a big enough pan) makes perfect.


The meatballs may get a bit deformed and a few pieces may fall off, but it's almost inevitable, so don't sweat it. Add the remaining parsley, the garlic and the onion, and cook until the onion starts to soften.


Pour in the crushed tomatoes, the chili flakes, the paprika and some salt and pepper. Let the sauce come to a light boil, turn down the heat and let it simmer for 30 minutes, stirring a couple of times.


Bring a large pot of salted water to a boil and cook the spaghetti according to the package instruction. Taste the sauce and adjust the seasoning. Drain the pasta and separate between pasta bowls. Add a few meatballs to each bowl (3 to 5, depending on their size and your appetite) and spoon some sauce over the pasta. Serve with some Parmigiano Reggiano for sprinkling.


If you have a checkered tablecloth and old chianti bottles, now is the time to bring them out, along with your Dean Martin records! The rustic look and deliciously retro taste of the sauce and meatballs is an absolute win if you are craving a slurpy pasta feast.

The hint of heat from the chili flakes and paprika is perfect for a cold winter night, but you can also use a sweeter tomato-basil sauce if spicy is not your thing:

4 garlic cloves, peeled and chopped
2 tablespoons extra-virgin olive oil
1 (28 ounce) can crushed tomatoes
1/2 teaspoon dried basil
1/4 cup fresh basil, sliced
1/4 teaspoon dried oregano
1 tablespoon red wine vinegar
Sea salt and freshly ground pepper, to taste

In a large saucepan, sauté the garlic and 2 tablespoons oil over medium-high heat until it starts to sizzle. Stir in the tomatoes, basil, oregano, red wine vinegar, a pinch of salt and a few grinds of pepper. Pour over the browned meatballs and proceed with the recipe.

If you are in a hurry, every element of this recipe can be made in advance and assembled quickly: prepare your meatballs and your sauce separately, refrigerate or freeze everything and simply heat up and mix together when you are ready to eat! This is when it comes in handy to double the recipe and put the extra away to have an easily prepared meal later.

You can also use those meatballs in a wrap or sub, or serve them in their sauce with some crusty bread and sharp cheese. And here is a great meat-free alternative you can use if your New Year resolution is a change of diet:

12 ounces tempeh
1 (15 ounce) can black-eyed peas
2 cloves garlic, finely minced
1 teaspoon dried thyme
2 teaspoons dried oregano
1/2 teaspoon paprika
Several pinches of freshly ground black pepper
1 tablespoon soy sauce
1 tablespoon tomato paste
1 tablespoon balsamic vinegar
1/4 cup whole wheat bread crumbs
1/4 teaspoon salt

Prepare a steamer for the tempeh. Break the tempeh into bite-sized pieces and steam for 10 minutes. In the meantime, preheat the oven to 350 degrees and line a large cookie sheet with parchemin paper. In a mixing bowl, use a fork or potato-mashers to mash the beans. They should be well mashed, with no whole beans left, but not completely smooth, like a puree. Add the garlic, herbs and spices, soy sauce, tomato paste and balsamic vinegar and mix well. Add the tempeh to the mixture and mash well. When the mixture is cool enough to handle,  add the bread crumbs and salt (the batter may be a bit bitter: it will mellow out when baked). Using about 2 tablespoons of the mixture per ball, roll the mixture into walnut-sized balls, placing them on the baking pan. Spray with an ample amount of nonstick cooking spray and cover loosely with tin foil. Bake for 15 minutes, flip the balls and bake for 10 more minutes, uncovered.

Make you basic tomato sauce separately, and mix them together before serving on your spaghetti.

It is a cliche of a dish, but what a delicious cliche! Serve these with a rustic Italian red wine and make sure to eat it watching "Moonstruck".

Monday, 31 December 2012

It's Not Easy Being a Green Tea Cupcake

There is something amazing about a cup of nice green tea: it's soothing and tasty, it will get rid of toxins, hydrate you just as well as a big glass of water, boost your brain power and your immune system... It really is a gorgeous magic potion for the body and for the soul. My favorite is David's Tea Dragon Pearls: I drink two cups of the stuff every day I can, and every drop feels and tastes wonderful. Living in the real world would be very tough sometimes if there was no green tea... and no adorable mugs to drink it from - thank you Mel and Matt for the cutest Christmas presents!


December is always synonymous with madness at work, and while chocolate is wonderful to keep stress under control, I could not have made it without my green tea, and in that spirit, I wanted a zen little dessert I could bring to my in-laws' Christmas lunch. Why not turn my magic potion into a tasty sweet? My mother-in-law is as much of a tea fan as I am, so I knew those little cupcakes would be received enthusiastically at her table.

This recipe requires you to get your hands on some matcha green tea powder: you can easily find it at tea shops, but if that fails, try to hit Asian stores or Chinatown. Matcha is the tea used in the Japanese tea ceremony: its made from a specific kind of green tea and ground into a very fine powder, then whisked with hot water to create the traditional beverage. It's worth noting that it contains three times as much antioxidant as regular green tea, so these cupcakes are just as much health food as they are dessert! Or at least, that's what I keep telling myself... they disappeared in the blink of an eye...

2 cups all-purpose flour
1/2 tablespoon baking powder
1/4 teaspoon salt
2/3 cup milk
2 tablespoons matcha green tea powder (I used Matcha Matsu from David's Tea)
3/4 cup (1 1/2 stick) butter, room temperature
1 1/2 cup sugar
2 eggs
1 egg yolk
A few drops almond extract
A few drops vanilla extract

Preheat the over to 350 degrees, and line a muffin pan with cupcake liners. Sift the flour, baking powder and salt together in a medium bowl. Mix the milk and matcha powder and reserve.


In a large mixing bowl, beat the butter and sugar together until fluffy, about 5 minutes. Add the eggs, one at the time, beating well after each addition, finishing with the egg yolk. Mix in a few drops of almond and vanilla extract (1 teaspoon of extract in total does the trick). Add a third of the flour mixture and half of the milk and matcha mixture, and mix well. Add another third of the dry ingredients and the rest of the wet ingredients, mix and finish with the rest of the flour. Mix until just incorporated.


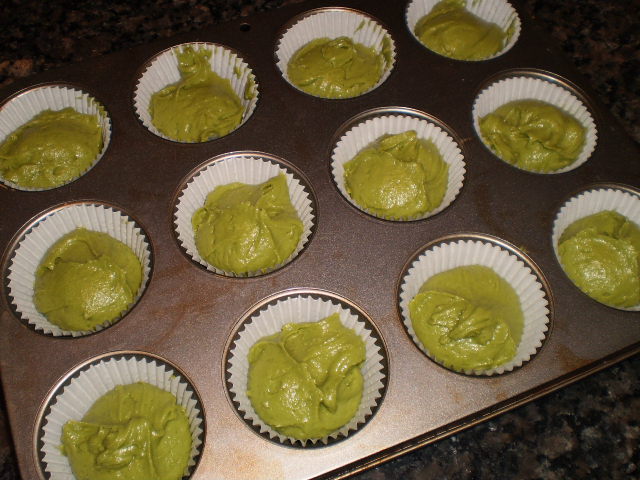
Spoon the batter in the cupcake liners and bake for 22 to 25 minutes, until the top of the cupcakes springs when touched, or until a cake tester comes out clean. Let the cupcakes cool in the pan 5 minutes before moving them to a baking rack, and let them cool completely before icing.


You can add a few drops of green food coloring if you really want your cupcakes to pop bright green, but that is entirely optional: as you can see, the matcha makes the batter quite green without any coloring! They will be perfect Halloween or St-Patrick's Day cupcakes with that gorgeous color...

I am a huge fan of green tea desserts, with green tea ice cream being at the top of my list, and I was delightfully surprised when I tasted the batter and it had that exact delicate-yet-rich flavor: not too sweet and with no hint of the bitterness you sometimes have with green tea. Just the smooth, sophisticated green taste... Those cakes have a soft and moist crumb, and their subtle flavor is absolutely delicious!

I chose a simple green tea glaze (inspired by the recipe in "Vegan Cupcakes Take Over the World") for the batch I brought my in-laws:

2 tablespoons butter, room temperature
1 cup confectioners’ sugar
1/2 teaspoon matcha tea powder
1 to 2 tablespoons milk
1/4 teaspoon almond extract
1 drop vanilla extract

With a fork, beat the butter until fluffy in a small bowl. Mix in the confectioners’ sugar and matcha to form a crumbly mixture.


Slowly beat in 1 tablespoon milk, almond extract and vanilla extract. If the icing is too thick to spread, pour in additional milk a teaspoon at the time and mix until the desired consistency is reached.


Use a tablespoon to pour glaze into the center of each cupcakes and spread it out a bit with the back of the spoon. Let the glaze set before serving (refrigerating your glazed cupcakes can help there: place them in an air-tight plastic container and chill them for 30 minutes).


While this glazing is simple, easy to make and very tasty, you could ice these cupcakes in many different ways. A classic cream cheese or buttercream frosting spiked with 1 tablespoon of matcha powder (and colored a brighter green, if you wish) will make spectacular cupcakes!

I made another batch for my New Year's party, and since my friends are chocolate fiends, and since chocolate and green tea are a match made in decadence-and-stress-reducing-heaven, I whipped up a simple but oh-so-rich chocolate ganache to frost the second batch:

9 ounces bittersweet chocolate, finely chopped
1 cup heavy cream
1 tablespoon dark rum (optional, but awesome)

Put the chocolate in a medium, heat-proof bowl. Bring the cream just to a boil in a small sauce pan (keep a close eye on it!). When the cream reaches the boiling point, pour it over the chocolate and whisk it until its smooth. Stir in the rum (if using). You can either let it cool slightly before pouring it on the cupcakes (starting in the middle and letting it drip), or if you want a fluffier frosting, let it cool until thick, then whip it up with a whisk until it has the desired texture.


And voila! A lovely, elegant and delicious dessert that should not be over-looked in favor of flashier cupcakes! Remember:

"It's not easy being green,
It seems you blend with so many other ordinary things
And people tend to pass you over 'cause you're
Not standing out like flashy sparkles in the water
Or stars in the sky

But green's the color of spring
And green can be cool and friendly-like
And green can be big like an ocean, or important
Like a mountain or tall like a tree

When green is all there is to be
It could make you wonder why, but why wonder why
Wonder, I am green and it'll do fine, it's beautiful
And I think it's what I want to be"

(Yes, I sing silly songs when I bake and I LOVE the Muppets)

A very happy New Year to all my lovely readers! May it be filled with health, love, prosperity and delicious treats! xxx