Saturday, 13 October 2012

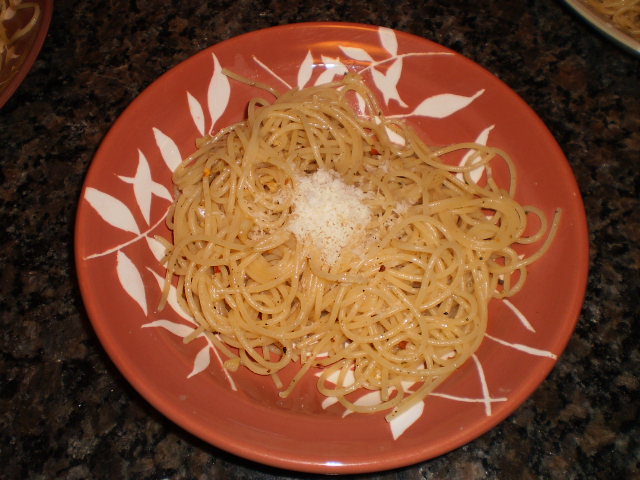
Broke-Ass Pasta (a.k.a. Aglio-Olio)

It’s almost embarrassing to admit, but I get very very anxious if there is not a hefty stock of dry pasta in my pantry. Back in my broke musician days, I would not have survived very long without my best friends spaghetti, penne and macaroni, and there is now an irrational but deeply-rooted fear that I may starve to death if I have no pasta handy.

If you make sure to have a decent bottle of olive oil at all times, then the ingredients for this recipe cost less than $5, and yield four helpings. Ideal for hungry artists who wish to eat well without selling-out, and students with limited budgets!

I make this recipe from time to time, not out of financial worry, but simply because it’s simple, quick to make, and completely delicious. Ever had one of those evenings where you have no inspiration for dinner ideas, or no energy but a dire need to eat? This recipe is made for such evenings, and also from anyone recovering from an illness that upset their stomachs. Minimalist pasta dishes such as this one settles the tummy and gives you the calories and carbs your body needs to recover.

1 package dry linguine or spaghetti (stringy pasta work the best with this recipe, but any pasta you have in the pantry will do)
6 tablespoons olive oil
2 to 4 cloves garlic, minced

Chili flakes
Sea salt and ground pepper
1 handful fresh parsley, minced
1/2 cup Parmesan cheese, grated


Bring a large pot of salted water to a boil and cook the pasta according to the package instructions. Heat a large pan over medium heat and add the oil, garlic, a small pinch of chili flake, salt and freshly ground pepper. Sauté garlic for 2 minutes, until golden, then take off the heat.


Once the pasta is cooked, strain and drop it in the garlicky olive oil, turn the heat to medium and mix it up for a few minutes with the parsley.


Serve sprinkled with Parmesan and more black pepper.

If you like a nice crunch, add a handful of breadcrumbs as you toss your pasta in the oil. Minimalist and delicious. Garlic fiends will be especially enamored of this pasta dish, as you can make it subtle or screamingly garlicky as you want, depending on your mood or taste. Use Italian or flat-leaf parsley, which is more flavorful that regular curly parsley. It also makes for a lovely window-plant, so why not get some that you can grow at home? Tasty AND pretty!  

It's raining cash? Awesome! Add 1 cup of small or medium cooked shrimps and 2 or 3 finely chopped scallions to your garlic and oil. You have random leftovers you want to get rid of, like cooked sausages? No worries: throw them in the pan along with the pasta, that will give them just enough time to heat through.

If you love to cook, olive oil is something you should think of as an investment. 15 to 25 dollars for a bottle of extra-virgin, cold pressed olive oil is quite reasonable. Think about it the same way you'd think of a bottle of wine: would you drink $5 wine? Nah, me neither. And I wouldn't cook with ridiculously cheap olive oil, either. Getting the good stuff with make a huge difference in your dishes (and not just your salad dressings).

I've talked about the importance of not over-cooking pasta before, but it's a very important point that deserves to be repeated again. Al dente means you need to have a firm bite when you chew, but no crunch. Drain pasta as soon as they have the desired texture to stop the cooking, unless you are going to throw them in a sauce; in which case, leave them just a little bit harder because they will finish cooking in the sauce.

If you can afford it, a fruity white wine cleanses the palate beautifully after this garlicky feast! 

Sunday, 7 October 2012

Eggplant and Chicken Macaroni Gratin

I have been mildly obsessed with baked pasta dishes lately. Maybe because fall is right around the corner, which generally means my appetite for comfort food increases dramatically. What can I say, I do not like cold (you gotta wonder why I still live in a country where it snows from October to April) and I make up for the miserable weather with awesome food.

This recipe was inspired by an improvised pasta dish my mother whipped up the last time I went to see her. Her version was good, but I reworked it to satisfy my carnivorous boyfriend's cravings, and make it into a sort of alla Norma twist on a classic mac-and-cheese.


I had a beautiful fresh eggplant from my father's garden (the eggplant was sooo cute and chubby, I felt kinda guilty chopping it), my basil plant was offering me gorgeous, huge green leaves and I had a ton of fresh local garlic in the pantry. This gratin is my farewell to summer, and acceptance of fall, season of ankle boots, chunky scarves and leather jackets.

1 eggplant, cut into small cubes
1 skinless, boneless chicken breast, cut into bite-sized pieces
Olive oil
1 yellow onion, finely chopped
2 to 4 garlic cloves, chopped
1 tablespoon dry oregano
1 teaspoon chili flakes
1 (28 ounce) can diced tomatoes
Sea salt and freshly ground pepper
1/4 cup fresh basil leaves, chopped
1 package dry macaroni
1 cup ricotta cheese
1 cup mozzarella, grated

Place the eggplant cubes in a colander, sprinkle with salt and toss well. Sweat the eggplant for 30 minutes to an hour, then rinse under cold water and drain well. While the eggplant sweats, preheat a pan over medium heat. Cook the chicken cubes in a glug of olive oil, until tender, 7 to 10 minutes. Set aside. Drain the cooking fat from the pan, add more olive oil and put back on the heat. Cook the onion and garlic, until fragrant, about 3 minutes.


Add the eggplant, oregano and chili flakes. Fry up the eggplant cubes, tossing well until the are lightly browned on all sides.


Pour in the diced tomatoes and give the sauce a good stir. Season with salt and freshly ground pepper. Bring to a boil, then lower the heat. Simmer the sauce, covered, for 10 minutes.


In the meantime, bring a large pot of salted water to a boil. Add the macaroni and cook according to the package instruction, until almost al dente, and drain. Preheat the oven to 350 degrees and grease a 9 by 13-inch baking dish. Remove the sauce from the heat and add the basil, chicken, ricotta and macaroni.


Mix well and transfer to the baking dish. Cover generously with the mozzarella.


Bake in the oven until heated through, and until the cheese is golden and bubbly, about 30 minutes.


Vegetarians can replace the chicken with a zucchini, chopped in half-moons, to keep the "late summer at the farmer's market" spirit of the recipe. Add them to the pan along with the eggplant, and proceed with the recipe.

This recipe makes a very tasty, creamy pasta casserole. The chicken is very tender, the eggplant gives a satisfying bite and the sauce is zesty and rich: it makes a filling and healthy substitute for the usual mac and cheese. It also makes a ton, so bring the leftovers with you for lunch! A nice helping of these will make the yellowing leaves and the migrating geese a bit less melancholy.

Monday, 1 October 2012

Pesto Lasagna or Lasagne Alla Genovese

Basil is one of those things I can't imagine living without. I use fresh leaves in my cooking at least 3 times a week, and what better time to use them than at their peak, right at the end of the summer heats? Basil will add a sweet herb-y taste to pasta sauces, meat dishes, and even desserts and cocktails! The plant is also lovely: keep it by a window where it will get lots of sunlight and generously water it everyday, and you'll always have fresh basil to flavor your food!

Pesto, it goes without saying, is one of my favorite things, ever. It's versatile, tasty, can be adjusted just to your taste, and it can easily be frozen for later use. I try to always have some pesto handy, because a tablespoon here or there can make almost any dish suddenly taste very sophisticated. Roast chicken? Pesto! Minestrone? Pesto! Grilled white fish? Pesto! The damn thing is addictive. So imagine a lasagne literally stuffed with it!!


This recipe makes a beautiful lasagne for hotter weather, because it is not as heavy as the tomato or meat sauce based ones, and if you make your own pesto, it is simply bursting with seasonal goodness (however, do not fool yourself into thinking this is diet lasagne!). Sure, it's a bit of work and a lot of assembling, like any lasagne, but the creamy blend of bechamel and pesto is to die for. It also looks really beautiful and smells amazing! I got inspired by a post of The Italian Dish, but used my own pesto and bechamel recipe to create this dream of a pasta bake.

10 to 20 lasagne noodles, pre-cooked (or no-boil lasagne noodles)

Pesto (makes about 1 cup):
2 cloves of garlic, chopped
3 large handfuls of fresh basil, leaves picked and chopped
Coarse sea salt
1 handful of pine nuts, lightly toasted
1 large handful of grated Parmesan cheese
Olive oil
Sea salt
1 squeeze of lemon juice

Bechamel (makes about 4 cups):
4 tablespoons (1/4 cup) butter
4 cups milk
4 tablespoons all-purpose flour
1/8 teaspoon grated nutmeg
1/4 teaspoon white pepper

Topping:
1 cup grated Parmesan cheese
1 cup grated mozzarella cheese
1 teaspoon dried oregano
Freshly ground black pepper

Pulse the garlic and basil in a food processor with a pinch of coarse sea salt. Add the pine nuts to the mixture and pulse again. Transfer to a bowl and add half the Parmesan. Stir gently and add olive oil slowly; you need just enough to bind the sauce and give it an oozy consistency. Season to taste and add most of the remaining cheese. Poor in more oil and taste again. Keep adding cheese and oil until you are happy with the taste and consistency. Add a little squeeze of lemon juice at the end.

In a heavy medium saucepan, melt the butter without letting it brown. Remove from the heat. Whisk in the flour, 1 tablespoon at the time until it is incorporated.


Heat up the milk in another cooking pot until just about to boil. Add ladlefuls of the milk to the butter and flour mixture. Put this mixture back on the heat and whisk. Add the nutmeg and white pepper.


When the milk is absorbed, add more, a little at the time and stir until all the milk is used up. Keep whisking until the sauce is velvety. If the sauce doesn't thicken, add some flour, one scant tablespoon at the time, stirring constantly until the desired texture is achieved.

Preheat oven to 350 degrees. In an 9 by 13-inch baking pan, place about 1/3 cup of the bechamel to coat the bottom of the pan. Lay first layer of lasagna noodles. Add enough bechamel to coat the noodles. Add some pesto and spread into the bechamel. Add a handful of the grated Parmesan.


Continue to layer the noodles, bechamel, pesto and Parmesan until the last layer of noodles (I got 4 layers of 3 noodles). On top of this, spread one layer of bechamel, add the rest of the Parmesan and top with the mozzarella.  Sprinkle the oregano on top.


Wrap tightly with foil. Bake for forty to forty-five minutes (if using regular, cooked noodles) or 50 minutes to one hour (if using no-boil noodles). Remove foil and bake for 10 minutes more, until top is golden. Check if the noodles are cooked through by piercing the lasagne with a fork. Cool 5 to 15 minutes before serving.


If you are a lasagne-newbie, you may be wondering if traditional pre-cooked noodles are better than no-boil noodles. While purists will want to kill me, I have to confess that I never really noticed a significant difference between the two: while pre-cooked noodles can have a more uniform texture, they can be harder to handle, and have a tendency to be sticky. No-boil noodles mean less dishes to clean, and a quicker assembly, but they need to cook longer...

Here is what you do if you want to pre-cook your noodles: cook them in boiling salted water, and take them out when they just start getting a bit malleable, after about 3 minutes. To make sure they do not stick together, lay the noodles, well separated, around the edges of the cooking pot and colander. When you assemble your lasagne, carefully lift them and lay them as desired in your baking dish. Do not cook them too early in the process because if they have time to dry out, they will become trickier to arrange.

If you are using no-boil noodles, make sure they are soaked in plenty of sauce because they absorb a lot of liquid. Leave the lasagne in the oven 10 to 15 minutes longer if you used no-boil noodles, and poke your lasagne with a fork, to make sure they are nicely cooked before cutting and serving.

Of course, if you are in a hurry, you can use store-bought pesto. I recommend the Fontaine Santé brand, because the consistency is nice and gooey, and not too paste-like (there is also no weird ingredients or preservative in that pesto, making it the sanest choice I have yet to find on the shelves). This is especially important in a baked pasta dish like this one, where the sauce helps cook the pasta. If the pesto is too thick, the results will not be as creamy.

I served this elegant lasagne to my pesto-loving brother, who almost licked his plate clean. Honestly, I was quite close to doing that myself. The sauce's texture thickens a bit in the oven, and mixes really nicely with the pesto: the Parmesan and crunchy golden mozzarella crust complemented the sauce perfectly. The only thing I might try differently would be mixing the bechamel and the pesto before spreading it on the noodles .

If you want to beef up this lasagne, add finely chopped broccoli or cauliflower (or both!) between the pesto and the Parmesan on the middle layers of noodles. The veggies will gently cook in the sauce, and you'll get healthy goodness with your luxurious pasta bake, making it somewhat less of a guilty pleasure. Serve it with a dry white wine, to balance out the sweet creaminess of the bechamel and the tang of the pesto.

Sunday, 23 September 2012

Shrimp and Lemon Risotto

It was a lazy, grey afternoon. The kind of bleh weather that calls for a little plate of sunlight to brighten it up. I had wanted to try making risotto on my own ever since my risotto-fairy had demonstrated her skills at the stove, and I had the perfect flavor combination for the cloudy day: shrimps and lemons. There is something about nice big shrimps cooked with garlic and lemon that screams Mediterranean beach to me. Who would turn down an evening at the beach?

I'll be honest: I was terrified to try risotto again, even if I'd had an expert demonstrating her technique right under my nose. I had the V-Wonder read the recipe from David Rocco's "Made in Italy", and she gave it her seal of approval. That gave me a certain amount of confidence: if my expert said the recipe sounded good, I trusted her. I prepared all my ingredients in advance (because let's face it, a risotto needs to be looked after rather closely), got to work and gave this recipe my full attention.

1 pound large shrimps, peeled
6 tablespoons olive oil
2 cloves garlic, crushed
2 lemons, zested and juiced
4 cups vegetable or fish stock
1 medium white onion, finely chopped
2 cups Arborio rice
1 cup white wine, room temperature
Sea salt and freshly ground pepper
2 tablespoons butter
1/2 cup freshly grated Parmigiano-Reggiano
Chopped flat-leaf parsley, for garnish

Heat up a frying pan, add 3 tablespoons of olive oil and the garlic. Fry the garlic for 1 or 2 minutes, until lightly browned. Add the shrimp and lemon juice and toss the shrimp until they turn pink. Remove the pan from the heat. Remove and discard the garlic.


Put the stock in a medium pan and keep it at a gentle simmer. Pour 3 tablespoons of olive oil in a frying pan, and on medium heat, sauté the onion until soft. Be careful not to brown the onion.


Turn the heat up to medium-high, add the rice and stir so that all the grains of rice are coated in oil. Cook until the rice becomes translucent.


Add the wine and let it get fully absorbed by the rice, stirring constantly. Take a ladle-full of stock and add to the rice with a good pinch of salt. Stir to mix, and cook, stirring, until all the stock is absorbed. Continue to add stock, one ladle at the time until the rice is al dente and creamy, 16 to 18 minutes.


Just before you add the final ladle of stock, add the shrimps with the lemon juice.


Let the shrimps and risotto finish cooking, so that the flavors blend together. Take the rice off the heat, add the lemon zest, butter, Parmigiano, pepper and parsley and mix well. Serve immediately.


I was so proud of how this risotto turned out! It had the perfect, rich creaminess I was aiming for. I suppose that once you've seen it done right, it's not that hard to pull off! I also tasted the rice periodically, to make sure the texture was what I was looking for: firm, but not crunchy, with lots of rich creaminess.

Obviously, lemon and shrimp are a match made in Heaven (or in this case, on the Amalfi coast... which is pretty damn close to Heaven in my book). The texture of the risotto and the firmness of the shrimps makes for a great bite, and the color of the final dish was the exact shade of Italian sunlight a rainy afternoon required. A nice cold glass of Suave white wine worked perfectly with this risotto's bright taste.


Thanks for showing me how to make a great risotto, V-Wonder! I can't wait to try other variations!

Tuesday, 18 September 2012

Wicked Korma

As I have mentioned, my birthday was a few days ago. I did not really feel like having a party. I wanted to spend a quiet day at home doing some of the stuff I love best: talking shit with my girl Véronique and cooking. I took care of whipping up an awesome dessert, and she showed up with a bag full of ingredients with which to make the actual dinner.

Reproducing her cooking is usually tricky, because she is an intuitive cook who doesn't really measure ingredients, but I got lucky this time, because she based this korma on a recipe she dug out from an online food forum.

I have my own korma recipe which I make from time to time; this one is very different, and while both are tremendously tasty, I could not pick a favorite between the two. My recipe's sauce is not as thick, and the chewy chickpeas give it a very different feel than the much thicker sauce V whipped up. I guess my recipe is more dainty, and her's more hearty. When you think about it, that's actually very representative of our respective styles... I am keeping both preciously!

Here is how to make Véronique's wicked korma, for 4 people. She used beef when she cooked it for my birthday, and it was wonderful, but chicken is the traditional meat used in a korma.

1 1/2 pound stewing beef or chicken breasts
1 heaped tablespoon of finely grated fresh ginger
3 cloves of garlic, minced
1 cup thick plain yogurt (preferably Balkan)
2 dried red chilli
2 finely chopped onions
1 tablespoon ghee
1 tablespoon ground coriander
1 pinch of ground white pepper
1 teaspoon turmeric
1 teaspoon garam masala
Water
1 (14 ounce) can coconut cream
Sea salt, to taste
2 heaped tablespoons ground almonds
1 large handful raisins
Finely chopped cilantro leaves, to garnish
1/2 lemon, juiced

Cut the meat into bite sized chunks. Mix the meat with the ginger, garlic and yogurt.


Cover and marinade for 12 hours or in the fridge overnight. Blend the chopped onion and red chilies with an immersion blender (add a little water if you need to). Blend until smooth. Heat the ghee in a pan. Add the ground coriander, ground white pepper, turmeric and garam masala and stir fry for about 1 minute over a low heat.


Turn up the heat, add the onion and chili paste and stir fry for 10 minutes. Add the meat and the marinade and continue to stir fry for another 10 minutes.


Add the coconut cream and enough water to just cover the meat and bring to a boil, stirring until the coconut is dissolved. Stir in the ground almonds and raisins. Reduce heat to low, cover the pan and simmer until the meat is tender (45 minutes to 1 hour for beef, 30 to 40 minutes for chicken).


Remove from heat, add lemon juice and salt to taste. Mix well. Serve sprinkled with the chopped cilantro leaves.


As usual with the V-Wonder's cooking, the quantities are approximate because she eyeballs everything. Taste your sauce and adjust the seasoning until you taste-buds are happy! My taste-buds were certainly utterly satisfied: rich, creamy spicy curry goodness tends to have that effect on me.

The texture of the sauce, from the onions being pureed instead of simply being chopped, was amazing, and it is a trick I will certainly use next time I make some curry! Also, using coconut CREAM is crucial to get the desired thick... well... creaminess. In a regular can of coconut milk, the "cream" is the thick blob that floats at the top of the can. You can buy whole cans of that rich stuff: fat, but delicious!

Thanks again for the wonderful birthday dinner, V! Much love! xx

Saturday, 15 September 2012

Dark Chocolate and Goat Cheese Brownies

I have a life-long love story with goat cheese. Tangy, creamy, luxurious... When I went to France, I ate like a pig and came back to Montreal with an extra 10 pounds, most of which was probably goat cheese... I had found out that goat cheese drizzled with honey on fresh baguette was insanely delicious, and I abused this knowledge until my waistband was uncomfortably tight. Goat cheese lends itself beautifully to sweet-salty flavor combinations because it is tangy, but not too sharp. Honey, but also maple syrup and dark chocolate can be very good friends to the creamy wonder.

The past few weeks have been completely draining: I finally had time off from work, and it was my birthday. I wanted dessert pretty badly. And it had to have goat cheese in it, as this delicious, heavenly dairy never fails to take me back to the gorgeous, lavender-fragrant French country side where I first discovered its magic.

Yup, I turned twenty-eight last Wednesday! The number is a bit surreal to write down, mostly because I feel crazier now than I did ten years ago. People who say you'll calm down as you get older may be full of it, because it seems to me that the older I get, the more insane and radical I become. Albeit, in a very different way from when I was 17... and not just because my liver seems to have aged prematurely.

I think about a lot of things very differently than I did when I first slathered some Manic Panic in my mane (as would anyone who learned a thing or two over a decade), but my need to speak my mind, stand up for what I believe in and not let myself be swallowed up by society's expectations is stronger now than it was then.

I still adore Jello Biafra and I still think few things are cooler than Mohawks and studded leather jackets, but now I understand the point of retirement plans and of the police force, and I firmly believe that compassion and respect for your fellow human being is the golden rule to feeling better about the world. At the end of the day, I don't think I have changed so much as I have learned and grown. I guess that's the point: learning to be yourself every day of your life.

As much as I think of this evolution in a good way, I occasionally get mixed feelings about it. The pressure to fit in as you get closer to 30 can be pretty intense ("When are you getting married? When are you gonna have a baby? When are you gonna buy a house? Don't you think you have enough tattoos?"... I feel like throwing punches every time I hear those questions), and staying true to your colors can be exhausting. It's easy to be tempted by the idea of getting in line just so people will leave you be or take you seriously.

Such thoughts were another reason why I craved a rich and delicious dessert that would put me in a sugar-coma so I could get some rest and feel less weird about my birthday. When I saw this recipe in Nadia G.'s "Cookin' for Trouble", I started drooling on the book. I usually bake cupcakes for birthdays, but I was too obsessed with the idea of goat-cheese on a brownie to even think about my usual favorite dessert. I invited my best friend over, we got ourselves some bubbles, and here is what we made:

1 cup unsalted butter
1 cup chopped unsweetened dark chocolate
2 1/2 cups dark brown sugar
4 eggs
1 cup walnuts, toasted and chopped (optional)
1 cup all-purpose flour
1/4 teaspoon sea salt
1 cup creamy goat cheese, room temperature

Heat a double-boiler over medium heat. Add 1 cup of butter and the dark chocolate to the top pan and stir until the chocolate has melted.


Take it off the heat and let cool slightly. Whisk in 2 cups of brown sugar and 3 eggs. With a wooden spoon, fold in the walnuts (if using), all-purpose flour and sea salt. In a large mixing bowl, combine the goat cheese, 1/2 cup of brown sugar and 1 egg. Blend using an electric beater at low speed.


Preheat the oven to 350 degrees. Line a 9 by 13-inch baking dish with parchemin paper. Pour the brownie batter into the baking dish, then evenly disperse spoonfuls of the goat cheese mixture over the batter.


With a knife, score the surface into a pattern (I suck at that, as you can see). Bake for 40 minutes, or until a toothpick comes out clean. Cool the baking dish on a pan. Cut into bars, remove from the baking dish and refrigerate for at least 1 hour or 2. Store in an air-tight container in the fridge, with parchemin paper between the layers of brownies.


Trust me, this tastes just as rich and decadent as it looks. The goat cheese is creamy, and gives just enough of a salty kick to balance the intense sweetness of the dark chocolate (and all that butter). We enjoyed these as a knock-out dessert to follow my dearest Véronique's curry, along with our champagne. I could not have wished for a more perfect dessert for the occasion.

I cut the brownies into 8 large squares, but you can obviously cut them up to whatever size fits your appetite. I am also not insane about walnuts, so I skipped them, but I am sure they give this recipe a very nice crunch. The brownies tasted even better chilled overnight: the texture became dense, almost fudgey. I had half a piece with a couple of scoops of vanilla ice cream: holy cow, it was awesome!

If you ever feel conflicted about life or about your birthday, these are a very good antidote! They are also perfect for hardcore chocolate cravings. I am lucky to have enjoyed them with my boyfriend and my best friend, two people that make my life wonderful. They also made my birthday evening really great. I raise my glass of milk and my brownies to them! xx

Tuesday, 11 September 2012

Boeuf Bourguignon or I Have the Paris Blues Again

My Paris-fever came back with a vengeance recently, thanks to my boyfriend getting me hooked on "Spiral", an awesome French cop show. Watching people chase criminals around the world's most beautiful city, stopping to eat a croissant every once in a while, had me longingly flipping through my bistro cookbooks while listening to Jacques Brel (cliché, I know, but so awesome).

While there is a plan to take a trip to the City of Light in the works for next year, I wanted a piece of my Paris. NOW. So I decided to make boeuf bourguignon.

I had read Julia Child's version, but despite having the week off from work, I did not want to spend quite that much time preparing dinner. I also wanted a recipe that did not involve frying bacon in butter... Luckily for me, Linda Danniberg's "Paris Bistro Cooking" offered a traditional, yet non-heart-attack-inducing version of the famous recipe. It still requires a bit of work, so you might want to save it for weekends, when you can take your time.

As the name says, this stew of beef braised in red wine comes from the Burgundy region of France. It started out as a peasant dish, but it has become a standard of French cuisine. Let's face it: when a dish is as hearty, filling and tasty, it ought to be a classic. This makes 4 to 6 helpings, and it's ridiculously easy to pull off.

1 1/2 pound stewing beef, cut into large cubes
2 tablespoons olive oil
4 tablespoons cognac
1 tablespoon butter
2 small onions, cut into wedges
3 or 4 garlic cloves, chopped
3 medium carrots, cut into sticks
1 tablespoon all-purpose flour
4 cups red wine, preferably Burgundy (or Chianti, if you can't find Burgundy)
1 cup water
2 tablespoons tomato paste
1/2 pound button mushrooms (if using slightly bigger mushrooms, like cremini, half or quarter them depending on their size)
1 bouquet garni (1 sprig each of parsley and thyme and 1 bay leaf, tied in a square of cheesecloth)
Sea salt and ground pepper

Brown the meat in the oil in a heavy-bottomed casserole.


Drain off the fat. Add the cognac and ignite carefully. When the flames subside, remove the meat. Add the butter to the casserole and brown the onions, garlic and carrots over medium-high heat.


Sprinkle in the flour, stirring well. Add the wine and water and stir in the tomato paste, mushrooms, bouquet garni and the salt and pepper, scrapping the bottom and sides of the pan to loosen the browned meat juices.


Return the meat to the casserole, bring to a boil. Cover and lower the heat; simmer for about 2 hours, until the meat is tender. Skim off any surface fat and remove the bouquet garni.


Serve with steamed or boiled potatoes and buttered peas.


I must confess that one of the things that I find truly awesome about a recipe like boeuf bourguignon is that it offers me an opportunity to legitimately set something on fire in my kitchen... The flame was not really impressive, but the smell was incredible! Actually, my kitchen smelled awesome for the whole 2 hours of stewing. Sweet torture...

Julia Child called this the best beef dish ever. I don't agree with her all that often, but boeuf bourguignon really is an amazing dish. The meat is sweet and tender from stewing in wine, and the veggies are wonderfully flavored. It should be subtly seasoned, but not too sharp: add a teaspoon of dried thyme and be generous with freshly ground black pepper if you want to heighten the flavors, but be careful not to over do it. A full-bodied red wine goes well with boeuf bourguignon, such as the Burgundy used for cooking, but a Chianti or Merlot will also be a wonderful match.

Some bulk stores sell bouquet garni pre-made, but if you are making them at home, I suggest you buy some fresh parley and thyme, prepare a bunch of bouquet garni and put the ones you are not using in a sealable bag in the freezer. You'll be happy to have them handy the next time you make a stew or hearty pasta sauce.

While my Paris blues will never really be cured, eating a nice helping of this lovely traditional dish while watching "Amélie" did make them easier to deal with. The blues can never really take hold of a person with a full stomach...