Wednesday, 27 March 2013

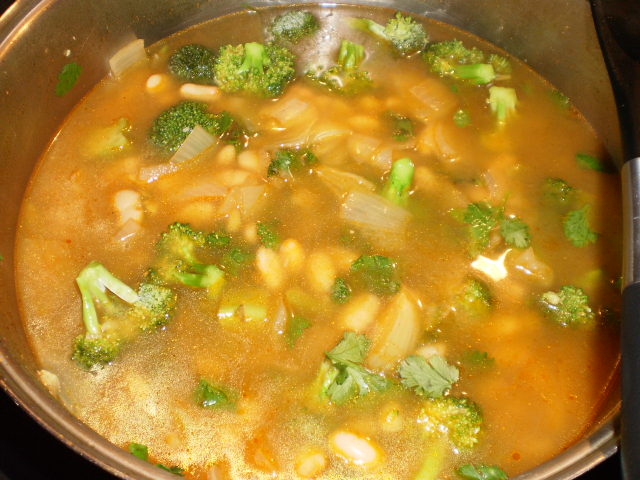
Broccoli, Ginger and White Bean Soup

I know what you are thinking. You are thinking: "This chick is addicted to broccoli and ginger".

Could be. I can't go very long without ginger: the fresh stuff in a curry or stir-fry, ginger candies, ginger tea... (for the record, I may also be addicted to scarves, Doc Martens, tattoos and a few records, but that's a whole other ball game). Broccoli is one of my favorite veggies: it's cute, tasty, packed with iron and vitamin C, and it is one of those cancer-fighting veggies. Honestly, broccoli deserves a super-hero suit.

Combine the two ingredients together and you have one immune-boosting combo that can beat the pants off any insipid supplement. Add beans to the mix and your proteins are taken care of. Is this the perfect, healthly, nourishing and tasty soup, or what?!

Spring is almost on our doorstep, but this being Canada, the weather is rather unpredictable and schizophrenic: 10 degrees Celsius one day, minus 7 the next, sunshine and snowfall simultaneously... That never stopped us Montreal girls from getting our short skirts good and ready, but a bit of warm, comforting food can't hurt when spring is having repeated false starts. This soup seems to me like the perfect compromise between a bright summery soup and a warming winter comfort. Ideal for this seasonal limbo we found ourselves in!

1 large head of broccoli (a bit more than 1 pound), stalks and florets chopped roughly
2 large onions, roughly chopped
5 cloves of garlic, roughly chopped
1 tablespoon of olive oil oil
4 tablespoons fresh ginger, chopped
2 limes, juiced
1 teaspoon cayenne pepper
4 cups vegetable broth
3 tablespoons tamari
1 large pinch of black pepper
1 small bunch fresh coriander, roughly chopped
1 (28 ounces) can of cannellini (or other white beans), drained and rinsed
1 large handful of toasted pine nuts

In a large saucepan, gently fry the onions, garlic, ginger and cayenne pepper in the olive oil for 5 minutes.


Add the broccoli stalks and the vegetable broth. Bring to a boil then cover and simmer over medium heat for 8 minutes. Add the broccoli heads, the beans and the coriander. Add enough water to just cover everything.


After 5 minutes, use a knife to pierce the broccoli: when it’s tender, turn the heat off and allow to cool slightly before you start blending. If you want to keep some whole broccoli florets for serving on top of your soup, remove them now. Add the fresh lime juice, the tamari, pepper and puree with an immersion blender. Taste and check for seasoning. Put back on low heat and make sure the soup is heated through. Serve immediately.


This soup's flavor is very surprising: exotic, hot and... well, green! It's miles away from the boring old cream of broccoli or broccoli and cheddar soups you may be used to. The green vegetable's flavor and the fresh coriander come out the stars of the show, along with the lovely heat of ginger and cayenne. You could garnish it with a scattering of pine nuts, a touch of plain yoghurt or sour cream, and a lovely piece of fresh nan bread to dip! It's a bit thin to be a meal-soup, but it is the perfect appetizer for a Middle Eastern or Indian themed meal. Actually, any meal with bold flavors could second a bowlful of this wonderful soup!

Sunday, 17 March 2013

Roast Pork Tenderloin with Potatoes and Mushrooms

I decided to break the little tofu rut the blog had gotten into lately with a good old meat and potato recipe!

I was in the mood for something comforting and old-fashioned for our Sunday night dinner: it just felt like the kind of night where I wanted to stay home, apron-up and spend the evening in the kitchen while blasting Bad Religion records. The winter's dragging on and it's making me crave rich comfort food and angry political music. I'm quirky like that.

Tenderloin is my favorite cut of pork, mostly because it's affordable, but also because it's really versatile: you can roast it, grill it, chop it up to stew it, slice it thin and stir-fry it... I try to always have one or two in the freezer because there are so many ways of turning it into a plateful of yums. I usually have a lot of Asian-themed recipes for pork, but I wanted to try something a bit more traditional.

This dish has a classic Sunday dinner flair to it, like something you'd see Betty Draper whip up for a dinner-party on "Mad Men": meat, potatoes, mushrooms, a creamy sauce... just classic! The ingredients are mostly pantry-staples I always have around, and the technique is absolutely idiot-proof easy, making it a recipe everyone can pull-off with great success.

You can either mix up regular potatoes and sweet potatoes, or use just one kind, but the sweet potatoes can offer a lovely change of pace texture-wise, and they also boost the vitamin content of your plate.

1-pound pork tenderloin, trimmed
3 medium white potatoes, cut into 3/4-inch chunks (or 2 white potatoes and 1 sweet potato)
Sea salt and freshly ground pepper   
1 tablespoon unsalted butter
1 package mushrooms, thinly sliced
3 cloves garlic, minced
1 onion, chopped
1 tablespoon paprika
1 teaspoon white pepper
1 teaspoon savory
1 teaspoon ground sage
1/4 cup all-purpose flour   
2 cup milk
1 cup chicken broth   
1 tablespoon Dijon mustard   
Chopped fresh parsley, for garnish

Preheat oven to 375°F. Butter a 13 x 9-inch glass baking dish. Place the pork in center of baking dish, tucking the thin end underneath. Arrange the potatoes around the pork.


Sprinkle with salt and pepper. Bake for 20 minutes. Meanwhile, in a large skillet, melt the butter over medium-high heat. Add the mushrooms, garlic, onions, spices and 1/4 teaspoon each of salt and pepper; sauté for 8 minutes or until mushrooms are brown.


Stir in the broth and mustard. Whisk flour into the milk; stir the mixture into the pan and bring to a boil, stirring. Boil and stir for 1 minutes.


Pour the sauce over the pork and potatoes and roast for another 25 minutes or until a meat thermometer inserted in thickest part of pork registers 160°F.


Transfer the pork to a cutting board; let rest for 5 minutes. Return the potatoes and the sauce to the oven for 5 minutes; stir well. Slice the pork crosswise; serve with the potatoes and sauce, sprinkled with parsley.


As you can see from the picture, I should have used a wider roasting dish. But hey, the sauce helps cook the meat just as much as the roasting does: no problem. The smell is also completely amazing as the dish cooks, and the meat comes out tender and juicy.

It's a nice, easy recipe with a lot of down time, so give it a try next time you are in the mood for a delicious, hearty meal!

Friday, 8 March 2013

Cold Sesame Noodles with Crispy Sesame Tofu

As you can probably tell from the title of this post, I had a craving for sesame. And when I crave a particular flavor, you need to not stand between me and my food fix. Why sesame? No idea! But I read a recipe for cold sesame noodles in my "Chinese Takeout Cookbook" and it tickled my fancy. As did a little recipe for sesame-incrusted tofu I saw on Martha Stewart's website (don't ask me how I ended up there). I couldn't decide which one I wanted to try first, so I said "fuck it" and made both at the same time!

Of course, you can make them separately: just make sure to prepare another dish or some veggies to round up your meal, because on their own, they are more little parts of a big picture (unless you are eating alone, in which case, I am sending you Internet hugs). They are also really quick to make (if your tofu is already pressed), so they are really useful recipes to keep up your sleeve for midnight snacks and random cravings.

Tahini is the most exotic ingredient you will need to get for the sesame noodles: it's basically the sesame paste that you use in hummus, baba ganoush and other delicious Middle Eastern dips. It's also one of the earliest recorded condiments in history! There are tahini recipes that date back 4000 years, a little fact I find pretty cool. When you get your jar of tahini, take a few minutes to mix it because the oil tends to separate, and don't forget to refrigerate it once you're done!

If you do not have toasted sesame oil, you can use regular, but hunting down the toasted stuff is worth it: the taste is rich and smoky and just has a little extra "humph" you totally want to experience.

Cold sesame noodles (from "Chinese Takeout Cookbook", modified):
12 ounces dried udon noodles (regular spaghetti also works)
2 tablespoons peanut oil
2 teaspoons minced garlic
2 teaspoons grated ginger
2 carrots, peeled and shredded (optional)

Sauce:
3 tablespoons tahini
2 tablespoons smooth peanut butter
2 tablespoons soy sauce
1 1/2 tablespoon sesame oil
2 tablespoons Chinese rice vinegar
2 teaspoons chili paste
2 tablespoons sugar
½ teaspoon ground Sichuan pepper (optional)

Garnish:
2 teaspoons white sesame seeds
2 scallions, green parts only, thinly sliced

Bring a pot of water to boil and cook the noddles until al dente, or the minimum amount of time according to package instructions. Drain immediately, rinse with cold water, and drain again. Toss with 1 tablespoon of the peanut oil and set aside. Heat the other tablespoon of peanut oil in a small pan over medium heat. Gently cook the minced garlic and grated ginger until just fragrant, about 30 to 40 seconds.


Remove from the heat and set aside. Prepare the sauce: in a medium bowl, combine the sesame paste, peanut butter, soy sauce, sesame oil, rice vinegar, chili paste, sugar, and optional Sichuan pepper. Add 3 tablespoons of water and whisk until the mixture is smooth.


Stir in the cooked garlic and ginger. Pour the sauce over the noodles, add the carrots, and toss. Transfer into bowls and sprinkle with sesame seeds and scallions. You can serve the sesame noodles at room temperature or chill in the fridge for 1 to 2 hours before serving.


I omitted the carrots because I ran out. Shame on me.

Crispy, sesame-incrusted tofu (inspired by Martha's recipe):
1 pound extra-firm tofu, drained and pressed, cut into 8 squares

Marinade:
2 tablespoons toasted sesame oil
2 tablespoons soy sauce
1 tablespoon mirin

1/4 cup white sesame seeds
1 tablespoon toasted sesame oil
3 tablespoons soy sauce

Mix the marinade ingredients together. Place the tofu squares in shallow dish and cover with the marinade. Let it sit for an hour (up to over night), flipping occasionally. Spread the sesame seeds on a plate. Press both sides of each tofu square into sesame seeds.


In a large nonstick frying pan, heat the toasted sesame oil over medium heat. Cook tofu the tofu squares, until golden brown, 4 to 6 minutes per side, flipping occasionally (use cooking tongs if you want to keep your sesame crust nice!).


Add the soy sauce; continue cooking and turning tofu, until it has absorbed all the liquid, about 1 minute. Serve, cut into fancy little triangles, if you wish.

The final results of both recipes made a quick and filling feast, bursting with that wonderful nutty sesame flavor I had been craving manically. They were also absolutely delicious eaten as a cold lunch the next day, and that kind of stuff is a perfect late-night snack after some partying and drinking!


The sauce for the noodles is gooey and savory and the little chewy bits of sesame tofu complement it very well. Sure, it's not the lightest or healthiest meal ideas, but can all use a little tasty treat now and again, can we? Have a good weekend!

Sunday, 3 March 2013

Kung Pao Tofu

Ah, week night dinners. How unpleasant you can be to prepare when one get back from work tired and grumpy, and yet that poor body still needs to be fed! That's why I love stir-fries: with the exception of pasta, nothing beats a stir-fry when you want a quick, healthy and filling meal that doesn't take too long and doesn't require too much effort and thinking. This dish is simple, delicious, with minimal chopping duties: exactly what one needs for a dull Wednesday evening!

Kung Pao is a traditional Sichuan recipe with the wonderful blend of sweet, salty and spicy tastes that make my taste buds very happy. I had wanted to try it for a while, but I was quite gung-ho on finding actual Sichuan peppers: not an easy feat! No grocery store near my apartment carried it; even my trusted exotic bulk store failed me! Lucky for me, my best friend shops in Chinatown all the time, and she got me a big bag... Woot-woot!

Many food writers specialized in Asian cooking swear by the little red peppercorns, and I was determined to use them in my Kung Pao! Their flavor is described as numbing hotness, and now that I have used them, I confirm that there is something that just makes your mouth feel... well, numbed! They are not spicy in the burning way some chiles (such as my dear scotch bonnets) are: it's really more of a building heat with a very exotic and peculiar flavor.

You gotta taste it to get it, really, but I think it might be an acquired taste for the palate used to Westernized Chinese food. It took a bit of experimenting with the recipe below until I found a way to infuse the dish with the very unusual Sichuan pepper taste, but make it subtle enough that it would not be completely off-putting. I found balancing it with the other more typical flavors of chile, ginger, garlic and scallion to be the best way to integrate it to the dish.

2 tablespoons peanut oil
2 fresh chiles, sliced in long, fine strips
1 tablespoon whole Sichuan peppercorns, or chili flakes
1 pound extra firm tofu, drained and pressed
2 to 3 gloves garlic, minced
2 tablespoons finely chopped ginger
1 bunch scallions, roughly chopped, plus some thinly sliced scallions for optional garnish
1 red bell pepper, julienned
1 large handful raw peanuts or cashews
Marinade:
2 tablespoons dark rice vinegar
2 tablespoons soy sauce
2 tablespoons mirin
Sauce:
4 tablespoons sugar
2 tablespoons cornstarch
4 tablespoons soy sauce
6 tablespoons dark rice vinegar
2 tablespoons sesame oil
4 tablespoons water

Cube the tofu and mix in the marinade ingredients. Let stand while you prepare the other ingredients. In another bowl, mix together the ingredients for the sauce and set aside.


Heat a wok with oil over high heat. Before the wok begins to smoke, add the chiles and Sichuan peppercorn. Stir-fry briefly until the chiles are slightly blistered and oil is fragrant.


Add the tofu and stir-fry 5 to 7 minutes, until crispy.


Add garlic, ginger, scallions and bell pepper, and stir-fry until fragrant, about 2 minutes.


Pour in sauce and mix to coat the other ingredients. When the sauce is thickened and shiny, stir in peanuts or cashews.


Transfer to plates, garnish with thinly sliced scallions, and serve with jasmine rice.


Kung Pao generally is a vegetable-free stir-fry, and while I did not want to over-crowd my wok with veggies, I felt the dish needed a minimum of vitamin, and red bell peppers seemed just perfect with the other ingredients and flavor. If you want more veggies, I suggest steaming some carrots or broccoli to add a burst of color to the plate.

The mix of chewy tofu, crunchy peanuts and bell peppers is great, and while the Sichuan peppers might take a bit of getting used to, the spicy, sour and sweet taste of the dish is really delicious. The sauce is meant more as a coating than as something to drown your tofu in, but you can always double it if you want a saucier plate. Who am I to argue against saucy?

If you try the Sichuan peppers and can't get used to their funny sour-spicy taste, you can always substitute them with a tablespoon of good old chili flakes. You'll keep the heat in your dish without the funky aftertaste.

As a side note, I am finally getting more comfortable with Twitter and Instagram, so if you are curious to see what else I ramble about besides food, you can find me there as @punkygabz.

Thursday, 21 February 2013

Thai Eggplant Curry

I just love trying out new recipes, especially when they turn out to be fantastic finds! This little recipe (which I had shamefully overlooked for the past few weeks) is amazing for several reasons. Here they are in no particular order:
  • Its super easy and quick to make. Once the chopping is done, you'll hardly need 20 minutes to get your meal on the table. Perfect for week nights!
  • Its so tasty and flavorful, with the ginger, garlic, curry paste and coconut milk. Not too spicy, not too sweet; just awesome.
  • Its a gorgeous, colorful plate of vegetables. A bright dish can cure the kind of winter blues that afflict so many of us at this time of the year, and we can all use a bit more veggies in our plate!

Eggplant is great in curries because it absorbs the flavor of the other ingredients, turning into tasty and tender little bites as it simmers. You could use any type of eggplant for this recipe, but I prefer the long Japanese kind here. Pick them smooth-skinned and as brightly purple as you can find! Unlike regular European eggplant, there is no need to salt them before you cook: they do not have the occasional bitterness you find in the larger eggplants.

3 tablespoons peanut oil
1 1/2 pounds Asian eggplants, cut into half-moons (3 or 4 eggplants)
2 orange or red bell peppers, diced
3 cloves garlic, minced
1 or 2 tablespoons fresh ginger, chopped
3 tablespoons Thai red curry paste (I used Thai Kitchen)
1 (14 ounce) can coconut milk (or coconut cream, for a luxurious, richer curry)
2 tablespoons fish sauce (substitute soy sauce if you want to keep it vegan)
1 tablespoon light brown sugar
1/4 cup Thai basil leaves
Sea salt and freshly ground black pepper, to taste
Lime wedges, to garnish

Heat the oil in a large, deep pan over medium heat. Add the eggplants and bell pepper and sauté until the eggplant has begun to soften all around, about 5 minutes.


Add the garlic, ginger, and curry paste. Mix well until the paste covers all the other ingredients, and cook until aromatic, another 1 minute.


Pour in the coconut milk and bring the liquid to a simmer. Stir in the fish sauce and brown sugar. Cook for another 5 minutes, until the eggplant is very tender.


Stir in the Thai basil leaves and cook for another minute. Season to taste with salt and pepper. Serve with rice and lime wedges to squeeze over the curry.


You can bulk it up a bit more by adding 1 container of cremini mushrooms, thinly sliced, along with the other vegetables: their earthy flavor goes very well with the spicy, creamy sauce.

This recipe serves 4, but if you want to make it for a crowd or a pot-luck, double the coconut milk, garlic, ginger and curry paste, and add 1 pound of extra-firm tofu, drained, pressed and cut into 1/2-inch pieces, and add it to the pot when you set the curry to simmer. If you think there isn't enough liquid, add 1 cup of water or vegetable broth.

If you prefer green or yellow Thai curry to red, you should feel free to use those instead of the red curry paste. Just watch out because the level of heat varies from one "color" to the other, green being the hottest, and yellow the mildest.

It's the perfect quick dinner for those cold and damp February evenings!

Tuesday, 12 February 2013

Apple Pie

My mother is an apple pie fairy: for as long as I can remember, she has made delicious, gooey magic in a buttery crust that my father, brother and I used to fight over tooth and nail. It's her signature dessert, and she still gets very eager requests from everyone who has ever tasted it.

I remember a college buddy of mine coming over to my house to prepare for an exam: he had once told me he hated apple pie, but to be polite, he accepted the slice my mother offered him, and it. Changed. His. World. He asked for a second helping, and begged her for the recipe. She's that good.

I had a craving for a homey, comforting dessert, and it so happened that I had some pie crust dough handy... What was I do? I had no choice but to make an apple pie!

My mother's apple pie filling is very minimalist: sweet apples, a dusting of sugar and some nutmeg. As delicious as that is, I wanted to try something a little different. Granny Smiths are my favorite apples, but they are quite tart, so I knew a bit of sugar would be required to balance out their flavor, and I love a hint of spices in a dessert, so some cinnamon, ginger, cloves and nutmeg found their way in my filling mix.

Here is my mom's pie dough recipe: it makes enough dough for 3 double-crusted pies. The extra can be frozen and used later, when you feel an urge for a lovely home-made pie (see my peach pie recipe for the step-by-step pictures!).

6 cups non-bleached all-purpose flour (5 ½ cups for the dough, and ½ cup for surfaces)
2 tablespoons baking powder
½ teaspoon salt
2 cups high-quality vegetable shortening, cut into small pieces
1 large egg, beaten
¼ cup white vinegar
1 2/3 cup whole milk, and extra for brushing

Sift 5 ½ cups of flour, the baking powder and the salt together in a large bowl. In a 2-cups measuring cup, mix the egg and vinegar, and add milk until you have 2 cups of liquid. Add the shortening to the dry ingredients, breaking it up with the fingertips or a pastry cutter and rubbing it into the dry ingredients until it is crumbly and mixed in. In 3 additions, add the wet ingredients to the dry, blending well with the hands between each addition: spread your fingers to scrape the bowl well while mixing. Blend until all the liquid ingredients are just incorporated, being careful not to over-mix. The dough should be moist and homogenous. Cover the bowl with plastic wrap and chill in the fridge for at least 30 minutes, up to overnight.

Here is the filling:

6 Granny Smith apples, peeled, cored and thinly sliced
1/3 cup brown sugar
1/2 granulated cane sugar
1 teaspoon freshly ground cinnamon
1/2 teaspoon ground ginger
1/8 teaspoon ground clove
1/2 teaspoon ground nutmeg
3 tablespoons all-purpose flour
1 pinch salt

Mix the sugars, spices, flour and salt. Put the apple slices and the sugar and spice mix in a large bowl and mix by hand until combined.


Preheat the oven to 425 degree. To assemble the pie, sprinkle flour on the working surface and on a rolling pin. Take a fist-sized piece of the dough and form it into a ball. Place the ball of dough on the working surface and flatten it with the rolling pin. Work the dough in a roughly circular shape by rolling outwards. Once the dough is rolled out to the desired size, fold it in half, place it in the pie plate, and unfold. Gently press the dough into the plate and smooth it out. Brush the edges with milk. Roll out the top crust portion of dough. Fill the bottom crust with the apple filling.


Fold the top crust in half, create slits or cut outs to let steam escape, then delicately lift it, place it on top of the filling and unfold.


Using the fingertips, the back of a spoon or a fork, pinch the dough around the edges to join the two crusts firmly and trim off the excess dough with a butter knife. Lightly brush the top crust with milk. Place in the oven and bake for 25 minutes. Lower the heat to 350, and bake for another 20 to 30 minutes. Place the pie on a cooling rack, and cool at least 1 hour before serving.


Does anything scream "comfort" more than the smell of an apple pie, cooling on your kitchen counter? That spicy, fruity, buttery smell is the stuff of childhood memories and a slice of that beauty hit just the spot.


The filling was just sweet enough, perfectly balanced with the nutmeg, cinnamon, ginger and clove, with the Granny Smith's flavor still shining through gloriously. It was exactly what I needed: a warm slice of comfort.

I'm not yet the pie fairy my mother is, but I feel like I am well on my way to mastering this magical dessert!

Thursday, 7 February 2013

Pantry Pasta, or Chickpea and Tomato Rotinis

Do you remember my super-basic garlic pasta? This recipe also comes from a time when I had to scrape my brain to figure out ways to eat good food without busting an extremely tight budget. Listen up, students and artists: one of the tricks to accomplishing that feat is to have a well-stocked pantry, full of non-perishable items on which you can fall back safely when there is no more dough for fresh produce.

Pasta, canned tomatoes and a selection of canned beans are things you should always have within reach, no matter what your budget is, because they are inexpensive, versatile and can make tasty and healthy bases to many great meals. You can get endlessly creative with basic ingredients like that if you have a little imagination.

Since all the ingredients for this recipe are pantry-staples in my kitchen, I nicknamed it Pantry Pasta: it makes a really tasty and filling bowl of saucy beans and pasta (pasta e fagoli is a theme Italians get very creative with), and the ordinary ingredients combined give a very rich flavor to every bite, despite being relatively cheap.

I love making some Pantry Pasta from time to time: it brings back wonderful memories of cooking in my tiny yellow kitchen before going to a rock show with friends... It has the nostalgic taste of the carefree and fun days of punk rock lifestyle: yummy, inexpensive to make... and vegan, with a hint of booze!

A word here about cooking with wine: I've read somewhere you should never cook with wine you would not drink. I say meh! Cooking with wine is my favorite technique to get rid of a lousy bottle I don't WANT to drink. The alcohol evaporates during the cooking process, leaving only the highlight of the wine's taste in the dish, so the only thing you really need to be concerned with is whether your wine is dry or sweet, depending on the desired effect. For this particular dish, a drier red wine is ideal. So that wood-chipper vino you got at a lousy gift-exchange back in December; now is the time to start using it for good!

1 package dry rotinis (pennes also work great here)
1 tablespoon olive oil
1 small red onion, finely chopped
2 garlic cloves, chopped
1 tablespoon tomato paste
1/2 teaspoon chili flakes
1 teaspoon oregano
1 teaspoon thyme
1 teaspoon cumin
1 bay leaf
1 (28 ounces) can crushed tomatoes
1 (19 ounces) can chickpeas, drained and rinsed
1/3 cup dry red wine
Sea salt and freshly ground pepper
6 to 8 fresh basil leaves, ripped

Heat up the olive oil in a large pan, over medium heat. Cook the onion for 7 to 8 minutes, until softened.


Stir in the garlic, tomato paste, chili flakes, oregano, thyme and cumin. Cook for a few minutes, until fragrant.


Add the crushed tomatoes, chickpeas, red wine, the bay leaf and some sea salt and freshly ground black pepper. Bring to a boil, then turn the heat down and simmer for about 15 minutes, until the sauce is thickened.


In the meantime, bring a large pot of salted water to a boil, and cook the pasta according to package instructions, until al dente. Remove the bay leaf from the sauce and add the fresh basil leaves. Add the pasta to the sauce, mix well and serve immediately.


You can serve it with some Parmigianno-Reggiano, if you are a cheese-fiend like me, but it's just as tasty in all it's vegan glory. I love chickpeas and their lovely chewy texture, and a seasoned tomato sauce is really their best friend: the cumin adds a subtle Middle Eastern hint to the otherwise very Italian ingredients of the sauce, making it exotic and mysterious.


This dish is a simple and homey dinner, and the leftovers make for a great, filling and healthy lunch that will keep you powered until the end of the day. Of course, if the wine you used in the sauce is to your taste, I won't discourage you for having a glass along with your pasta...