Monday 31 December 2012

It's Not Easy Being a Green Tea Cupcake

There is something amazing about a cup of nice green tea: it's soothing and tasty, it will get rid of toxins, hydrate you just as well as a big glass of water, boost your brain power and your immune system... It really is a gorgeous magic potion for the body and for the soul. My favorite is David's Tea Dragon Pearls: I drink two cups of the stuff every day I can, and every drop feels and tastes wonderful. Living in the real world would be very tough sometimes if there was no green tea... and no adorable mugs to drink it from - thank you Mel and Matt for the cutest Christmas presents!


December is always synonymous with madness at work, and while chocolate is wonderful to keep stress under control, I could not have made it without my green tea, and in that spirit, I wanted a zen little dessert I could bring to my in-laws' Christmas lunch. Why not turn my magic potion into a tasty sweet? My mother-in-law is as much of a tea fan as I am, so I knew those little cupcakes would be received enthusiastically at her table.

This recipe requires you to get your hands on some matcha green tea powder: you can easily find it at tea shops, but if that fails, try to hit Asian stores or Chinatown. Matcha is the tea used in the Japanese tea ceremony: its made from a specific kind of green tea and ground into a very fine powder, then whisked with hot water to create the traditional beverage. It's worth noting that it contains three times as much antioxidant as regular green tea, so these cupcakes are just as much health food as they are dessert! Or at least, that's what I keep telling myself... they disappeared in the blink of an eye...

2 cups all-purpose flour
1/2 tablespoon baking powder
1/4 teaspoon salt
2/3 cup milk
2 tablespoons matcha green tea powder (I used Matcha Matsu from David's Tea)
3/4 cup (1 1/2 stick) butter, room temperature
1 1/2 cup sugar
2 eggs
1 egg yolk
A few drops almond extract
A few drops vanilla extract

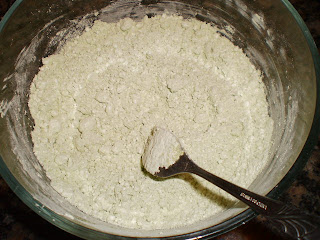
Preheat the over to 350 degrees, and line a muffin pan with cupcake liners. Sift the flour, baking powder and salt together in a medium bowl. Mix the milk and matcha powder and reserve.


In a large mixing bowl, beat the butter and sugar together until fluffy, about 5 minutes. Add the eggs, one at the time, beating well after each addition, finishing with the egg yolk. Mix in a few drops of almond and vanilla extract (1 teaspoon of extract in total does the trick). Add a third of the flour mixture and half of the milk and matcha mixture, and mix well. Add another third of the dry ingredients and the rest of the wet ingredients, mix and finish with the rest of the flour. Mix until just incorporated.


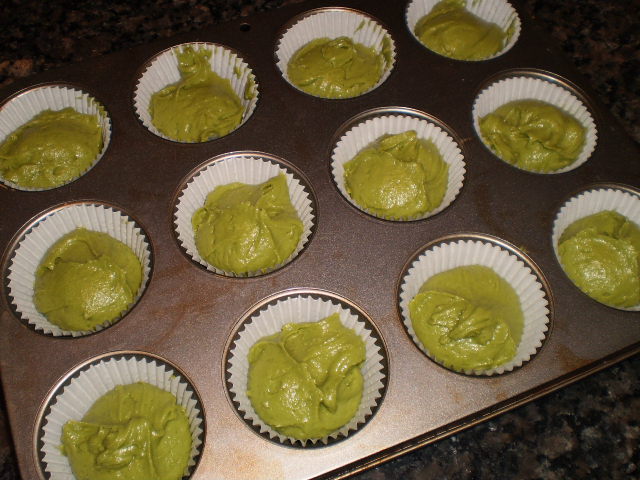
Spoon the batter in the cupcake liners and bake for 22 to 25 minutes, until the top of the cupcakes springs when touched, or until a cake tester comes out clean. Let the cupcakes cool in the pan 5 minutes before moving them to a baking rack, and let them cool completely before icing.


You can add a few drops of green food coloring if you really want your cupcakes to pop bright green, but that is entirely optional: as you can see, the matcha makes the batter quite green without any coloring! They will be perfect Halloween or St-Patrick's Day cupcakes with that gorgeous color...

I am a huge fan of green tea desserts, with green tea ice cream being at the top of my list, and I was delightfully surprised when I tasted the batter and it had that exact delicate-yet-rich flavor: not too sweet and with no hint of the bitterness you sometimes have with green tea. Just the smooth, sophisticated green taste... Those cakes have a soft and moist crumb, and their subtle flavor is absolutely delicious!

I chose a simple green tea glaze (inspired by the recipe in "Vegan Cupcakes Take Over the World") for the batch I brought my in-laws:

2 tablespoons butter, room temperature
1 cup confectioners’ sugar
1/2 teaspoon matcha tea powder
1 to 2 tablespoons milk
1/4 teaspoon almond extract
1 drop vanilla extract

With a fork, beat the butter until fluffy in a small bowl. Mix in the confectioners’ sugar and matcha to form a crumbly mixture.


Slowly beat in 1 tablespoon milk, almond extract and vanilla extract. If the icing is too thick to spread, pour in additional milk a teaspoon at the time and mix until the desired consistency is reached.


Use a tablespoon to pour glaze into the center of each cupcakes and spread it out a bit with the back of the spoon. Let the glaze set before serving (refrigerating your glazed cupcakes can help there: place them in an air-tight plastic container and chill them for 30 minutes).


While this glazing is simple, easy to make and very tasty, you could ice these cupcakes in many different ways. A classic cream cheese or buttercream frosting spiked with 1 tablespoon of matcha powder (and colored a brighter green, if you wish) will make spectacular cupcakes!

I made another batch for my New Year's party, and since my friends are chocolate fiends, and since chocolate and green tea are a match made in decadence-and-stress-reducing-heaven, I whipped up a simple but oh-so-rich chocolate ganache to frost the second batch:

9 ounces bittersweet chocolate, finely chopped
1 cup heavy cream
1 tablespoon dark rum (optional, but awesome)

Put the chocolate in a medium, heat-proof bowl. Bring the cream just to a boil in a small sauce pan (keep a close eye on it!). When the cream reaches the boiling point, pour it over the chocolate and whisk it until its smooth. Stir in the rum (if using). You can either let it cool slightly before pouring it on the cupcakes (starting in the middle and letting it drip), or if you want a fluffier frosting, let it cool until thick, then whip it up with a whisk until it has the desired texture.


And voila! A lovely, elegant and delicious dessert that should not be over-looked in favor of flashier cupcakes! Remember:

"It's not easy being green,
It seems you blend with so many other ordinary things
And people tend to pass you over 'cause you're
Not standing out like flashy sparkles in the water
Or stars in the sky

But green's the color of spring
And green can be cool and friendly-like
And green can be big like an ocean, or important
Like a mountain or tall like a tree

When green is all there is to be
It could make you wonder why, but why wonder why
Wonder, I am green and it'll do fine, it's beautiful
And I think it's what I want to be"

(Yes, I sing silly songs when I bake and I LOVE the Muppets)

A very happy New Year to all my lovely readers! May it be filled with health, love, prosperity and delicious treats! xxx

Monday 24 December 2012

Friday Night Garlic, Shrimp and Mushroom Pasta

Friday night was the first evening of a long awaited vacation: sixteen glorious days of rest, reading, cooking, eating and spending time with friends and family. I got home hungry, but tired, and I was about to prepare some very simple garlic pasta, but inspiration struck and I whipped up an improvised dish that rocked!

This is the sort of magic that can happen when you decide to throw all kinds of stuff you like in a pan and end up with a plate of goodness: the perfect start to my holidays, that I washed down with a glass of champagne (I am completely addicted to bubbles, and Asti sparkling wine is affordable and tasty for every imaginable occasion)!

1 package dry pasta
4 tablespoons olive oil
4 to 6 cloves garlic, finely chopped
1 teaspoon chili flakes
1 package cremini mushrooms, sliced
2 cups small cooked shrimps
1/2 lemon, juiced
Sea salt and freshly ground pepper
Parmagianno Reggiano

Bring a large pot of salted water to a boil. Cook the pasta according to the package instructions. Meanwhile, preheat the olive oil over medium heat in a large pan. Add the garlic and the chili flakes, and cook until fragrant, 2 minutes.


Add the mushrooms and cook until their have rendered their liquid and are shiny, about 5 minutes.


Add the shrimps and stir until they are heated up, about 3 minutes. Add the lemon juice, a pinch of salt and plenty of freshly ground pepper.


Reduce the heat to low and keep the mixture on simmer for 5 to 10 minutes. Toss the freshly cooked pasta to the pan and mix well.


Serve generously sprinkled with freshly grated Parmigianno Reggiano.


Just a bit of heat, a hint of lemon, the tickle of the pepper, the earthiness of the mushrooms and the screaming garlic-ness: delicious!!

This simple recipe was a wonderfully satisfying way to getting the vacations started: it took less than 20 minutes to make and combined a whole bunch of my favorite ingredients! I can now power through the holiday cooking and baking marathon!

Ta!

Sunday 16 December 2012

General Tao Tofu

Oh my goodness, I realize it's been a while since my last post, and I must apologize: the end of the year turns my office into an asylum. There was also our big company Christmas party last Friday, an event which requires as much planning and organization as a rocket launch. Spoilers: it's basically like a huge prom for grown-ups!

When I got back to my humble little kitchen, I wanted some of MY traditional holiday grubs: General Tao. Yes, you read that right: I come from one of those weird families that hasn't had a traditional turkey for Christmas in over a decade. Our Nativity celebration generally involves take-out and a "Star Wars" marathon. I kinda like it! It's fun, totally uncomplicated and I can be shameless about wearing a geeky t-shirt and my Converse shoes. Don't get me wrong, it's a lot of fun to get dolled-up and eat fancy food with my colleagues, but the slouchiness is much more my style.

This little recipe is a treasure I found browsing on Appetite for China. I tweaked it a bit, but it's still very simple and quick to get on the table, and it tastes better than any restaurant General Tao I have ever tried. I have a chicken version of this recipe, but since it requires the chicken cubes to be rolled in batter and fried, this is the version I use when I don't want to wait too long, or make too huge a mess. It's also much lighter than (and nowhere near as greasy as) the chicken version: something to consider after all those rich Holiday meals you may have already started eating...

Remember to give your tofu plenty of time in the pan: a good General Tao needs a chewy bite, so you really want the soy curd to get golden and crispy to get the perfect texture.

1 pound extra-firm tofu
Peanut oil
1/2 to 1 teaspoon dried red chili flakes
2 cloves garlic, minced
1 tablespoon minced ginger,
2 to 4 scallions, white and green parts separated and thinly sliced
1 teaspoon white sesame seeds (for garnish)

Sauce:
3 tablespoons tomato paste (or substitute ketchup for a slightly sweeter sauce)
2 tablespoons soy sauce
2 tablespoons rice vinegar
2 teaspoons hoisin sauce
2 teaspoons Sri Racha sauce
2 teaspoons sesame oil
1 1/2 to 2 teaspoons sugar

Drain and press the tofu, then cut into 1-inch pieces. Prepare the sauce: in a small bowl, stir together the tomato paste, soy sauce, rice vinegar, hoisin sauce, chili sauce, sesame oil, and sugar (it won't look like a lot, but remember that this sauce should coat the pieces of tofu, and not drown them too much).


Heat 2 tablespoons of the peanut oil in a wok or large skillet over medium-high heat. Swirl to coat the bottom. Add the tofu in one layer (you may have to do this in batches) and allow it to sear on the first side undisturbed for about 1 minute.


Then use a spatula to move the tofu cubes around until they are golden on half or most of the sides, about 3 to 4 minutes.


Transfer to a plate and set aside. In the same pan, add the remaining 1 tablespoon of peanut oil. Add the dried chilis, garlic, ginger, and scallions and stir-fry until just fragrant, about 30 or 40 seconds.


Pour in the sauce and stir until thickened, about 1 minute. Add the tofu and carefully toss to coat with the sauce.


Transfer everything to a large serving dish. Sprinkle the sesame seeds and scallions greens on top and serve with rice and steamed vegetables on the side.


The sauce has the perfect blend of spicy, tangy and sweet you want from a good, satisfying General Tao. Honestly, this is quite literally an awesomesauce. The tofu gets perfectly coated in the mixture, giving you a chewy bite of piquant Asian yumminess. If you like it saucy, go ahead and double the sauce, especially if you want to throw some veggies in the wok along with your tofu, like some broccoli, snow peas or bell peppers.

I am looking forward to making a huge batch of this amazeballs recipe and sharing it with my urban family along with some Tzingtao beers! Have lovely Holidays everyone: enjoy food and drink, and don't forget to tell the people in your life that you love them!

Thursday 6 December 2012

Roasted Tomato Soup

When you poke your nose out of the door in the morning and there's frost on the cars in the street and you can see your breath, it's soup season! Which, in Montreal, often feels like it lasts 8 months a year...

A good soup recipe is very precious: it can generally easily be doubled, frozen, taken to work as a light lunch, slurped as a midnight snack, nourish a poor cold-afflicted body and it generally tastes almost better reheated than it did fresh from the stockpot.

I had never made tomato soup before stumbling on this recipe on Hot Pink Apron, which is an aberration, really, given how much I love tomatoes. But this recipe was so simple and sounded so tasty that I felt compelled: November is finally over, and it has got to be the suckiest month of the year (long, dark, cold and we don't get Remembrance Day off in Quebec - what a sham), and a nice bowl of soup sounded like Heaven after a long work day. Bring on the comforting treat! We deserve it, if only because we survived November.

My grocery store carries lovely tomatoes on the vine; they are as tasty as tomatoes get (at least until I start growing my own on the balcony next summer!) so I got a nice bunch. I also had a new basil plant with gorgeous big green leaves that were just begging to be massively added to this soup. Is there a better food match than tomatoes and fresh basil? I think not! Note that I also added more garlic than the original Hot Pink Apron recipe: my man and I can never get enough garlic...

Olive oil
6 to 8 ripe tomatoes, roughly chopped
2 small red onions, roughly chopped
4 garlic cloves, roughly chopped
1 tablespoon dried oregano
1 (28 ounce) can of crushed tomatoes
4 cups vegetable broth
1 large bunch fresh basil leaves
Coarse sea salt and freshly ground pepper

Set the oven to broil. Grease the baking pan with a couple of tablespoons of olive oil. Chop up the tomatoes, onions and garlic and toss on the baking pan. Sprinkle with a healthy dose of coarse sea salt and the dried oregano.

 
Broil the tomatoes and onions for 10 minutes. Rotate the tray. Lower the heat to 350 degrees and roast the tomato mixture for another 30 minutes.


Meanwhile, add the crushed tomatoes, broth and the basil to a large stock pot; bring to boil and simmer on medium-low heat.


Add the roasted tomato mixture to the stock pot and simmer for another 15 minutes.


Remove from the heat and using an immersion blender, purée the soup. Put back on low heat until the soup is reheated, add a pinch of salt and plenty of freshly ground black pepper, and serve with crusty bread and a sprinkle of grated sharp cheese (Parmigiano Reggiano rocks here).


I used fresh Campari tomatoes, very flavorful little fruits that taste good virtually everywhere you'd use tomatoes: they are quite small, so I used a lot more than 6. The trick seems to be keeping a ratio of 3/2 between the fresh tomatoes and the red onions. By the way, this is a great recipe to make if you have slightly mushy tomatoes that have been sitting in the crisper a bit too long!

Such an easy, straightforward recipe deserves a huge shout-out: the kitchen smelled absolutely heavenly while the tomatoes and onions were roasting. The basil keeps the soup from getting the bitter tomato aftertaste I was dreading, and the final texture is luxurious, just thick enough - yet silky.

I am so in love with this soup! Crusty bread is an absolute must: I usually stick to one slice per meal, but I just had to get a second one. Bread soaked in that lovely fragrant soup was just too darn irresistible. Garlic bread would be the ultimate side with which to clean up a bowl of this red wonder, unless you are as crazy as I am and enjoy dipping... grilled cheese sandwiches in your soup!! Oh yeah, baby!


Great minds think alike, by the way: check out Closet Cooking's grilled cheese croutons. Genius.

This recipe earned a spot on my favorite-soups roster: I am gonna whip up a batch every time I need a reminder that tomato season will be back... eventually...

Saturday 1 December 2012

Alex's Ultimate Pancakes

I am very lucky to have amazing foodie friends. They are a great source of inspiration and I just love bouncing ideas off them and picking their brains for cooking tricks. My friend Alex is one such foodie; baking is his specialty, and he gets my mouth watering every time he mentions his latest experiments.

I am very honored to have his permission to reproduce this pancake recipe he spent years perfecting. When he announced he had created the ultimate version, I knew I had to try it.

This is literally a copy-paste of the recipe he sent me, so you'll find the narrative style a bit different from my usual prose; I thought that the best way to detail his recipe was to use his own words.

-----
Dry ingredients:
3 cups flour
1/2 cup sugar
3 teaspoons baking powder (do NOT put too much)
Dash of salt

Wet ingredients:
2 large eggs
3 cups of milk
6 tablespoons of vegetable oil
Splash of vanilla extract

Mix the dry in one bowl. Mix the wet in another bowl. Make a well in the dry ingredients and pour in the wet. DO NOT WHISK! DON'T EVEN USE ONE! Mix with... GASP! a SPATULA! Fold and gently mix until well incorporated but still with some lumps. Luuuuumps. We like dee LUUUUUMPS!


Let sit at room temperature for 30 minutes (no less, not too much more). LIGHTLY stir with the spatula. The flour will have expanded and the lumps should have moistened and will come apart. PRE-HEAT a pan to medium heat (4/10... 5/10... depends on your stove). I use an ice cream scoop to make sure my pancakes are the same size (I'm anal about pancake stacks). You need to flip when they bubble and the edges look dry.


They are soooooo fluffy they DRINK up butter/margarine. We get "Celeb" which is Maxi's house brand of Becel. 2$ less and tastes EXACTLY the same (buttery, with less guilt). I put a lot on them; it melts and the pancakes soak it up. Then I finish with the DARK maple syrup we found this spring at the Marché Jean-Talon. C'est de la tire en canne, c'est tellement bon!

Add 1/2 teaspoon ground cinnamon and half of that of nutmeg to the batter for a comforting yummy nutty kick!

*If they are not browned enough increase the heat and let the pan warm up.

*Note that a perfectly smooth batter means you over-mixed and hence developed gluten. SHAME! Your pancakes will not be miraculously fluffy, but they will still be delicious. Smile. Just be careful next time!
-----

I followed Alex's instructions very carefully. I used my stirring spatula to gently mix the batter, I preheated my crepe pan with a light psssht! of non-stick cooking spray, measured the batter with my ice cream scoop and used a thin slotted spatula to flip the pancakes. By the way, pancakes are very much like crepes: the first one is always a mess, so don't get upset. Just keep going, the second pancake will already be a huge improvement.

Besides 2 flipping incidents (my hand-eye coordination sucks early in the morning), making these pancakes was quite simple. They are ready to flip rather fast, so give them your full attention if you don't want to overcook them. If they start bubbling too quickly, lower the heat to medium-low: giving the pancakes time to set properly will make them easier to flip and will reduce batter splashing - they will also rise higher if they cook more slowly.

The fascinating part is that once flipped, you can see them rise before your eyes! They have the perfect texture and density to stack up high on a plate and drench in butter and maple syrup, just like in movies and 24-hour diners.


My ice cream scoop is small, so I used 2 scoops of batter per pancakes, and I got 16 little fluffy wonders. Alex usually makes bigger pancakes, and gets about 8.

And they really DO drink butter! A little nub of butter on one of these hot pancakes goes "slurp" and disappears. I am definitely a real butter kind of gal (my dad being French, I was brought up to think margarine was the devil's lube, and therefore, not something fit for human consumption), and when it comes to maple syrup, I like to use a lot. The pancakes drank up the butter and the maple syrup like little sponges, making each bite deliciously oozy.

Given the impressive quantity of pancakes wielded by this recipe, I suggest halving it if you are making them for 2. While they were delicious plain, I am sure a handful of fresh berries or banana slices would make them stellar.

Thank you so much for this wonderful recipe, Alex! You are ze baking-master!