Showing posts with label cheese. Show all posts

Saturday, 21 December 2013

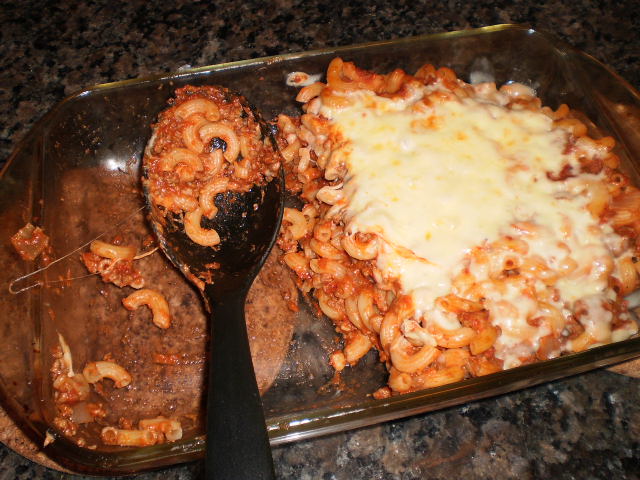
Cheese O.D. Baked Mac n' Cheese

Hello everyone! As promised, I am back with a new recipe!

For those wondering, my move went very well and very smoothly. A huge thank you to this awesome moving crew: Véronique, Mike, Paul, Richard, Sam, Jonathan, Amanda, Karine and John! I could never have done it without you!! The place came together in a pinch and I already feel right at home in my new digs! If you want to see what it looks like, keep an eye on my Instagram (punkygabz), as I plan on putting up pics very soon! As you can see, the cat wasted no time getting comfortable:


Once my books were unpacked (15 boxes!), all I wanted to do was to break in my lovely new kitchen! I also promised my readers some delicious comfort food recipes, and I am nothing if not a woman of my word!

In the broad category of "comfort food", does anything hit the spot better than macaroni and cheese? Gooey melted cheese, pasta, gooey melted cheese, pasta... Sure, it's a sin against decent nutrition, but who cares? Sometimes, it's just was the Feelgood M.D. ordered!

When I got the urge for some of that decadent pasta bake, I absolutely had to made it from scratch: the color of Kraft Dinner is enough to make my stomach churn, never mind the taste and texture... But most mac and cheese recipes I have come across require you to prepare a tedious bechamel: I didn't want to spend time making that (no to mention the extra pot and pan cleaning... ugh), I just wanted to stuff my face with cheese until I had to roll out of my chair.

Thank goodness, Nadia G's recipe was exactly what I was looking for: just cheese! I took the liberty of adding a hint of garlic (come on, Nadia! What kind of Italian are you!) and a bit of nutmeg, which tends to elevate dairy-based dishes to a whole other level of "OMG-this-is-crack" (my gratin dauphinois, for example).

Fontina cheese might be something you've never tried before: it's a nutty, semi-soft Italian cheese. The real deal is quite pungent, but the imported stuff tends to be a lot milder. If you can't find it, or don't like it, emmental or mozzarella are great substitutes. You could even use some Parmiggiano-Reggiano if you prefer sharp-tasting cheeses. As long as it's a cheese that melts well, you're fine.

1 package dry macaroni or fusilli pasta
2 tablespoons butter
1/4 cup yellow onion, minced
2 cloves garlic, finely minced
2 cups milk
1 bay leaf
1 pinch grated nutmeg
1 cup aged Cheddar cheese, grated
1 cup Swiss or Gruyere cheese, grated
1 cup Fontina (or emmental or mozzarella) cheese, grated
Sea salt and ground pepper
A handful of bread crumbs

Preheat the oven to 350 degrees. Boil pasta in salted water until half cook, 6 to 7 minutes. Drain, and set aside. Preheat a large pan over medium heat. Add 1 tablespoon of butter, the onions and garlic. Sauté until soften, about 8 minutes.


Add the milk, bay leaf and nutmeg. Bring mixture to a slow boil, then turn the heat to medium-low.


Throw in the cheeses and some freshly cracked pepper. Stir until melted, then taste; adjust seasoning.


Remove the bay leaf. Grease a baking dish with 1 tablespoon of butter. Add the pasta to the sauce; mix to coat every noodle. Pour in the baking dish and sprinkle liberally with bread crumbs.


Bake for 30 to 40 minutes.


I'm cheese-crazy, so I grated extra Swiss cheese and extra mozzarella on top of my pasta before sprinkling my bread crumbs. Sue me.And trust me, it was as amazing as it sounds. You should have seen my best friend and I stuff our faces as if our lives depended on it...


I am familiar with the tradition of adding cocktail sausages to a batch of mac and cheese. But after an amazing dinner at Diablos BBQ, I strongly suggest using chopped chorizo instead, especially if you like a little spicy kick. I mean, if you are going to put yourself in a cheese and pasta induced coma, why not add some spicy sausages? Cut some chorizo into little bite-sized pieces until you have about 1/2 cup and throw in the sauce along with the pasta (remember to get rid of the thin skin from around the chorizo before adding it to the sauce).


If you'd rather counter the guilt of stuffing your face with all that cheese with some veggies, broccoli and/or cauliflower florets and a small can of diced tomatoes (drained!) will make it a somewhat healthier pasta bake.

Grab a fork, a glass of dry white wine and devour a big bowl of this little cheesy sin while watching something equally cheesy!

Monday, 1 April 2013

Uber-Cheesy Broccoli and Bacon Pasta Bake

I know that with a title like that, there is little need to elaborate. It's a very simple equation: cheese + pasta + bacon = awesome. As stated previously, broccoli is a super-hero vegetable, but it also happens to be really delicious, especially with pasta (remember these? they were the bomb!). And who will turn down a plate of lovely pasta baked to cheesy, golden perfection?

Not this gal. And well, bacon is just a bonus. It IS Easter weekend, after all... Lent is definitely over!!

For a successful baked pasta dish, always remember to keep a very close eye on your pasta: as they will cook in the sauce, you have to leave them slightly undercooked before you mix them with the sauce and finish them in the oven, otherwise you will get a gooey mess of overcooked mush. Check you pasta as they boil they must still have a some crunch when you drain them! Small pasta cook faster than big or stringy pasta, so pay attention as you get them ready.

I don't buy bacon very often (we rarely eat it, and it ends up sitting in the freezer for ages before I get around to defrosting it and using it) but when I do, I get President's Choice Old Fashioned thick-sliced bacon. I justify this purchasing of extremely fat pig-bottom by telling myself that since we have some every 3 months or so, I am making up for lost bacon-free time by ingesting all the calories at once... Challenge that flawless reasoning!

This dish is definitely an indulgence. The equation I mentioned above might lead to awesome, but awesome often seems to rhyme with carbs and fat OD for some reason... Save it for dinner after an especially lousy work day, or a hockey night where you have a feeling the bloody Bruins are gonna win and you just know in your bones comfort-food is a necessity... All that cheese, bacon and pasta will knock you right out into an oblivious food-coma of bliss. Trust me.

2 cups small dry pasta (shell, ziti or macaroni are all wonderful options)
Sea salt and freshly ground black pepper
4 slices of bacon
1 small yellow onion, finely chopped
2 cloves garlic, chopped
2 tablespoons fresh flat-leaf Italian parsley, minced
2 tablespoons all-purpose flour
1 1/2 cups milk
2 cup fresh broccoli, florets and stem chopped small
340g mozzarella, grated
1 tablespoon bread crumbs

Preheat the oven to 350° F. Bring a large pot of salted water on to boil. Add pasta and cook until almost al dente. Drain and set aside. While the pasta is cooking, cook the bacon in a pan over medium heat until crispy.


Transfer to a plate lined with kitchen towels to absorb the excess grease. Chop the bacon into small pieces and set aside.


Leave about 1 tablespoon of bacon fat in the pan and discard the rest. Cook the onions, garlic and parsley until just translucent.


Add the flour and stir until it has coated the mixture.


Gradually add in milk and continue cooking, stirring until mixture has thickened (if it is not thickening, you can add 1 scant tablespoon of flour, but don't dump it: lightly sprinkle it in the pan). Add the broccoli and cook for 2-3 minutes just to soften the florets. Season to taste with a pinch of sea salt and plenty of freshly ground black pepper.


Add 1 cup of the mozzarella, the bacon and the cooked pasta to pan. Toss to combine, making sure everything is well coated.


Pour the mixture into a greased ovenproof dish.


Sprinkle the bread crumbs and the rest of the cheese on top and bake for 10-15 minutes, until the mixture is bubbly and the bread crumbs are golden.


Turn on the broiler for a minute of 2 before serving, to get a nice crisp on top.


If you want more veggies in there, you can halve the broccoli and add finely chopped cauliflower, carrot, zucchini and/or mushroom to you pan along with the broccoli, and throw them in the oven with your pasta. You might feel less guilty about stuffing your face will all this cheese...

This dish is indecently cheesy, and unlike chick-flicks and pop music, this is the awesome kind of cheesy!! The bacon's smoky flavor compliments the crunchy greenness of the broccoli very well. If you like it spicy, I would suggest adding a teaspoon of chili flakes along with the onion and garlic, but a few crunches of the pepper mill is really all you need to brighten up a bowl of these lovely pasta. You could also try mixing up the cheese by replacing 1/2 cup of the mozzarella you add to the sauce with the same quantity of any of your other favorite cheeses. I am sure Romano, Emental or Gruyere would seriously rock this pasta bake to a stellar level.

Technically, I was supposed to get 4 helpings, but those would be helpings for reasonable people with self-control... If you are making this for company, I strongly suggest doubling the recipe and getting very generous with the mozzarella...

As a side note, how annoying is it when your camera-phone takes nicer pictures than your camera-camera... Sigh!

Monday, 1 October 2012

Pesto Lasagna or Lasagne Alla Genovese

Basil is one of those things I can't imagine living without. I use fresh leaves in my cooking at least 3 times a week, and what better time to use them than at their peak, right at the end of the summer heats? Basil will add a sweet herb-y taste to pasta sauces, meat dishes, and even desserts and cocktails! The plant is also lovely: keep it by a window where it will get lots of sunlight and generously water it everyday, and you'll always have fresh basil to flavor your food!

Pesto, it goes without saying, is one of my favorite things, ever. It's versatile, tasty, can be adjusted just to your taste, and it can easily be frozen for later use. I try to always have some pesto handy, because a tablespoon here or there can make almost any dish suddenly taste very sophisticated. Roast chicken? Pesto! Minestrone? Pesto! Grilled white fish? Pesto! The damn thing is addictive. So imagine a lasagne literally stuffed with it!!


This recipe makes a beautiful lasagne for hotter weather, because it is not as heavy as the tomato or meat sauce based ones, and if you make your own pesto, it is simply bursting with seasonal goodness (however, do not fool yourself into thinking this is diet lasagne!). Sure, it's a bit of work and a lot of assembling, like any lasagne, but the creamy blend of bechamel and pesto is to die for. It also looks really beautiful and smells amazing! I got inspired by a post of The Italian Dish, but used my own pesto and bechamel recipe to create this dream of a pasta bake.

10 to 20 lasagne noodles, pre-cooked (or no-boil lasagne noodles)

Pesto (makes about 1 cup):
2 cloves of garlic, chopped
3 large handfuls of fresh basil, leaves picked and chopped
Coarse sea salt
1 handful of pine nuts, lightly toasted
1 large handful of grated Parmesan cheese
Olive oil
Sea salt
1 squeeze of lemon juice

Bechamel (makes about 4 cups):
4 tablespoons (1/4 cup) butter
4 cups milk
4 tablespoons all-purpose flour
1/8 teaspoon grated nutmeg
1/4 teaspoon white pepper

Topping:
1 cup grated Parmesan cheese
1 cup grated mozzarella cheese
1 teaspoon dried oregano
Freshly ground black pepper

Pulse the garlic and basil in a food processor with a pinch of coarse sea salt. Add the pine nuts to the mixture and pulse again. Transfer to a bowl and add half the Parmesan. Stir gently and add olive oil slowly; you need just enough to bind the sauce and give it an oozy consistency. Season to taste and add most of the remaining cheese. Poor in more oil and taste again. Keep adding cheese and oil until you are happy with the taste and consistency. Add a little squeeze of lemon juice at the end.

In a heavy medium saucepan, melt the butter without letting it brown. Remove from the heat. Whisk in the flour, 1 tablespoon at the time until it is incorporated.


Heat up the milk in another cooking pot until just about to boil. Add ladlefuls of the milk to the butter and flour mixture. Put this mixture back on the heat and whisk. Add the nutmeg and white pepper.


When the milk is absorbed, add more, a little at the time and stir until all the milk is used up. Keep whisking until the sauce is velvety. If the sauce doesn't thicken, add some flour, one scant tablespoon at the time, stirring constantly until the desired texture is achieved.

Preheat oven to 350 degrees. In an 9 by 13-inch baking pan, place about 1/3 cup of the bechamel to coat the bottom of the pan. Lay first layer of lasagna noodles. Add enough bechamel to coat the noodles. Add some pesto and spread into the bechamel. Add a handful of the grated Parmesan.


Continue to layer the noodles, bechamel, pesto and Parmesan until the last layer of noodles (I got 4 layers of 3 noodles). On top of this, spread one layer of bechamel, add the rest of the Parmesan and top with the mozzarella.  Sprinkle the oregano on top.


Wrap tightly with foil. Bake for forty to forty-five minutes (if using regular, cooked noodles) or 50 minutes to one hour (if using no-boil noodles). Remove foil and bake for 10 minutes more, until top is golden. Check if the noodles are cooked through by piercing the lasagne with a fork. Cool 5 to 15 minutes before serving.


If you are a lasagne-newbie, you may be wondering if traditional pre-cooked noodles are better than no-boil noodles. While purists will want to kill me, I have to confess that I never really noticed a significant difference between the two: while pre-cooked noodles can have a more uniform texture, they can be harder to handle, and have a tendency to be sticky. No-boil noodles mean less dishes to clean, and a quicker assembly, but they need to cook longer...

Here is what you do if you want to pre-cook your noodles: cook them in boiling salted water, and take them out when they just start getting a bit malleable, after about 3 minutes. To make sure they do not stick together, lay the noodles, well separated, around the edges of the cooking pot and colander. When you assemble your lasagne, carefully lift them and lay them as desired in your baking dish. Do not cook them too early in the process because if they have time to dry out, they will become trickier to arrange.

If you are using no-boil noodles, make sure they are soaked in plenty of sauce because they absorb a lot of liquid. Leave the lasagne in the oven 10 to 15 minutes longer if you used no-boil noodles, and poke your lasagne with a fork, to make sure they are nicely cooked before cutting and serving.

Of course, if you are in a hurry, you can use store-bought pesto. I recommend the Fontaine Santé brand, because the consistency is nice and gooey, and not too paste-like (there is also no weird ingredients or preservative in that pesto, making it the sanest choice I have yet to find on the shelves). This is especially important in a baked pasta dish like this one, where the sauce helps cook the pasta. If the pesto is too thick, the results will not be as creamy.

I served this elegant lasagne to my pesto-loving brother, who almost licked his plate clean. Honestly, I was quite close to doing that myself. The sauce's texture thickens a bit in the oven, and mixes really nicely with the pesto: the Parmesan and crunchy golden mozzarella crust complemented the sauce perfectly. The only thing I might try differently would be mixing the bechamel and the pesto before spreading it on the noodles .

If you want to beef up this lasagne, add finely chopped broccoli or cauliflower (or both!) between the pesto and the Parmesan on the middle layers of noodles. The veggies will gently cook in the sauce, and you'll get healthy goodness with your luxurious pasta bake, making it somewhat less of a guilty pleasure. Serve it with a dry white wine, to balance out the sweet creaminess of the bechamel and the tang of the pesto.

Monday, 25 June 2012

Chicken Parmesan

My mother kept a version of this recipe up her sleeve when she wanted to make sure my brother and I would show up for dinner. There is a reason chicken Parmesan is legendary as far as getting finicky kids to eat. It. Just. Works. Breaded chicken, hot pasta, a simple tomato sauce and melted cheese. Duh. What sane kid would turn something like this down?

I may be all grown up now (in body, if not in mind), but every once in a blue moon, my inner child gets a craving for a plate of this nostalgic indulgence. I had only ever made it with processed ingredients before: frozen chicken or veal cutlets and jarred sauce. I blush at the memory, and I won't ever do that again, scout's honor! Especially since I found out that making chicken parm from scratch is way easier than I had imagined. Sure, there is a bit of cleaning to do after, and you gotta time yourself well to get the pasta and chicken ready at the same time, but it comes together without a hitch. No wonder moms have been using this to get their progeny around the table for ages!

Psst! You don't really have to use chicken. Scalloped veal is a classic alternative, very popular with grown-ups, and vegetarians will find a recipe for chickpea cutlets at the end of this post, because everyone should be able to enjoy this recipe. I happened to have plenty of chicken handy, so I made this:

4 garlic cloves, peeled and chopped
2 tablespoons extra-virgin olive oil
1 (28 ounce) can crushed tomatoes
1/2 teaspoon dried basil
1/4 cup fresh basil, sliced
1/4 teaspoon dried oregano
1 tablespoon red wine vinegar
Sea salt and freshly ground pepper, to taste
2 large boneless, skinless chicken breasts, halved crosswise
1 large egg
1 cup dry bread crumbs
1 package spaghetti or rottini
1/4 cup extra-virgin olive oil
1/2 cup mozzarella cheese, grated
1/4 cup Parmesan cheese, grated, plus extra for serving

First, make the uber-simple tomato-basil sauce. In a large saucepan, sauté the garlic and 2 tablespoons oil over medium-high heat until it starts to sizzle. Stir in the tomatoes, basil, oregano, red wine vinegar (if you prefer a sweeter sauce, skip the vinegar and add 1 teaspoon brown sugar instead), a pinch of salt and a few grinds of pepper. Bring to a simmer; cook until the sauce thickens a bit and the flavors meld, 10 to 12 minutes. Add the fresh basil for the last 5 minutes on the heat. Cover and keep warm (you can make the sauce up to a couple of hours early, if you need: simply reheat it over medium-low heat, stirring constantly, when the chicken goes under the broiler).


Put the chicken pieces between two sheets of plastic wrap and pound, using a heavy pan, until the cutlets are about 1/4-inch thick. Bring a large pot of salted water to a boil. In a shallow bowl, beat egg until well-blended. Mix bread crumbs with some black pepper on a plate. Preheat broiler. Working one cutlet at a time, dip both sides of each in beaten egg, then in bread crumbs. Put cutlets on a wire rack set over a cookie sheet (this will save you from picking up massive messes of crumbs and drippings).


Heat the remaining olive oil over medium-high heat in a 12-inch skillet. When oil starts to shimmer, add the cutlets and sauté until golden brown on each side, about 5 minutes total. Wash and dry the wire rack and return to the cookie sheet. As the cutlets cook, prepare the pasta according to package directions. Transfer the cutlets to the clean wire rack over the cookie sheet. Top each with a portion of the cheeses. Broil the cutlets, 4 to 5 inches from heat source, until cheese melts and is spotty brown (if your broiler is on "high" this will take only a couple of minutes). Drain the pasta. Put a cutlet and a portion of pasta on each plate. Spoon 2 or 3 tablespoons of sauce over the cutlet, then sauce the pasta as desired. Serve with extra Parmesan for sprinkling.


This recipe serves 4, and you may get a bit of leftover pasta and sauce. The cutlets reheat much better than I had expected in the microwave, but you can always half the recipe if you are only cooking for two.

For my vegetarian friends, here is a recipe for chickpea cutlets (from the ever-awesome "Veganomicon") that can be used as an alternative to meat! Follow the recipe below, before broiling and serving them as you would with the chicken.

1 cup cooked chickpeas
2 tablespoons olive oil
1/2 cup vital wheat gluten
1/2 cup plain breadcrumbs
1/4 cup vegetable broth
2 tablespoons soy sauce
2 cloves garlic, grated
1/2 teaspoon lemon zest
1/2 teaspoon dried thyme
1/2 teaspoon Hungarian paprika
1/4 teaspoon dried sage

In a mixing bowl, mash the chickpeas together with the oil until there are no whole chickpeas left. Add the remaining ingredients and knead for about 3 minutes, until strings of gluten have formed. Pre-heat a large skillet over medium heat. Meanwhile, divide the cutlet dough into 4 equal pieces. Knead each piece in your hand for a few moments and then flatten and stretch each one into a rough;y 4 by 6-inch rectangular cutlet shape. Add a thin layer of olive oil to the skillet. Place the cutlets in the pan and cook on each side for 6 to 7 minutes. They are ready when they are lightly browned and firm to the touch.

Tada! Now go feed your finicky inner child.

Monday, 18 June 2012

Meat and Mushroom Pasta Bake of Extreme Yumminess

I had set myself the goat of making meat and mushroom lasagne, and in the course of experimenting with making the ultimate mushroom bolognese, I had a little fun with a different kind of pasta bake that turned out so freaking delicious, I really could not NOT share it here.

It was really hot and sticky, and I couldn't bring myself to make bechamel for the lasagne, so I made a seriously tasty sauce, threw it on lovely macaroni, covered it in mozzarella and broiled the whole thing. And my, was that ever an awesome dinner! Stick-to-your-rib filling, rich and utterly satisfying.

Here is the recipe for the meat and mushroom sauce, and the steps to turn it into enough baked macaroni to feed an army. Keep this one flagged for serious hungry evenings, or simply for when you want to make yourself enough lunches for a month.

2 tablespoons olive oil
1 teaspoon dried oregano
1 teaspoon dried thyme
1 teaspoon chili flakes
1 large yellow onion, chopped
3 garlic cloves, chopped
8 ounces fresh cremini or mini-portobello mushrooms, thinly sliced
1 pound ground beef
1 (28 ounce) can crushed tomatoes
1 (14 ounce) can garlic tomato paste
1/3 cup red wine
Freshly ground black pepper
1 package dry macaroni, or other small pasta, like shells
1 (340 gram) package of pizza mozzarella, grated

Heat the olive oil in a large saucepan over medium-heat. Add the garlic and onion and sauté until the garlic is fragrant and the onions are soft and slightly golden, 5 to 7 minutes. Add the mushrooms and cook, stirring often, until they have released their liquid and are getting colored. Add the ground beef, breaking up the big pieces with a spoon, and cook until the meat crumbles, about 7 minutes. Add the crushed tomatoes and tomato paste and mix well to blend everything. Add the red wine, stir and bring to a boil. Lower to a simmer, cover and cook for 30 minutes, stirring occasionally. Bring a large pot of salted water to a boil, and cook the pasta according to the package's instructions. Preheat the broiler and lightly grease a large baking dish. When they are almost al dente, drain and mix in with the sauce. Spoon the mixture in the baking dish and generously sprinkle with the grated mozzarella. Put under the broiler for 10 to 15 minutes, until the cheese is melted, golden and bubbly.

Behold!


I was so pleased with this little experiment, and so was my boyfriend! The sauce will be back when I actually get around to tackling lasagne, but it would also be great on any other kind of pasta. And for my vegetarian friends out there, I sneaked with mushroom faux-bolognese recipe from theitaliandishblog.com, cuz everyone should enjoy a filling mushroom pasta sauce!

2 tablespoons olive oil
1 large carrot, peeled and diced small
2 medium sized celery ribs, diced small
1/2 medium onion, diced small
Sea salt or kosher salt and freshly ground black pepper
3 garlic cloves, grated or minced
3/4 cup red wine
1 pound mixed fresh mushrooms, chopped
1 ounce dried porcini mushrooms (optional)
1 1/2 cups vegetable broth
1 (15 ounce) can whole tomatoes, crushed by hand
1 (15 ounce) can tomato paste
2 bay leaves
2 teaspoons sugar
2 teaspoons dried oregano
1 teaspoon dried thyme

Soak the dried porcini mushrooms in 1 cup of very warm water and let sit for 20 minutes.  Strain through a cheesecloth or a coffee filter and keep the liquid. Sauté the onion, carrot and celery in a large pot in the olive oil with a big pinch of kosher or sea salt and a few grindings of pepper.  Let the vegetables cook for about 8 minutes, on low heat.  Add the garlic and cook for one minute. Increase heat and add the wine.  Cook for 5 minutes, making sure the wine is simmering. Add the mushrooms. Add the rest of the ingredients, including the reserved porcini mushroom liquid. Simmer, uncovered, for about an hour to an hour and a half, until the sauce has reduced down and a lot of the liquid has cooked off - cook until you like the thickness of the sauce. Taste for salt and adjust seasoning.

Veggie-lovers will have their money's worth with that sauce! It's also a great summer substitute for the meaty bolognese, which is obviously a bit heavier, and therefore not always hot-weather appropriate. It's also so jam-packed with delicious vegetables, you won't really miss the meat.

There you have it! An awesome pasta-bake that will be universally satisfying! Don't be afraid of the quantity, as it freezes very well if you don't have rabid dinner guests to clear your baking dish.

Tuesday, 20 December 2011

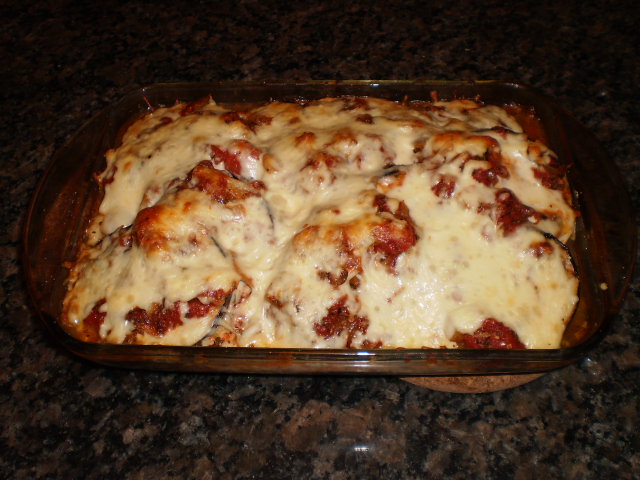
Aubergine Parmigiana (Some Assembly Required)

My love of eggplants is no secret. This recipe is one of my favorite ways of enjoying them; it also has a special place in my heart because cooking this dish led me to two very important realizations.

The first time I made eggplant parmigiana was when I was just starting to see cooking as something more than just boiling water or preheating the oven. I carefully prepared this dish and when I sat down and took a bite, it knocked my socks off. I was impressed with how delicious it was, but also by the fact that I had cooked this little plate of Heaven myself. Wow! I had never known I could do that!! I had never known this was so fun and rewarding! Eating my first home-made eggplant parmigiana taught me that not only could I cook, but I also loved it. Talk about a glorious start to my punk-housewifery!

The other thing I realized as I was stuffing my face with this glorious mess of melt-in-your-mouth veggies and cheese was that I could never be vegan. Vegetarian, maybe. But life without cheese?! Life without mozzarella, Brie, Jalsberg, goat cheese, Camembert, havarti, Gruyère? My French and Italian blood told me that would not be a life worth living. Don't get me wrong: I totally respect veganism and enjoy more than a few vegan dishes on a regular basis. But cheese is something I would never be able to give up. And a helping of eggplant parmigiana sealed the deal for good. My love affair with cheese will endure until my dying day.


There are many recipes for eggplant parmigiana out there. Some people think you should fry your eggplant, others swear by grilling. I side with the latter, not just out of concern about oil and fat, but simply because I prefer the texture. Some people also prefer to purée the tomato and onion sauce, but I like the chunky veggies bits. I leave those details to your discretion, but I find a thick sauce gives the dish a more rustic flair, which I just love. I also dig the crunch of the onion and the savory burst of tomatoes. If you want to have a smooth sauce, just pulse it with an immersion blender before layering the dish. Easy as π!

This recipe is loosely based on the one in "Jamie's Italy", and serves 4 as a vegetarian main dish, or 6 to 8 as a side-dish. It's to die for with lamb roast, but I like it just by itself, with some crusty bread to mop up the sauce and a glass of strong red wine (namely, some Dogajolo, because I'd drink that with everything Italian).

2 large eggplants
1 yellow onion, chopped
3 cloves of garlic, peeled and minced
2 tablespoons oregano
2 tablespoons Italian herbs
1 (24 ounce) can whole tomatoes
1 large handful fresh basil leaves
5 to 6 large handfuls of grated Parmesan cheese
5 to 6 large handfuls of grated Mozzarella cheese
olive oil
sea salt and ground pepper
Red wine vinegar
Breadcrumbs

Remove the stalks from the eggplant and slice them into 1 cm thick slices and sweat them in a large plate. Set aside until the have sweated a thin layer of water; pat them dry. While the eggplants are sweating, preheat 2 glugs of olive oil in a large pan over medium heat. Add the onion, garlic, oregano and Italian herbs, and cook for 10 minutes, until the onion is soft and the garlic is lightly colored. Put the tomatoes in a bowl and break them up with your hands into small chunks, then add to the pan. Give the mixture a good stir, put the lid on and let it simmer for 15 minutes.

 
While the sauce simmers, preheat a grilling pan over high heat and grill the eggplant (in batches of 4 slices) until they have nice char marks on both sides.

 
Preheat the oven at 375 degrees. By this point, the sauce should be reduced and sweet. Season it carefully with salt and pepper and a small glug of red wine vinegar, and add the basil leaves. In a large Pyrex dish, layer the ingredients as follow: one thin layer of tomato sauce, a layer of eggplant, two handfuls of Parmesan and two handfuls of Mozzarella.


Repeat until you have used up all the eggplant, and cover with a bit more sauce and what is left of the cheeses, topped with a sprinkling of bread crumbs. Place in the oven and bake for half an hour, until golden, crisp and bubbly.


Obviously, choose good-quality cheese, and your dish will be so good you'll want to marry it. The ideal is Parmgianno Reggiano and buffalo mozzarella you grate yourself. Kraft Parmesan and Petit Québec mozzarella just don't cut it; you can easily do better than that without having to step in a fancy fromagerie.

Since my baby-brother doesn't like eggplants, we almost never ate this dish at home. But now that I mastered it, I make it for company and people go crazy for it. Oh, the delights those eggplant-phobics are missing. You can make this dish with zucchinis instead of eggplants, but treat yourself to the real deal at least once. It can be eaten hot or cold, and reheats quite well. Not that you'll have leftovers, but you know…

Sunday, 13 November 2011

Gratin Dauphinois

Does any dish scream "French" more than the gratin dauphinois? It is one of those staples of French cuisine which brings to mind lovely bistro tables and accordion music. Rich and creamy potatoes covered in melted cheese; it doesn't get much better than that!

The recipe's name refers to the Dauphiné region in France, where this method for preparing potatoes originated. And as with any other so-called classics, there are about a million versions out there, varying with regions and personal taste. Of course, everyone is convicted that their version is the ultimate gratin dauphinois. I have tried a few, and I find that a balance of the creamy texture of the potatoes, strong taste of cheese and subtle seasoning is the goal one must aim for with this gratin. It is not meant to be the main course of a dinner, but a luxurious side-dish to a roasted or grilled meat (even if it will steal the spotlight if prepared properly), so it can't have an overwhelming taste. It must be just like Audrey Hepburn in "Funny Face": easily overlooked at first sight, but fallen madly in love with after a small taste. Yes, I just compared the divine Audrey to a potato gratin. I am a monster.

My point is that it does require quite a bit of preparation, so you might not want to serve it as a side to another dish that is laborious to prepare (unless you spend your days at home cooking, lucky you!). A lamb-roast is amazing with gratin dauphinois, because of the taste, and because it pretty much takes care of itself in the oven and won't have you fussing with a bunch of pans. I also like to serve it with some marinated fish or chicken (or lamb chops!), cooked in the grilling pan. Less is more in your marinade here! A bit of lemon juice, a handful of tarragon and thyme and some olive oil. Period. Forget heavy and sweet marinades here; the gratin is rich enough. A lovely pepper steak is the ultimate low-maintenance protein to serve as a main course with your gratin. It is a week night, so that's what I did.


The gratin dauphinois below is my favorite, found in the pages of Patricia Wells' "Bistro Cooking"; the spice of nutmeg and the robustness of Gruyère make for a really amazing blend of tastes. And of course, I just love potatoes. The cream and milk give them a great texture; they all but melt in your mouth… Note that it's totally worth it to go to a fromagerie to buy real Gruyère. The Swiss cheese you get in supermarkets is not bad, but there is something about the strength of Gruyère that will take this dish to another level. I used one from Fribourg, Neuchatel for the gratin pictured below, and I got the bang for my bucks.

3 pounds Russet potatoes, peeled and very thinly sliced
2 cups whole milk
3 garlic cloves, minced
1/4 teaspoon salt
3 bay leaves
Freshly ground nutmeg
Freshly ground black pepper
1 cup heavy cream
2 cups freshly grated Gruyère cheese

Preheat the oven to 375 degrees. Place the potatoes in a large saucepan and cover with the milk and 2 cups of water. Add the garlic, salt and bay leaves. Bring to a boil over medium-high heat, stirring occasionally so that the potatoes do not stick to the bottom of the pan. Reduce the heat to medium and cook, stirring from time to time, until the potatoes are tender, but not falling apart, about 7 to 10 minutes. Using a slotted spoon, transfer half of the potatoes in a large gratin dish. Sprinkle with the nutmeg, pepper, half the heavy cream and half the cheese. Cover with the remaining potatoes, and sprinkle again with nutmeg, pepper and add the remaining cream and cheese. Bake the gratin until crisp and golden on top, about 1 hour. Serve immediately.


Remember that as with most potato-dishes, this reheats like a charm, so grab the leftovers for your lunch the next day with a salad or a sandwich. To die for!