Have you ever had a moment where you just can't choose what to eat to satisfy your sweet tooth? All the options look too good to pass up, and you wish you could just have all the desserts in the world at the same time (for those who might be wondering, no, I don't have a case of the munchies: I just get naturally really hungry)! Well this recipe is awesome, because you don't have to choose between having a cupcake or having a cookie: you CAN have them both at the same time!
I originally came across the idea of mashing those two desserts together while flipping through "Vegan Cupcakes Take Over the World", and I remember thinking that it was sheer brilliance. (As a side-note, you should totally get this book: the recipes are very original and inspiring, and they are easy!! Everything I have tried from it so far has been yummy, and didn't even really require the use of my stand mixer. If you are terrified of baking, this book will cure your fears!)
What is it about Oreo cookies that is so awesome? It really seems to bring the inner child out of everyone! Perhaps it's because kids have been dipping them in their milk for over a hundred years. Whatever the reason, they have been sneaked in many dessert recipes: brownies, ice cream sandwiches, pie crust, puddings, milk shakes... I occasionally indulge in Hershey's infamous Cookies & Cream candy bar, and I almost lost my mind when my boyfriend brought home a container of Nestle's Cookies & Cream ice cream... I can't get enough of those damn cookies in every form, so I just had to try the cupcake version...
I worked with the book's recipe, so those cupcakes are fully vegan, but if you have any basic, reliable chocolate cupcake and buttercream recipes you love, you should feel free to simply get yourself a bag of Oreos and tweak your own recipes just a little bit so you can get this spectacular dessert!
Start by getting 1 bag of Oreos, or other cream-sandwich cookies you like.

1 cup unsweetened non-dairy milk (I usually use soy milk)
1 teaspoon apple cider vinegar
3/4 cup cane sugar
1/3 cup canola oil
1 teaspoon vanilla extract
1/2 teaspoon almond extract
1 cup all-purpose flour
1/3 cup cocoa powder
3/4 teaspoon baking soda
1/2 teaspoon baking powder
1/4 teaspoon salt
Preheat the oven to 350 degrees, and line a 12-muffins pan with cupcake liners. Whisk together the milk and vinegar in a large bowl, and set aside to curdle for a few minutes. Add the sugar, oil, vanilla extract and almond extract to the milk and beat until foamy.

In a separate bowl, sift together the flour, cocoa powder, baking soda, baking powder and salt. Add the coarse cookie crumbs to the dry ingredients, and mix.


Add the dry mixture in 2 batches to the wet ingredients, and beat until there are no large lumps left (a few tiny lumps is OK). Divide the batter into the liners, filling them about 3/4 of the way.

Bake for 18 to 20 minutes, until a toothpick inserted in the middle comes out clean. Transfer to a cooling rack and let the cupcakes cool completely before frosting.

1/2 cup non-hydrogenated vegetable shortening, at room temperature
1/2 cup non-hydrogenated margarine, at room temperature
3 1/2 cup confectioners' sugar (you may need a little bit more or less, depending on how stiff you want your buttercream)
1 1/2 teaspoon vanilla extract
1/4 cup unsweetened soy milk
Beat the shortening and margarine together until well combined and fluffy.

Add the sugar and beat for 3 more minutes, add the vanilla extract and soy milk, and beat for another 5 to 7 minutes, until fluffy.

Add the fine cookie crumbs, and mix until they are uniformly combined to the frosting.

When the cupcakes have cooled, generously pile on some frosting (a rubber spatula is your best friend for this step), and crown each cupcake with half a sandwich cookie (don't try to pipe that frosting down: the little cookie bits make that rather complicated and frustrating).

I have to say, even if I usually prefer using real butter in baking, this cupcake recipe really does make a perfect, moist and tender chocolate cake that will fool a traditionalist' palate: no one would ever guess this is egg and dairy-free! And while the words "vegan buttercream" make me roll my eyes, this icing is thick, fluffy, sweet and indulgent. The assembled cupcakes are also the cutest thing.

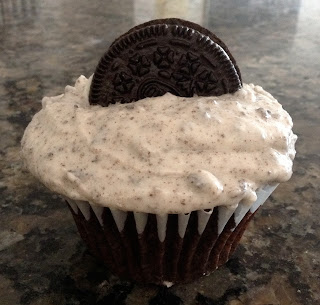
And they taste exactly like cookies & cream ice cream... Make sure to a have a nice big glass of (non-dairy... let's keep this vegan, shall we?) milk to wash all that delicious sweetness down.
What is it about Oreo cookies that is so awesome? It really seems to bring the inner child out of everyone! Perhaps it's because kids have been dipping them in their milk for over a hundred years. Whatever the reason, they have been sneaked in many dessert recipes: brownies, ice cream sandwiches, pie crust, puddings, milk shakes... I occasionally indulge in Hershey's infamous Cookies & Cream candy bar, and I almost lost my mind when my boyfriend brought home a container of Nestle's Cookies & Cream ice cream... I can't get enough of those damn cookies in every form, so I just had to try the cupcake version...
I worked with the book's recipe, so those cupcakes are fully vegan, but if you have any basic, reliable chocolate cupcake and buttercream recipes you love, you should feel free to simply get yourself a bag of Oreos and tweak your own recipes just a little bit so you can get this spectacular dessert!
Start by getting 1 bag of Oreos, or other cream-sandwich cookies you like.
- Coarsely chop about 10 cookies, for the batter (you need about 1 cup of coarse crumbs).
- Separate the cookie from the cream of 5 more cookies, and finely mash the cookies, for the frosting (you need about 1/2 cup of those fine crumbs). This done really easily by putting your cookies in a plastic bag and mashing them with a rolling pin. Roll the rolling pin on the bag until the cookies are reduced to a fine crumb.
- Slice 6 whole sandwich cookies in half-moons, for the final touch

1 cup unsweetened non-dairy milk (I usually use soy milk)
1 teaspoon apple cider vinegar
3/4 cup cane sugar
1/3 cup canola oil
1 teaspoon vanilla extract
1/2 teaspoon almond extract
1 cup all-purpose flour
1/3 cup cocoa powder
3/4 teaspoon baking soda
1/2 teaspoon baking powder
1/4 teaspoon salt
Preheat the oven to 350 degrees, and line a 12-muffins pan with cupcake liners. Whisk together the milk and vinegar in a large bowl, and set aside to curdle for a few minutes. Add the sugar, oil, vanilla extract and almond extract to the milk and beat until foamy.

In a separate bowl, sift together the flour, cocoa powder, baking soda, baking powder and salt. Add the coarse cookie crumbs to the dry ingredients, and mix.


Add the dry mixture in 2 batches to the wet ingredients, and beat until there are no large lumps left (a few tiny lumps is OK). Divide the batter into the liners, filling them about 3/4 of the way.

Bake for 18 to 20 minutes, until a toothpick inserted in the middle comes out clean. Transfer to a cooling rack and let the cupcakes cool completely before frosting.

1/2 cup non-hydrogenated vegetable shortening, at room temperature
1/2 cup non-hydrogenated margarine, at room temperature
3 1/2 cup confectioners' sugar (you may need a little bit more or less, depending on how stiff you want your buttercream)
1 1/2 teaspoon vanilla extract
1/4 cup unsweetened soy milk
Beat the shortening and margarine together until well combined and fluffy.

Add the sugar and beat for 3 more minutes, add the vanilla extract and soy milk, and beat for another 5 to 7 minutes, until fluffy.

Add the fine cookie crumbs, and mix until they are uniformly combined to the frosting.

When the cupcakes have cooled, generously pile on some frosting (a rubber spatula is your best friend for this step), and crown each cupcake with half a sandwich cookie (don't try to pipe that frosting down: the little cookie bits make that rather complicated and frustrating).

I have to say, even if I usually prefer using real butter in baking, this cupcake recipe really does make a perfect, moist and tender chocolate cake that will fool a traditionalist' palate: no one would ever guess this is egg and dairy-free! And while the words "vegan buttercream" make me roll my eyes, this icing is thick, fluffy, sweet and indulgent. The assembled cupcakes are also the cutest thing.


And they taste exactly like cookies & cream ice cream... Make sure to a have a nice big glass of (non-dairy... let's keep this vegan, shall we?) milk to wash all that delicious sweetness down.


