Showing posts with label beef. Show all posts

Thursday, 3 January 2013

Spaghetti and Meatballs

Sometimes, I think spaghetti and meatballs might be the ultimate food cliche. Who hasn't seen that ridiculous/adorable scene in "The Lady and the Tramp" where the two dogs share a plate and end up kissing because they have both been eating the same noodle?

Funnily enough, you'll hardly ever find that dish in restaurants in Italy: it's one of those American-Italian dishes people in Rome have never heard of, like pasta alla carbonara or Alfredo sauce. But who cares, really? It's delicious and filling, and quite versatile. I decided to make some spaghetti and meatballs after we were all but walled-in by a big snow storm: I thought we could use a nice bowl of comfort-food!

This recipe is for basic beef and pork meatballs in tomato sauce (inspired by David Rocco's recipe in "Made in Italy"): you begin by browning the meat in the pan before letting it cook through in the sauce. You can use any ground meat you can get your hands on: beef and pork are classic choices, but lamb is delicious! Add pine nuts or raisins to your meatballs for a change of pace: the texture and slight sweetness is surprisingly awesome!

Veg-heads need not despair: I also added Isa Chandra's "Appetite for Reduction"'s black-eyed pea and tempeh beanballs recipe, which is a super-tasty meatless alternative.

My friend Alex (the king of pancakes) suggested adding a bit of smoky paprika to a simple tomato sauce, and I do love paprika in red meat dishes, so I modified my usual sauce recipe a bit... Here is the result!

Meatballs:
1 pound ground beef
1 pound ground pork
1 cup bread crumbs
2 eggs
1 cup freshly grated Parmigiano-Reggiano cheese
1 tablespoon dried oregano
1 bunch flat-leaf parsley, chopped
Sea salt and freshly ground pepper

Sauce:
4 tablespoons olive oil
4 cloves garlic, finely chopped
1 small yellow onion, finely chopped
1/2 to 1 tablespoon chili flakes
1/2 to 1 tablespoon paprika
1 (28 ounce) can crushed tomatoes
Sea salt and freshly ground black pepper

1 package dry spaghetti


Put the ground meat in a large bowl along with the bread crumbs, eggs, Parmigiano, oregano, half the parsley and some salt and pepper.


Mix the ingredients together by hand until small meatballs that hold together can be formed. Aim for anywhere between 16 and 24 meatballs, depending on the size you make them (I try to make them ping-pong ball-sized). Keep in mind that the smaller the meatballs, the better they will hold while cooking, but don't make them too small either or they will overcook!


Heat up the olive oil in a large sauce pan over medium heat. Add the meatballs and slightly brown them on all sides (use tongs or a shallow cooking spoon - proceed in batches if you need to). This is the trickiest part of the recipe, and only practice (and a big enough pan) makes perfect.


The meatballs may get a bit deformed and a few pieces may fall off, but it's almost inevitable, so don't sweat it. Add the remaining parsley, the garlic and the onion, and cook until the onion starts to soften.


Pour in the crushed tomatoes, the chili flakes, the paprika and some salt and pepper. Let the sauce come to a light boil, turn down the heat and let it simmer for 30 minutes, stirring a couple of times.


Bring a large pot of salted water to a boil and cook the spaghetti according to the package instruction. Taste the sauce and adjust the seasoning. Drain the pasta and separate between pasta bowls. Add a few meatballs to each bowl (3 to 5, depending on their size and your appetite) and spoon some sauce over the pasta. Serve with some Parmigiano Reggiano for sprinkling.


If you have a checkered tablecloth and old chianti bottles, now is the time to bring them out, along with your Dean Martin records! The rustic look and deliciously retro taste of the sauce and meatballs is an absolute win if you are craving a slurpy pasta feast.

The hint of heat from the chili flakes and paprika is perfect for a cold winter night, but you can also use a sweeter tomato-basil sauce if spicy is not your thing:

4 garlic cloves, peeled and chopped
2 tablespoons extra-virgin olive oil
1 (28 ounce) can crushed tomatoes
1/2 teaspoon dried basil
1/4 cup fresh basil, sliced
1/4 teaspoon dried oregano
1 tablespoon red wine vinegar
Sea salt and freshly ground pepper, to taste

In a large saucepan, sauté the garlic and 2 tablespoons oil over medium-high heat until it starts to sizzle. Stir in the tomatoes, basil, oregano, red wine vinegar, a pinch of salt and a few grinds of pepper. Pour over the browned meatballs and proceed with the recipe.

If you are in a hurry, every element of this recipe can be made in advance and assembled quickly: prepare your meatballs and your sauce separately, refrigerate or freeze everything and simply heat up and mix together when you are ready to eat! This is when it comes in handy to double the recipe and put the extra away to have an easily prepared meal later.

You can also use those meatballs in a wrap or sub, or serve them in their sauce with some crusty bread and sharp cheese. And here is a great meat-free alternative you can use if your New Year resolution is a change of diet:

12 ounces tempeh
1 (15 ounce) can black-eyed peas
2 cloves garlic, finely minced
1 teaspoon dried thyme
2 teaspoons dried oregano
1/2 teaspoon paprika
Several pinches of freshly ground black pepper
1 tablespoon soy sauce
1 tablespoon tomato paste
1 tablespoon balsamic vinegar
1/4 cup whole wheat bread crumbs
1/4 teaspoon salt

Prepare a steamer for the tempeh. Break the tempeh into bite-sized pieces and steam for 10 minutes. In the meantime, preheat the oven to 350 degrees and line a large cookie sheet with parchemin paper. In a mixing bowl, use a fork or potato-mashers to mash the beans. They should be well mashed, with no whole beans left, but not completely smooth, like a puree. Add the garlic, herbs and spices, soy sauce, tomato paste and balsamic vinegar and mix well. Add the tempeh to the mixture and mash well. When the mixture is cool enough to handle,  add the bread crumbs and salt (the batter may be a bit bitter: it will mellow out when baked). Using about 2 tablespoons of the mixture per ball, roll the mixture into walnut-sized balls, placing them on the baking pan. Spray with an ample amount of nonstick cooking spray and cover loosely with tin foil. Bake for 15 minutes, flip the balls and bake for 10 more minutes, uncovered.

Make you basic tomato sauce separately, and mix them together before serving on your spaghetti.

It is a cliche of a dish, but what a delicious cliche! Serve these with a rustic Italian red wine and make sure to eat it watching "Moonstruck".

Sunday, 18 November 2012

Meat and Mushroom Lasagne

I have been working on this lasagne recipe for a while. I had started experimenting with it in the spring, but when the hot weather arrived, I thought this monument of a recipe was a bit too heavy to cook. Who wants to slave over 3 different steaming pots when it's 35 degrees in the shade? The pesto lasagne was more weather appropriate, but now that the evenings are colder, I felt like trying my meat and mushroom sauce again.

Baked pasta dishes have an aura of intense comfort food to me. Filling, rich and covered in melty cheese. It can't get much better than that in my world, especially if I have a big glass of red wine to wash it down with. And just like non-baked pasta, it seems the possibilities are endless when it comes to combining flavors and textures. I wanted to replicate the signature sauce from my favorite little Italian restaurant, Napoli Pizzeria: meat and mushroom sauce. When I went to school a few block from that restaurant, I used to gorge myself on this delicious mixture. Now I wanted it at home!

By the way, if you are ever in Montreal and appreciate kitsch decor and perfectly done pasta, please run to this little family-owned restaurant on St-Denis street in the Quartier Latin. The prices are very reasonable, there is a about 100 different pizzas on the menu and if being serenaded by an odd Mariachi band is not a problem for you, you will have a blast.

Of course, I don't have the original Napoli Pizzeria meat and mushroom sauce recipe, so I improvised a bit, made a lovely mushroom bolognese (that I have preciously shared here), a ricotta mix laced with savory herbs and assembled a lasagne. Here is the result!

10 to 20 lasagne noodles, pre-cooked (or no-boil lasagne noodles)

Meat and mushroom bolognese:
2 tablespoons olive oil
1 teaspoon dried oregano
1 teaspoon dried thyme
1 teaspoon chili flakes
1 large yellow onion, chopped
3 garlic cloves, chopped
8 ounces fresh cremini mushrooms, thinly sliced
1 pound ground beef
1 (28 ounce) can crushed tomatoes
1 (14 ounce) can garlic tomato paste
1/3 cup red wine
Freshly ground black pepper

Ricotta blend:
1 pound fresh ricotta cheese, room temperature
1½ cups grated Parmesan cheese
¼ cup whole milk
¼ cup chopped fresh basil
1 tablespoon fresh thyme leaves or 1 teaspoon dried thyme
1 tablespoon chopped fresh rosemary leaves or 1 teaspoon dried rosemary

Topping:
1 (340 gram) package of pizza mozzarella, grated

Heat the olive oil in a large saucepan over medium-heat. Add the garlic and onion and sauté until the garlic is fragrant and the onions are soft and slightly golden, 5 to 7 minutes. Add the mushrooms and cook, stirring often, until they have released their liquid and are getting colored (they will also shrink and become nice and soft).


Add the ground beef, breaking up the big pieces with a spoon, and cook until the meat crumbles, about 7 minutes. Add the crushed tomatoes and tomato paste and mix well to blend everything. Add the red wine, stir and bring to a boil. Lower to a simmer, cover and cook for 30 minutes to 1 hour, stirring occasionally.


Preheat the oven to 375°F and grease a 9- by 13-inch pan. Combine the ricotta, Parmesan, milk, basil, thyme, and rosemary in a medium bowl; season with salt and pepper to taste. Spread about a ladleful of the bolognese sauce in the bottom of the greased pan. Arrange about 1 layer of noodles over the  sauce (it’s okay if they overlap slightly), then cover the noodles with more sauce, followed by about ½ of the cheese mixture. Repeat once. Add a final layer of noodles, cover them with the remaining tomato sauce, and arrange the mozzarella in a single layer on top. Wrap tightly with foil and bake for 30 to 45 minutes. Remove the foil and bake for another 10 minutes, until the noodles are cooked through and the cheese is golden.


I highly recommend you use pizza mozzarella to top your lasagne: it has the most awesome stretchy texture. The ground beef, while delicious, can be left out for a vegetarian mushroom-and-cheese pasta treat. Oh, and by the way, this recipe does makes a ton! Use the largest baking dish you have (or a few small ones); I got 8 helpings from this recipe.

As I explained in my previous lasagne recipe, the cooking time may vary depending on whether you use traditional or no-boil noodles. It always take a bit longer with no-boil noodles, but it is important to not over-cook a lasagne; check it after 30 minutes, testing the noodles by poking the lasagne with a fork. If it gets to soft, your beautiful pasta construction will collapse when you put it on a plate.

I was out of ricotta the night I decided to make this, so I switched the cheese and herb mixture for some creamy bechamel: that will take your lasagne to another level of richness!

4 (1/4 cup) tablespoons butter
4 cups milk
4 tablespoons all-purpose flour
1/4 teaspoon grated nutmeg
1/2 teaspoon white pepper

In a heavy medium saucepan, melt the butter, without letting it brown. Remove from the heat. Whisk in the flour, 1 tablespoon at the time until it is incorporated. Heat up the milk in another cooking pot until just about to boil. Add ladlefuls of the milk to the butter and flour mixture. Put this mixture back on medium heat and whisk. Add the nutmeg and white pepper. When the milk is absorbed, add more, a little at the time and stir until all the milk is used up. Keep whisking until the sauce is velvety. If the sauce doesn't thicken, add some flour, one scant tablespoon at the time, stirring constantly until the desired texture is achieved (I sometimes add up to 4 extra tablespoons of flour).

If you are going to use the bechamel, build your lasagne as follows: 1 layer bechamel, 1 layer bolognese, 1 layer noodles. Repeat until you run out of noddles, top with more bolognese and cover with grated mozzarella.

Tuesday, 11 September 2012

Boeuf Bourguignon or I Have the Paris Blues Again

My Paris-fever came back with a vengeance recently, thanks to my boyfriend getting me hooked on "Spiral", an awesome French cop show. Watching people chase criminals around the world's most beautiful city, stopping to eat a croissant every once in a while, had me longingly flipping through my bistro cookbooks while listening to Jacques Brel (cliché, I know, but so awesome).

While there is a plan to take a trip to the City of Light in the works for next year, I wanted a piece of my Paris. NOW. So I decided to make boeuf bourguignon.

I had read Julia Child's version, but despite having the week off from work, I did not want to spend quite that much time preparing dinner. I also wanted a recipe that did not involve frying bacon in butter... Luckily for me, Linda Danniberg's "Paris Bistro Cooking" offered a traditional, yet non-heart-attack-inducing version of the famous recipe. It still requires a bit of work, so you might want to save it for weekends, when you can take your time.

As the name says, this stew of beef braised in red wine comes from the Burgundy region of France. It started out as a peasant dish, but it has become a standard of French cuisine. Let's face it: when a dish is as hearty, filling and tasty, it ought to be a classic. This makes 4 to 6 helpings, and it's ridiculously easy to pull off.

1 1/2 pound stewing beef, cut into large cubes
2 tablespoons olive oil
4 tablespoons cognac
1 tablespoon butter
2 small onions, cut into wedges
3 or 4 garlic cloves, chopped
3 medium carrots, cut into sticks
1 tablespoon all-purpose flour
4 cups red wine, preferably Burgundy (or Chianti, if you can't find Burgundy)
1 cup water
2 tablespoons tomato paste
1/2 pound button mushrooms (if using slightly bigger mushrooms, like cremini, half or quarter them depending on their size)
1 bouquet garni (1 sprig each of parsley and thyme and 1 bay leaf, tied in a square of cheesecloth)
Sea salt and ground pepper

Brown the meat in the oil in a heavy-bottomed casserole.


Drain off the fat. Add the cognac and ignite carefully. When the flames subside, remove the meat. Add the butter to the casserole and brown the onions, garlic and carrots over medium-high heat.


Sprinkle in the flour, stirring well. Add the wine and water and stir in the tomato paste, mushrooms, bouquet garni and the salt and pepper, scrapping the bottom and sides of the pan to loosen the browned meat juices.


Return the meat to the casserole, bring to a boil. Cover and lower the heat; simmer for about 2 hours, until the meat is tender. Skim off any surface fat and remove the bouquet garni.


Serve with steamed or boiled potatoes and buttered peas.


I must confess that one of the things that I find truly awesome about a recipe like boeuf bourguignon is that it offers me an opportunity to legitimately set something on fire in my kitchen... The flame was not really impressive, but the smell was incredible! Actually, my kitchen smelled awesome for the whole 2 hours of stewing. Sweet torture...

Julia Child called this the best beef dish ever. I don't agree with her all that often, but boeuf bourguignon really is an amazing dish. The meat is sweet and tender from stewing in wine, and the veggies are wonderfully flavored. It should be subtly seasoned, but not too sharp: add a teaspoon of dried thyme and be generous with freshly ground black pepper if you want to heighten the flavors, but be careful not to over do it. A full-bodied red wine goes well with boeuf bourguignon, such as the Burgundy used for cooking, but a Chianti or Merlot will also be a wonderful match.

Some bulk stores sell bouquet garni pre-made, but if you are making them at home, I suggest you buy some fresh parley and thyme, prepare a bunch of bouquet garni and put the ones you are not using in a sealable bag in the freezer. You'll be happy to have them handy the next time you make a stew or hearty pasta sauce.

While my Paris blues will never really be cured, eating a nice helping of this lovely traditional dish while watching "Amélie" did make them easier to deal with. The blues can never really take hold of a person with a full stomach...

Saturday, 17 March 2012

Home-Made Hamburgers

Who doesn't love a nice, juicy hamburger? I love them, and resisting the urge to order one when eating at a pub (or any restaurant that serves a decent burger) is incredibly difficult. Fast-food burgers have stopped being satisfying a long time ago: tiny, thin and flavorless meat patties are possibly the most underwhelming thing one can eat. And no should have to eat them! Not when it's so easy to make your own and season them exactly the way you want.

A pound of ground beef should wield 6 burger patties. Unless I have people over, I freeze 4 patties in pairs, with a piece of parchemin paper between the patties to make sure they don't stick too hard once frozen.

There are a million ways to season burger patties, and the recipe below is simply my favorite. Use the amount of garlic you want and switch the spices to your taste (sage is awesome, especially if you like mushrooms in your burgers!). I like the subtle, smoky taste paprika gives the meat, and a bit of garlic-bite is never a bad thing. The only ingredients I suggest keeping in at all time are the bread crumbs, the egg and the mustard. These will help your patties keep their shape during the cooking process. Nothing is messier or more frustrating than a burger that crumbles and falls to pieces as you grill it.

1 cup of bread crumbs
8 sprigs of fresh Italian parsley
1 teaspoon of Italian herbs
1 teaspoon of chili flakes
1 teaspoon paprika
3 cloves garlic
2 heaping teaspoon of Dijon mustard
1 pound of lean ground beef
1 large egg
sea salt and ground pepper
olive oil

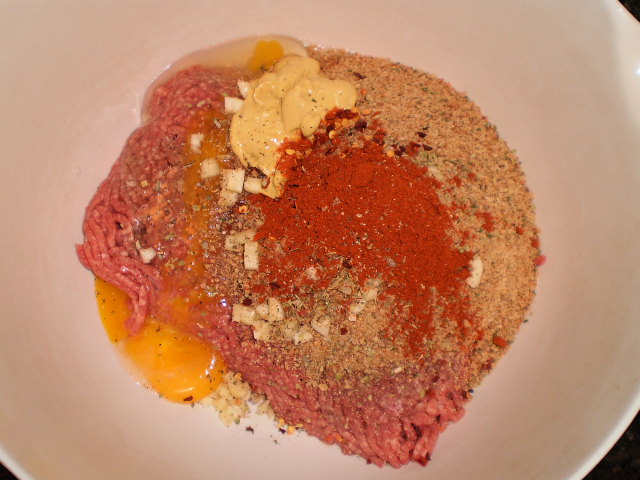
Put the crumbs in a large mixing bowl. Finely chop the parsley, including the stalks and add to the bowl, along with the mustard and the beef. Peel and finely chop the garlic and add to the meat mixture. Crack the egg and add along with a good pinch of salt and about a teaspoon of freshly ground black pepper. Scrunch and mix everything together until well combined. Divide into six balls and form each into a patty, about 3/4 inch thick.


This is the part where you either freeze your patties or eat them right away. If you freeze them, use small freezer bags and parchemin paper. They can stay frozen a month or two. I recommend defrosting them in the fridge instead of in the microwave (I hate defrosting stuff in the microwave) because the diabolical contraption can cook the meat before you throw it in the grilling pan, and that's just not the point.

If you are gonna cook your burgers right away, drizzle the patties with olive oil, put them on a plate and refrigerate for 30 minutes to an hour. Pre-heat a grilling pan over high heat for 4 minutes, then lower the heat to medium. Place the burgers on the grill and using a spatula, press down on them lightly to make sure the whole patty is in full contact with the heat. Cook them for 3 to 4 minutes on each side, until cooked to your liking. If using cheese as a garnish, add the cheese on top of the patty for the last minute of grilling, to let it melt a bit. Serve on burger or ciabatta buns, with garnish of your choice.


I am a die-hard fan of caramelized onions and goat cheese or Brie, but so many delicious things can go in a burger besides the old classics of tomato and lettuce. It's all about complementary tastes: Swiss cheese and sautéed mushrooms, strong Cheddar and finely sliced apples, Monterey Jack and bacon.


I suggest not over-crowding your burgers: the buns may get soggy and the whole thing will fall apart before you've had time to finish it! Carefully pick 2 or 3 garnishes and condiments. You'll enjoy the ensemble much more if you don't have to eat the whole thing in several pieces.

Sunday, 11 March 2012

Chili Challenged

My first few attempts at making chili (con carne and sin carne) had been rather epic failures. I used a pot that was way too small, I didn't add enough water so it reduced way too much and it was a bit bland. In other words, a mess and a disaster. But it takes more than one failed experiment to get me down! I tried again and again until I found a way to make a chili that looked and tasted exactly the way I wanted it to!

There has always been great controversy among chili purists about ingredients (generally, the argument revolves around the presence of beans and tomatoes). I wanted to keep my chili simple and colorful, because a plate full of festive food is really a necessity when that last leg of winter is so grey and boring.

For the chili pictured below, I only had red bell peppers in the fridge, which is fine, but to make it more festive, I usually mix up the colors, with one green and one orange (the first pic - of one of the failed attempts - captures that burst of color). That's purely aesthetics, so I leave the color scheme to you. However, I find that mixing two different kinds of beans is nice. It adds variety in the meaty bites. I love the red kidney and black turtle beans (so those are the ones that I wrote in the ingredients list below), but use any kind that you like. Pinto beans and chickpeas work very well! On my quest to making the perfect chili, I also discovered that tomato paste is essential to get the thick, saucy texture I wanted. Dose water carefully, mixing as you add until you get to the right consistency, or it will be too runny and more like a chunky soup than like a thick stew.

The spice issue was also challenging, because I do live with a spice-freak. I love spicy, but I don't like to sweat when eating, so it had to be carefully regulated to make sure it was piquant enough... but not so much so that it would kill me. If you don't like your lips to tingle, only use 1/2 a fresh red chile and forget the chili flakes. Don't be shy to taste as you cook and adjust your quantities!

This chili is also ridiculously easy to veganize. Simply use 1 pound extra-firm tofu, drained and pressed. Either cut it into bite-sized piece (like the little tofu triangles in the second set of pictures) or crumble it, if you want it to look like you used ground beef. You can reduce your simmering time to 30 to 40 minutes instead of an hour if using tofu instead of beef.

Enough talking: here is the product of a long and sometimes frustrating experimental cooking labor! It makes a good 6 to 8 servings, so make sure you use the largest pot you have.

2 medium yellow onions, finely chopped
3 cloves of garlic, finely chopped
1 fresh chile, finely chopped (I used scotch bonnets, but jalapenos and habaneros are perfect here, too)
2 bell peppers, roughly chopped
1 bunch fresh scallions, sliced (optional)
Olive oil
1 tablespoon chili powder
1 tablespoon ground cumin
1 tablespoon chili flakes
1 tablespoon dried oregano
1 teaspoon paprika
1 teaspoon ground coriander
1 teaspoon cayenne
Sea salt and ground pepper
1 (15 ounce) can red kidney beans, drained and rinsed
1 (15 ounce) can black turtle beans, drained and rinsed
1 (28 ounce) can diced tomatoes
1 (13 ounce) can tomato paste
1 pound ground beef (or 1 pound extra-firm tofu prepared to your taste)
1 to 2 cups water
2 tablespoons balsamic vinegar

Preheat a large (at least 6-quart) pot on medium-high heat. Add 2 lugs of olive oil and add all the chopped vegetables. Add the spices along with a pinch of salt and pepper. Stir every few seconds for 7 minutes, until softened and lightly colored. Add the beans, diced tomatoes and tomato paste. Mix well. Add the ground beef, breaking up the large chunks with a wooden spoon. Carefully add the water to the pan. Add the balsamic vinegar and season with a bit more salt and pepper. Mix again until all the ingredients are well blended. Bring to a boil, then turn the heat down to a simmer, and cover with the lid slightly askew for about an hour; stir occasionally to stop it catching. Serve with rice or tortillas, sprinkled with shredded Cheddar cheese and a spoonful of sour cream, to taste.

Chili con carne:


And chili sin carne!


I knew I'd finally hit gold after the first bite from this bowl. Thick, spicy, chewy, filling: the perfect chili! And both beef and tofu versions are equally delicious. Of course, if you make the tofu version, you can omit the cheese and sour cream. It's a lot of chopping, but oh so worth it if you need a big bowl of filling comfort food! The leftovers freeze and reheat very nicely, so don't be afraid to make a full recipe even if you are cooking just for yourself. It's also ideal if you have tons of hungry folks coming over for dinner.

Saturday, 14 January 2012

My Aunt Marguerite's Macaroni

This recipe is a bit legendary in my mother's family. It was supposed to be my aunt Marguerite's special recipe, but I never met said aunt, and I believe she might have been dead long before my mother learned to cook it herself, so our exact relations to this mystical woman are fairly nebulous.

I have a vivid imagination, so I imagine she must have been part of the Italian family that wound up here (in which case, she would have been zia Magherita), far from home and from the food she knew, so she probably improvised with whatever ingredients she could get her hands on. She realized our tomatoes were not half as tasty as the ones she used to enjoy back home, and as she was probably broke, she got the cheapest tomato sauce she could find, the cheapest meat available and drowned the whole thing in lots of fresh black pepper. And her recipe makes a ton of pasta because she probably wanted to feed as many family members as she could all from one pot.

Maybe I am completely wrong about her story, but her macaroni was ever the crowd pleaser, so we keep making it and eating it! Her legacy will never fade away, thanks to this easy and cheap meal!

4 cups dry tubular pasta (macaroni or tortiglioni are my faves)
Olive oil
2 cloves garlic, chopped
1 yellow onion, finely chopped
1 tablespoon savory
1 tablespoon oregano
1 tablespoon chili flakes (optional)
3 cans tomato soup
1 pound lean ground beef
Sea salt and ground black pepper

Boil a large pot of salted water. When boiling, add the pasta and cook according to package instruction. Preheat a large pan over medium-high heat. Fry the garlic and onion in the oil until soft and golden, about 5 minutes. Add the spices and mix well. Crumble the ground beef in the pan and fry with the onion until the meat is browned. Pour the tomato soup in the pan, and mix well with the meat and the onion. Check your pasta: when they are still a little bit firm, drain them and transfer to the pan of sauce. Blend well so that the noodles are well coated in sauce. Lower the heat, cover and let simmer for 5 minutes. Taste for seasoning, adjust if necessary and serve.


I love grating fresh mozzarella on top of my pasta and let it melt and get all gooey, but you can also turn easily turn this recipe into a baked pasta casserole. Preheat the oven to 375 degrees. After you have mixed your pasta in the sauce, take it off the heat and generously sprinkle it with freshly grated mozzarella and place it in the oven for 5 to 10 minutes, until the cheese has melted. Broil the dish for 2 minutes to make the cheese golden-brown, remove from the oven and serve.

For some reason, despite the fact that this is one of the easiest, cheapest-to-make recipes I know, it's a universal hit. Kids love it, grown-ups love it, cats love it. Maybe because it's got that Chef Boyardee-type of meaty pasta appeal (except that you actually WANT to eat it because it isn't made of unidentified canned ingredients). Maybe because everybody thinks it tastes just like something their mom used to make. Or maybe just because everybody secretly wishes they'd had an aunt Marguerite...

Wednesday, 4 January 2012

Beef Stroganoff

Even if I lived in Montreal my whole life, I never seem to get used to winter. If I had my way, I would hibernate or spend 4 months soaking my frozen bones in a hot bath. Instead, I take out a warm coat and sturdy boots, grind my teeth and make comfort food.

Thanks to globalization, we can still eat almost anything we want all year 'round, but cold weather such as what we have been experiencing lately will inevitably make me crave rich and filling dishes. Since they also get pretty brutal winters, the Russians have devised some truly delicious wintery comfort meals. I set on to explore some of those, out of curiosity, and to please my very own cute Russian.

I originally doubted the authenticity of beef Stroganoff, wondering if it wasn't to Russians what General Tao is to the Chinese, i.e. a complete bastardization of their traditional cuisine. But after a bit of research, I accepted it as real Russian cuisine, since the first recorded recipes for it date back from Imperial Russia (most likely named after some member of the aristocracy who liked to serve it to his guests in his huge winter palace...). It became massively popular in America, France, China and everywhere Russian exiles fled to after the Revolution. That makes quite a bit of sense, and the regional variations are relatively minimal.

1 pound of beef, cut into thin slices
1 tablespoon butter
1 onion, sliced
2 cloves garlic, chopped
1 (8 ounce) package cremini mushrooms, sliced
2 cups red wine
1 (5,5 ounce) can tomato paste
2 tablespoons paprika
1 tablespoon dried dill
1 teaspoon Dijon mustard
Sea salt and ground pepper
2 tablespoons all-purpose flour
1 cup sour cream
2 tablespoons fresh dill, chopped

Melt the butter in a pan over medium heat. Sauté the beef until it is no longer pink, about 5 minutes, and set aside. Add the onions and garlic and sauté until tender, about 5 minutes. Add the mushrooms and sauté until tender, about 5 minutes. Add the beef, wine, tomato paste, mustard, paprika, dill, salt and pepper and bring to a boil. Reduce the heat, cover and simmer until the meat is tender, about 60-90 minutes. Mix the flour in. Bring to a boil and cook while stirring until it has thickened, about 2-3 minutes. Remove from heat and stir in the sour cream and dill.


As you can see, it is a pretty simple recipe to make, so even with frost bitten fingers, anyone can whip this up. My boyfriend likes it better with rice (because all the yummy sauce gets soaked up by the rice) and I dig it over some egg noodles (because it's fun and messy), but either way works. You could even serve it over a couple of baked potatoes, if you fancy.


Sirloin is the preferred cut of beef to work with, but any cut will work, really, as long as it can be prepared into strips. Stewing cubes may be a bit too rough (they are generally from a rougher part of the animal, and take a longer stewing time to cook to the proper texture); if that's what you have at hand, try cutting them in half to make them a bit thinner.

It took me a couple of attempts to balance out the seasoning, so I feel like I can make the following Captain Obvious-statement: this dish isn't supposed to be spicy, but it shouldn't be bland either. Season subtly with garlic, paprika and dill to highlight the mushrooms and beef.

You can also substitute the red wine for beef stock (most of the recipes I've read actually call for beef stock specifically), but I love cooking with wine and find the taste much richer. I tried both ways and the wine version was a million times better. Besides, a Russian dish without booze: that doesn't make sense, does it? You should still taste the tartness of the sour cream, so once you add it, taste and adjust very carefully before serving. Your sauce should have a silky and pleasantly pink creamy texture.

Thursday, 29 December 2011

Shepherd's Pie

In Québec, every family has their recipe for shepherd's pie (commonly known here as pâté chinois - more on that in a minute), and they will each insist that their version is the real shepherd's pie. In that aspect, people here are very much like Italians, who all claim to make the original (and the best) minestrone or bolognese or pizza, or whatever. Every version is probably delicious, but family traditions are big deals in Italy, as they tend to be here in Québec.

It's no wonder that this dish became popular here after the massive waves of Irish immigrants settled in Canada after the potato famine, as it's very similar to Irish cottage pie. But it is called pâté chinois because during the railway construction in the late 19th century, English bosses taught their crew's cooks how to prepare it for the workers, who were predominantly Chinese. Those workers brought the recipe back to the cities and villages, and tada! It became known as Chinese pie.

Nothing says "homey winter food" like a steaming plate of shepherd's pie. It's one of those staples of Québec cuisine that makes winter a little easier to deal with. Hearty, filling and comforting; those recipes are priceless when the harsh January weather is around the corner (like today's -31).

This recipe is the bare-bones, uber-simple comfort food dish that my mom makes. We are a weird family, so we stray from tradition by putting the corn on top of the potatoes. Crazy, huh? It serves 4 to 6.

2 1/2 pounds Russet potatoes, peeled and coarsely chopped
1/2 cup milk
2 to 3 tablespoons butter
1 pound ground beef (or a mix of ground beef, pork and veal)
2 cloves garlic, chopped
1 yellow onion, finely chopped
1 (24 ounce) can creamed corn
Olive oil
Sea salt and ground pepper
Bread crumbs (optional)

Place the potato chunks in a large pot and cover with water. Boil until the potatoes are easily pierced with a fork. Drain in a colander and put back in the pot along with the milk and butter. Mash until creamy and set aside. Preheat the oven to 375 degrees. Preheat the olive oil a frying pan over medium heat. Add garlic and onions and sauté until the onions are soft and golden. Add the ground meat, season with salt and pepper, and cook for 7 to 10 minutes, until crumbling. In a Pyrex or casserole dish, put the meat and onion mixture in a layer. Cover with the mashed potatoes. Spread well to cover the meat. Add the creamed corn as the top layer. Sprinkle with bread crumbs, if using. Place in the middle of the oven for 30 to 40 minutes, until the top layer is golden and bubbling. Serve with ketchup, if you must.


This is the way my mom taught me to make it, but it's easily spiced up. Here are some ways to shake it up:
  • substitute one pound of the Russet potatoes for sweet potatoes
  • add another clove of garlic and use ground lamb instead of beef (technically, it is shepherd's pie only if mutton meat is involved - the proper name for this dish with beef is "cottage pie", not that anyone cares...)
  • add a small can of corn nibblets to the creamed corn
  • sprinkle with grated aged cheddar or Gruyère before putting the dish in the oven
Shepherd's pie can easily be frozen and re-heated later. It's surprisingly delicious reheated in the frying pan. Now, I know some other shepherd's pie recipe make a very firm casserole that you can artfully cut out and get a perfectly layered piece in your plate. Mine isn't like that at all, as you can see.


But the messy look has it's advantages! I prefer to generously sprinkle my plate with freshly ground pepper and vigorously mix the whole thing so that I can have a bit of every ingredient on my fork in every bite. If you want a nice, more photogenic shepherd's pie, I am told that the key is to bake it at a lower temperature, for a longer period of time.

Wednesday, 30 November 2011

Bolognese Sauce, or Why Mothers' Recipes are Timeless Classics

Since I moved out of my mother's house, I got the occasional craving for her amazing bolognese sauce with some spaghetti. When that would happen, I would face the long bus ride back to the 'burbs, sneer at everything, but go back home with a full belly and a big smile. But it was inevitable that sooner or later, I'd decide to grow up, make my own damn bolognese sauce and save myself the bus ride. In an act of rebellion, I figured I'd make a recipe that wasn't my mother's.

That was mistake numero uno.

Mistake numero dos was assuming that since I'd found a few really great recipes in Jamie Oliver's "Food Revolution", they would all be equally awesome and that his bolognese would be delicious. My mamma and my nonna never put any veggies in their sauce, but I figured "what the Hell", and went through the trouble of chopping some carrots and celery into tiny pieces and throwing them in there. He also added bacon to his sauce, but then he adds bacon to almost everything...

Despite the great variety of ingredients in the pot, the result was watery and bland. My boyfriend was also far from impressed, so I tried a few additions and subtractions, but I was forced to the following dreadful conclusion: my mother's sauce tasted a million times better. All those veggies simply don't have their place in a honest meat-sauce: save them for the salad you serve as an entrée! And bacon, well that was just Jamie being British. No Italian in his right mind puts bacon in a sauce where it's taste will get drowned with that of the beef and spices.

Of course, trying to replicate a parent's recipe is a wild goose chase, unless you inherit the pot and stove along with the recipe. You first need to accept that it will never taste exactly the same. Then you have to modify it slightly until it's delicious, albeit differently so from your mom's. This is what I came up with after many experiments with various spices: the balance of savory, oregano and basil with a hint of chili heat just works so well... and it tastes almost exactly like the stuff my mom still feeds me from time to time.

I was lucky enough to inherit my grandmother's Le Creuset 5 1/2 quart Dutchoven. It's bright orange, beautiful, in perfect condition and has been used by the women in my family for 3 generations. Good as new. My nonna made everything in that Dutchoven and I love it to bits. My bolognese doesn't taste exactly like hers, but making it in Betty-the-orange-Dutchoven gives it a nostalgic touch that adds to the taste (or maybe I suffer form psychosomatic delusions). This sauce can be served on pasta (4 to 6 helpings), used in a lasagna or to fill cannelloni. It keeps in the fridge for 4 days, and in the freezer for about a month (if stored in a good air-tight plastic container, of course).


2 medium yellow onions
4 cloves of garlic, chopped
Olive oil
1 tablespoon dried oregano
1 tablespoon dried savory
1 tablespoon dried basil
1 teaspoon chili flakes
1 pound lean ground beef (or a mix of ground beef and pork)
1 (28 ounce) can diced tomatoes
1 (14 ounce) can tomato paste
Sea salt and ground pepper
1 small bunch of fresh basil
4 ounces grated Parmesan cheese (optional)
Red wine vinegar (optional)

Peel and finely chop the onion. Preheat a large casserole-type pan (or amazing Dutchoven) on medium heat. Add a couple of glugs of olive oil, the onions, the garlic and the spices. Cook the onions until soft and slightly golden. Stir in the ground meat and cook for a few minutes, until the meat crumbles. Add the diced tomatoes and the tomato paste. Fill the tomato paste can with water and carefully add about 1/2 cup of water to the mix. Stir in a good pinch of salt and a lot of freshly ground black pepper. Mix well, and bring to a boil. Turn the heat down and simmer for 45 minutes, with the lid on, stirring occasionally. Remove the lid and simmer for another 15 minutes. Pick the basil leaves and put them aside. Remove from the heat and add a swig of red wine vinegar and half the Parmesan (if using either). Tear the bigger basil leaves and stir them in. Mix well, taste, adjust the seasoning as needed. Serve sprinkled with the rest of the Parmesan and garnish with the smaller basil leaves.


As a general rule, when I buy canned tomatoes, I get the Eden Organic brand, as they don't add any salt to their goodies. But their diced tomatoes do not have enough big chunks, which were a staple of the traditional sauce served by mom. So for this recipe only, I ignore my rule and get a big can of Les Compliments brand diced tomatoes (lowest sodium content I could find with the appropriately sized pieces of tomatoes). Feel free to use whole canned tomatoes instead of diced, but make sure you break them up well with a wooden spoon. If you can, use the tomatoes canned with a bit of basil or garlic to add a bit of extra seasoning.

If you feel bold, try the variation alla Max: instead of water, add 1 cup of red wine with your tomatoes and tomato paste, and omit the red wine vinegar at the end! It adds a richness to the taste that makes my boyfriend go crazy!

If you are a spice freak, you can definitely use a tablespoon of chili flakes instead of a teaspoon, or 1/2 a fresh red chile, finely chopped; but I would advise against adding anymore than that. The star of the show in this sauce is ground beef. It should be the main flavor you enjoy with this sauce, so be careful not to drown it in chile. Just sayin'. My aunt used to add a few drops of Tabasco to her plate, and if my grandmother or mother would catch her in the act, she'd get a sharp wooden spoon whack on the head. Don't make me do it to you!