Showing posts with label cupcake. Show all posts

Sunday, 15 September 2013

Ultimate Gingerbread Cupcakes

I am usually the person making cupcakes for every imaginable occasion. Let's face it, few occasions are cupcake-inappropriate. Birthdays, holidays, PMS, bachelor party, thank-you-awesome-tattoo-artist-present... And since I love baking, there is always butter, eggs and various sprinkles all over my kitchen.

So you can imagine how refreshing is it when someone bakes me cupcakes!! My friend JD, photographer extraordinaire and raging geek, is also a very good cook (sorry ladies, he's married!) and he knows how much I love ginger. So when he couldn't make it to my birthday dinner, he made it up to me by whipping up a beautiful batch of cupcakes that shall henceforth be known as the ultimate gingerbread cupcakes.


I can't tell you how excited I was when he dropped those off at my place! We had dinner, opened a bottle of bubbles and enjoyed those little ginger bombs watching David Fincher movies. What? It was my birthday!!!

JD is such a sweetheart that he even shared his recipe with me so that other people could enjoy those wonderful cupcakes: fellow ginger-addicts, rejoice!

Gingerbread cupcakes (24 cupcakes):
2 cups flour
1 teaspoon baking soda
1 teaspoon baking powder
1 1/2 teaspoon ground ginger
1 1/2 teaspoon ground cinnamon
1/2 teaspoon ground nutmeg
1 cup sugar
3/4 cup brown sugar
1/2 cup canola oil
1 teaspoon vanilla extract
2 eggs
1/3 cup molasses
1 cup hot water

Line two cupcake pans with paper liners and preheat the oven to 350. In a small/medium sized bowl, combine the dry ingredients: flour, baking soda, baking powder, ginger, cinnamon, and nutmeg. Carefully whisk them together. In another medium sized bowl or the bowl of a stand mixer, combine oil, sugar, brown sugar, and vanilla. Mix well. Add eggs and mix until incorporated. Next, add the molasses and mix well. Add half of the dry ingredients and half of the hot water to the sugar mixture and mix until incorporated. Repeat with the second half of the dry ingredients and hot water. Transfer the batter to the cupcake pans and fill each liner about 2/3 full. Bake 15 to 20 minutes, or until a cake tester comes out clean.

Maple cream cheese icing:
1 8oz package of cream cheese
1/4 cup (half a stick) butter, room temperature
2 tbsp maple syrup
4 cups powdered sugar

In a medium sized bowl or the bowl of a stand mixer, beat butter and cream cheese on medium high speed until smooth and creamy. Add 2 cups of powdered sugar, one cup at a time, mix until incorporated, and scrape the bowl after each addition. Add the maple syrup and mix well. You can test it at this point and decide if you want more maple syrup or not. Add more powdered sugar and mix, until the icing is the desired consistency.

Ginger syrup:
1 cup sugar
1 cup water
a few pieces of fresh ginger, peeled

Put the ingredients in a sauce pan, bring to a light simmer and let simmer, uncovered, for 30 minutes. Let cool overnight. Remove the pieces of ginger.

When the cupcakes have cooled, frost with the maple syrup cream cheese icing and drizzle the ginger syrup on top. Top each cupcake with a piece of candied ginger.

And voila! Ultimate gingerbread cupcakes!


The cakes were wonderful, moist and just spicy enough, and the very sweet and rich icing is perfectly balanced by the tangy ginger syrup. It took a lot of self-control not to eat the entire batch in one sitting, but I guess I am getting a bit wiser as I get older (not!) and I made the cupcakes last all weekend.

Thank you JD, for the wonderful birthday cupcakes! And a big thank you to the wonderful friends who celebrated with me Saturday night! You guys are the best, and I am so lucky to have you in my life! xxxxx

Saturday, 27 July 2013

Cookies & Cream Cupcakes

Have you ever had a moment where you just can't choose what to eat to satisfy your sweet tooth? All the options look too good to pass up, and you wish you could just have all the desserts in the world at the same time (for those who might be wondering, no, I don't have a case of the munchies: I just get naturally really hungry)! Well this recipe is awesome, because you don't have to choose between having a cupcake or having a cookie: you CAN have them both at the same time!

I originally came across the idea of mashing those two desserts together while flipping through "Vegan Cupcakes Take Over the World", and I remember thinking that it was sheer brilliance. (As a side-note, you should totally get this book: the recipes are very original and inspiring, and they are easy!! Everything I have tried from it so far has been yummy, and didn't even really require the use of my stand mixer. If you are terrified of baking, this book will cure your fears!)

What is it about Oreo cookies that is so awesome? It really seems to bring the inner child out of everyone! Perhaps it's because kids have been dipping them in their milk for over a hundred years. Whatever the reason, they have been sneaked in many dessert recipes: brownies, ice cream sandwiches, pie crust, puddings, milk shakes... I occasionally indulge in Hershey's infamous Cookies & Cream candy bar, and I almost lost my mind when my boyfriend brought home a container of Nestle's Cookies & Cream ice cream... I can't get enough of those damn cookies in every form, so I just had to try the cupcake version...

I worked with the book's recipe, so those cupcakes are fully vegan, but if you have any basic, reliable chocolate cupcake and buttercream recipes you love, you should feel free to simply get yourself a bag of Oreos and tweak your own recipes just a little bit so you can get this spectacular dessert!

Start by getting 1 bag of Oreos, or other cream-sandwich cookies you like.

  • Coarsely chop about 10 cookies, for the batter (you need about 1 cup of coarse crumbs).
  • Separate the cookie from the cream of 5 more cookies, and finely mash the cookies, for the frosting (you need about 1/2 cup of those fine crumbs). This done really easily by putting your cookies in a plastic bag and mashing them with a rolling pin. Roll the rolling pin on the bag until the cookies are reduced to a fine crumb.
  • Slice 6 whole sandwich cookies in half-moons, for the final touch


1 cup unsweetened non-dairy milk (I usually use soy milk)
1 teaspoon apple cider vinegar
3/4 cup cane sugar
1/3 cup canola oil
1 teaspoon vanilla extract
1/2 teaspoon almond extract
1 cup all-purpose flour
1/3 cup cocoa powder
3/4 teaspoon baking soda
1/2 teaspoon baking powder
1/4 teaspoon salt

Preheat the oven to 350 degrees, and line a 12-muffins pan with cupcake liners. Whisk together the milk and vinegar in a large bowl, and set aside to curdle for a few minutes. Add the sugar, oil, vanilla extract and almond extract to the milk and beat until foamy.


In a separate bowl, sift together the flour, cocoa powder, baking soda, baking powder and salt. Add the coarse cookie crumbs to the dry ingredients, and mix.


Add the dry mixture in 2 batches to the wet ingredients, and beat until there are no large lumps left (a few tiny lumps is OK). Divide the batter into the liners, filling them about 3/4 of the way.


Bake for 18 to 20 minutes, until a toothpick inserted in the middle comes out clean. Transfer to a cooling rack and let the cupcakes cool completely before frosting.


1/2 cup non-hydrogenated vegetable shortening, at room temperature
1/2 cup non-hydrogenated margarine, at room temperature
3 1/2 cup confectioners' sugar (you may need a little bit more or less, depending on how stiff you want your buttercream)
1 1/2 teaspoon vanilla extract
1/4 cup unsweetened soy milk

Beat the shortening and margarine together until well combined and fluffy.


Add the sugar and beat for 3 more minutes, add the vanilla extract and soy milk, and beat for another 5 to 7 minutes, until fluffy.


Add the fine cookie crumbs, and mix until they are uniformly combined to the frosting.


When the cupcakes have cooled, generously pile on some frosting (a rubber spatula is your best friend for this step), and crown each cupcake with half a sandwich cookie (don't try to pipe that frosting down: the little cookie bits make that rather complicated and frustrating).


I have to say, even if I usually prefer using real butter in baking, this cupcake recipe really does make a perfect, moist and tender chocolate cake that will fool a traditionalist' palate: no one would ever guess this is egg and dairy-free! And while the words "vegan buttercream" make me roll my eyes, this icing is thick, fluffy, sweet and indulgent. The assembled cupcakes are also the cutest thing.


And they taste exactly like cookies & cream ice cream... Make sure to a have a nice big glass of (non-dairy... let's keep this vegan, shall we?) milk to wash all that delicious sweetness down.

Sunday, 9 June 2013

Will Bake Whiskey Cupcakes for More Ink!

I got my first tattoo when I was seventeen. I had been talking about it for 5 years, so my parents were not really surprised. Little did they know this would be the opening of the floodgate: getting inked is freakishly addictive! Every time I get a new tattoo, it takes me about... an hour to come up with a new awesome idea for another one. Budget restriction is a blessing in disguise sometimes...

While I do occasionally get tired of silly questions (such as "What will it look like when you get older?" - to which my typical response is: "Fucking bad-ass. Go away.") and of random people at bus stops feeling like they can touch my arm without asking, I am forever in love with the art of tattooing, and if I could draw (which I really can't: even my stick-figures suck), I would have loved to learn how to do it! I suppose I must be content with being a walking canvas.

Of course, when you are young and craving a new tattoo, you sometimes come up with ideas that will make you frown a decade later. Such was the case for the astrological symbols I got tattooed on the nape of my neck (as a Virgo with Libra rising, I like to have things clearly labeled, I guess). It was a nice little tattoo, but as I got older, I figured something a bit edgier would probably suit me better and decided to have it covered up. Given my obsession with cupcakes, I started toying with the idea of getting a bad-ass, colorful cupcake tattoo! On a whim, I walked into a tattoo shop near my apartment, and the next thing I knew, I was watching one of their artists sketch the exact wicked cupcake I had in mind!


I was so impressed with how nice and friendly the guys at the shop were, and the artist did such a cool job that I decided to express my gratitude to the Jolly Rogers' crew with a batch of whiskey cupcakes. A boozy dessert seemed an appropriate choice to thank them for my totally rockin' new tattoo!

I had been meaning to try whiskey maple buttercream frosting for a long time, as I had heard nothing but raving praises about the sinful-sounding combo. Technically, this blog entry's title is a lie, because there was no whiskey in the cupcakes per see; I sneaked it all in the frosting! But I did pipe the frosting on some lovely vanilla cupcakes.

These vanilla cupcakes are vegan, and I know I killed the vegan-ness of the ensemble with the butter in the icing, but as far as basic vanilla cupcake recipes go, this one is really one of my favorites because of how simple and straight-forward it is. If you have never baked a cupcake in your life before, this recipe is a good place to start because it will not intimidate the pants off you (I admit, some baking recipes scare me to death... I have been telling myself I will make home-made bread for ages and it still hasn't happened). If you want non-vegan vanilla cupcakes, this recipe is a bit more complicated, but utterly delicious and well worth the extra-effort.

Vegan vanilla cupcakes (from "Vegan Cupcakes Take Over the World")
1 cup unsweetened almond milk
1 teaspoon apple cider vinegar
1 1/4 cups all-purpose flour
2 tablespoons cornstarch
3/4 teaspoon baking powder
1/2 teaspoon baking soda
1/2 teaspoon salt
1/3 cup canola oil
3/4 cup sugar
1 1/2 teaspoons pure vanilla extract and
1 vanilla bean, split lengthwise and scraped or 2 teaspoons pure vanilla extract

Preheat oven to 350 F. Line a muffin pan with cupcake liners. Whisk the almond milk and vinegar in a measuring cup and set aside for a few minutes to get good and curdled. Sift the flour, cornstarch, baking powder, baking soda, and salt into a large bowl and mix.


Beat together the almond milk mixture, oil, sugar, vanilla extract and vanilla bean in a large bowl.


Sift in the flour, cornstarch, baking powder, baking soda, and salt, and mix until no large lumps remain.


Fill cupcake liners two-thirds of the way and bake for 20 to 22 minutes.


Transfer to a cooling rack.


I was 1/4 cup shy of the required quantity of all-purpose flour, so I topped it off with some whole wheat pasty flour, hence the more golden hue of the cakes. My little trick did not affect the taste; it just gave them a slightly "healthier" look.

The frosting is inspired by the infamous Cupcake Royale specialty of bacon cupcakes iced with whiskey-maple buttercream... These people are clearly insane in the best way one can imagine.

1 cup unsalted butter, at room temperature
1/4 cup whiskey
5 tablespoons maple syrup
1/2 teaspoon salt
4 cups confectioners' sugar

Using an electric mixer, beat butter, whiskey, syrup, salt, and one cup of the confectioners' sugar together until smooth.


Add the rest of the sugar bit by bit until it has reached the desired consistency (you might not use all of it).


Spread generously on cooled cupcakes. This makes enough frosting for a dozen cupcakes.

Being both a whiskey-girl and a maple syrup addict, I was sold on this icing from the moment I read the ingredients list. While it looks like completely innocent vanilla frosting, one lick of this creamy buttercream packs a lovely sweet and boozy punch. Simply sinful. A clean-tasting cake like the vanilla one is the perfect vessel for such a decadent frosting, but it would also work great on Guinness cupcakes!


Oh, and take it from me: bring your tattoo-artist cupcakes, and they will love you forever!

Monday, 31 December 2012

It's Not Easy Being a Green Tea Cupcake

There is something amazing about a cup of nice green tea: it's soothing and tasty, it will get rid of toxins, hydrate you just as well as a big glass of water, boost your brain power and your immune system... It really is a gorgeous magic potion for the body and for the soul. My favorite is David's Tea Dragon Pearls: I drink two cups of the stuff every day I can, and every drop feels and tastes wonderful. Living in the real world would be very tough sometimes if there was no green tea... and no adorable mugs to drink it from - thank you Mel and Matt for the cutest Christmas presents!


December is always synonymous with madness at work, and while chocolate is wonderful to keep stress under control, I could not have made it without my green tea, and in that spirit, I wanted a zen little dessert I could bring to my in-laws' Christmas lunch. Why not turn my magic potion into a tasty sweet? My mother-in-law is as much of a tea fan as I am, so I knew those little cupcakes would be received enthusiastically at her table.

This recipe requires you to get your hands on some matcha green tea powder: you can easily find it at tea shops, but if that fails, try to hit Asian stores or Chinatown. Matcha is the tea used in the Japanese tea ceremony: its made from a specific kind of green tea and ground into a very fine powder, then whisked with hot water to create the traditional beverage. It's worth noting that it contains three times as much antioxidant as regular green tea, so these cupcakes are just as much health food as they are dessert! Or at least, that's what I keep telling myself... they disappeared in the blink of an eye...

2 cups all-purpose flour
1/2 tablespoon baking powder
1/4 teaspoon salt
2/3 cup milk
2 tablespoons matcha green tea powder (I used Matcha Matsu from David's Tea)
3/4 cup (1 1/2 stick) butter, room temperature
1 1/2 cup sugar
2 eggs
1 egg yolk
A few drops almond extract
A few drops vanilla extract

Preheat the over to 350 degrees, and line a muffin pan with cupcake liners. Sift the flour, baking powder and salt together in a medium bowl. Mix the milk and matcha powder and reserve.


In a large mixing bowl, beat the butter and sugar together until fluffy, about 5 minutes. Add the eggs, one at the time, beating well after each addition, finishing with the egg yolk. Mix in a few drops of almond and vanilla extract (1 teaspoon of extract in total does the trick). Add a third of the flour mixture and half of the milk and matcha mixture, and mix well. Add another third of the dry ingredients and the rest of the wet ingredients, mix and finish with the rest of the flour. Mix until just incorporated.


Spoon the batter in the cupcake liners and bake for 22 to 25 minutes, until the top of the cupcakes springs when touched, or until a cake tester comes out clean. Let the cupcakes cool in the pan 5 minutes before moving them to a baking rack, and let them cool completely before icing.


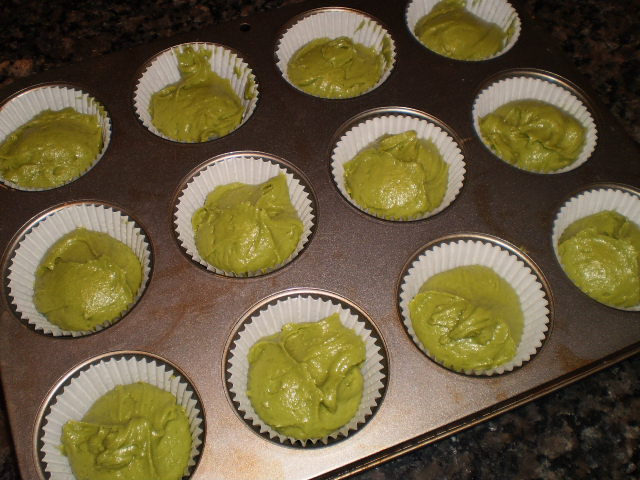
You can add a few drops of green food coloring if you really want your cupcakes to pop bright green, but that is entirely optional: as you can see, the matcha makes the batter quite green without any coloring! They will be perfect Halloween or St-Patrick's Day cupcakes with that gorgeous color...

I am a huge fan of green tea desserts, with green tea ice cream being at the top of my list, and I was delightfully surprised when I tasted the batter and it had that exact delicate-yet-rich flavor: not too sweet and with no hint of the bitterness you sometimes have with green tea. Just the smooth, sophisticated green taste... Those cakes have a soft and moist crumb, and their subtle flavor is absolutely delicious!

I chose a simple green tea glaze (inspired by the recipe in "Vegan Cupcakes Take Over the World") for the batch I brought my in-laws:

2 tablespoons butter, room temperature
1 cup confectioners’ sugar
1/2 teaspoon matcha tea powder
1 to 2 tablespoons milk
1/4 teaspoon almond extract
1 drop vanilla extract

With a fork, beat the butter until fluffy in a small bowl. Mix in the confectioners’ sugar and matcha to form a crumbly mixture.


Slowly beat in 1 tablespoon milk, almond extract and vanilla extract. If the icing is too thick to spread, pour in additional milk a teaspoon at the time and mix until the desired consistency is reached.


Use a tablespoon to pour glaze into the center of each cupcakes and spread it out a bit with the back of the spoon. Let the glaze set before serving (refrigerating your glazed cupcakes can help there: place them in an air-tight plastic container and chill them for 30 minutes).


While this glazing is simple, easy to make and very tasty, you could ice these cupcakes in many different ways. A classic cream cheese or buttercream frosting spiked with 1 tablespoon of matcha powder (and colored a brighter green, if you wish) will make spectacular cupcakes!

I made another batch for my New Year's party, and since my friends are chocolate fiends, and since chocolate and green tea are a match made in decadence-and-stress-reducing-heaven, I whipped up a simple but oh-so-rich chocolate ganache to frost the second batch:

9 ounces bittersweet chocolate, finely chopped
1 cup heavy cream
1 tablespoon dark rum (optional, but awesome)

Put the chocolate in a medium, heat-proof bowl. Bring the cream just to a boil in a small sauce pan (keep a close eye on it!). When the cream reaches the boiling point, pour it over the chocolate and whisk it until its smooth. Stir in the rum (if using). You can either let it cool slightly before pouring it on the cupcakes (starting in the middle and letting it drip), or if you want a fluffier frosting, let it cool until thick, then whip it up with a whisk until it has the desired texture.


And voila! A lovely, elegant and delicious dessert that should not be over-looked in favor of flashier cupcakes! Remember:

"It's not easy being green,
It seems you blend with so many other ordinary things
And people tend to pass you over 'cause you're
Not standing out like flashy sparkles in the water
Or stars in the sky

But green's the color of spring
And green can be cool and friendly-like
And green can be big like an ocean, or important
Like a mountain or tall like a tree

When green is all there is to be
It could make you wonder why, but why wonder why
Wonder, I am green and it'll do fine, it's beautiful
And I think it's what I want to be"

(Yes, I sing silly songs when I bake and I LOVE the Muppets)

A very happy New Year to all my lovely readers! May it be filled with health, love, prosperity and delicious treats! xxx

Wednesday, 31 October 2012

Bloody Hell!

I have a big soft spot for Halloween (and British curses... actually, make that British slang, period)! The cheesy B-movies, the psychobilly music, hours spent preparing kinky costumes for a late-night "Rocky Horror Picture Show", universal permission to binge on sweets...

Any excuse to bake cupcakes is a good excuse for me, so I volunteered to bring a batch to my office's Halloween lunch, but I wanted something a bit more out-of-the-box than the traditional pumpkin cupcakes (I find pumpkins very cute, but not especially tasty). So when Marilla of Cupcake Rehab posted these, the "Dexter" fan in me could not resist whipping them up!


I wanted the blood stains to really pop out, so I opted for one of my favorite combos: vanilla cupcakes and cream cheese icing (although I did seriously consider red velvets).


Vanilla cupcakes (24):

2 3/4 cup all-purpose flour
3 teaspoons baking powder
1/2 teaspoon salt
3/4 cup unsalted butter, room temperature
1 2/3 cup sugar
5 egg whites
2 1/2 teaspoon vanilla
1 1/4 cup milk

Preheat oven to 350 degrees, and line a muffin pan with paper liners. In a medium bowl, mix flour, baking powder and salt; set aside. In a large bowl, beat the butter on medium speed for 30 seconds. Gradually add sugar, beating well after each addition and scraping the bowl occasionally. Beat 2 minutes longer. Add egg whites, one at the time, beating well after each addition. Beat in vanilla. On low speed, alternatively add flour mixture, about 1/3 of mixture at the time, and milk, about 1/2 at a time, beating until just blended. Divide batter in the lined baking cups, filling them about 2/3 of the way. Bake for 18 to 20 minutes, or until a cake tester inserted in the middle comes out clean. Cool in the pan for 5 minutes before transferring to a cooling rack. Wait until completely cooled to frost.

Cream cheese frosting (yes, I know, I have an addiction...):

2 sticks (1 cup) butter, at room temperature
1 cup cream cheese, at room temperature
4 cups powdered sugar
2 tablespoons vanilla extract

Using the whisk attachment, whip the butter and cream cheese on high speed for about 5 minutes, scraping the bowl down as necessary. Reduce the speed to low and slowly add the powdered sugar until all is incorporated. Add the vanilla and mix to combine. Increase the speed to medium high and whip for a few minutes until the frosting is light and fluffy, scraping the bowl as necessary.

And the finishing murderous touch is some gel food coloring, diluted in warm water until it has the perfect bloody, gooey consistency; you then dip the wider end of a chop stick in, and go Jackson Pollock on the cupcakes! Beware: concentrated food coloring stains, so cover your work surface in garbage bags and wear gloves if you want to avoid the unpleasant experience of cleaning up a crime scene (or going all Lady Macbeth... unless that's your costume!).


A big thank you to Cupcake Rehab, for the coolest Halloween cupcake idea EVER! You rock! These were a blast to make, and were a huge success with the Halloween lunch crowd!

Sunday, 26 August 2012

B-Cup... Cakes

I have reached the age where suddenly, people that I have known a long time start getting married and having babies. On a pretty massive scale. Sometimes, it makes me feel like I may have taken a wrong turn somewhere, but then I usually shrug and get back to thinking of more important things (like coming up with new tattoo ideas, wondering whether or not I'll get fired if I show up to work with my hair a brighter shade of purple, figuring out what my boyfriend would like to eat for dinner: vital stuff).

I am neither pro-marriage nor pro-kids, but I am pro-happiness, so whatever my friends do, as long as it makes them happy, it's a-OK by me.

My friend JD (who took that awesome pic of me with the meat cleaver: see top of the page) is one of those people getting married and making me feel old. And while I am obviously not attending the bachelor party (seriously, knowing him, I don't want to know how the Hell that evening will go down...), his sister asked me to contribute to the evening by preparing a dessert in the shape of what JD loves most in the world...


These are revamped vanilla cupcakes with cream cheese icing, tinted pink with Wilton pink gel food coloring, and topped with mini-Swedish berry candies. It was rather odd having two dozens tiny boobs all over my kitchen counter, but these were great fun to make!

Wishing you all the happiness in the world, JD! I hope you enjoyed the boob cakes! xx

P.S. JD, you still owe me a Key Lime pie! Don't think getting married means you are off the hook!

Wednesday, 4 July 2012

Guinness Cupcakes for my Baby's Birthday

No, it's not St-Patrick's Day, I know. But it IS my boyfriend's birthday and we are both stout fans, so when he chose this as his birthday cupcake, I was quite pleased.

Stout is a dark beer, made from malt or barley, and Guinness is the most famous stout in the world. It's dry, light and creamy, and has an almost cult-ish status. It must be served at a specific temperature, poured from the tap in what is known as a double-pour, in a specifically shaped pint-glass... Some researches have also shown that there are antioxidants specific to Guinness that slow down bad cholesterol deposits, hence the famous slogan "Guinness is good for you!".

Besides all the pomp and circumstance, another thing Guinness has been increasingly known for is it's culinary uses. The fad probably started in faux-Irish pubs that wished to give their menu a more authentic look by adding stuff like beef and Guinness stew on it, but it caught on. The smoothness of this stout and it's slight coffee aftertaste eventually led some creative cooks to add it to desserts, particularly the chocolate-based cakes.


This cupcake recipe is quite simple and makes a light, chocolate-y cake with all the richness of the stout. There are several ways to ice these babies, most infamously with Bailey's frosting (and sometimes whiskey ganache) to create an Irish Carbomb cupcake. A mocha icing would also be lovely if you want to intensify the coffee-chocolate flavors, but cream cheese is a big favorite. I personally think a white icing makes them look more like little beer-cakes, since the frosting can look like the creamy head of the beer. That and I'd eat a chair if it had cream cheese frosting on it...

1 (330 ml) bottle Guinness stout
1/2 cup milk
1/2 cup vegetable oil (I used canola oil)
1 tablespoon pure vanilla extract
3 large eggs
3/4 cup sour cream
3/4 cup unsweetened cocoa
2 cups sugar
2 1/2 cups all-purpose flour
1 1/2 teaspoons baking soda

Preheat the oven to 350°F. Line a muffin pan with cupcake liners. In a large mixing bowl, pour the Guinness and give it a moment for the foam to settle, then add the milk, vegetable oil, and vanilla. Beat in the eggs, one at a time. Mix in the sour cream.


In a large mixing bowl, whisk together the cocoa, sugar, flour, and baking soda. Gradually mix the dry ingredients into the wet Guinness mixture.


Fill the liner 2/3 and bake 25 minutes, until risen and set in the middle but still soft and tender. Cool for 5 minutes before removing the cupcakes from the tins and letting them cool completely on a wire rack.


This recipe was supposed to make 24 cupcakes, but I somehow wound up with 36... Don't ask me how that happened... The important thing is that they were delicious, light and fluffy, yet loaded with chocolate flavor and a little "je-ne-sais-quoi" of Guinness. Basically, if you closed your eyes and wished really hard that your beer was dessert, those cupcakes would be what you'd find when you opened your eyes again.

The taste of beer is not overwhelming at all, and I enjoyed these so much I am considering making them my default chocolate cupcake recipe. If you prefer cooking with butter, you can also replace the milk and oil with 1 stick (1/2 cup) of unsalted butter, melted and added to the wet ingredients. It was also my first time using organic cane sugar instead of ordinary white sugar (I recently attended a conference where a nutritionist explained how they make regular sugar, and let's just say it's pretty effing disgusting, so I decided to switch). The texture is the same and the taste is great, so I think cane sugar is totally worth hunting down and baking with.

And once more with feelings, here is my favorite cream cheese frosting recipe. It makes enough to frost 12 cupcakes, so double or triple it to go with the Guinness cupcakes!

1 stick (1/2 cup) butter, at room temperature
1/2 cup cream cheese, at room temperature
2½ cups confectioner sugar
1 tablespoon vanilla extract

Using the whisk attachment of a mixer, whip the butter and cream cheese on high speed for about 5 minutes, scraping the bowl down as necessary. Reduce the speed to low and slowly add the powdered sugar until all is incorporated. Add the vanilla and mix to combine. Increase the speed to medium high and whip for a few minutes until the frosting is light and fluffy, scraping the bowl as necessary.

This is seriously the perfect frosting: the texture is perfect for piping or spreading, it's not too sweet with just enough of the tangy cream cheese taste, and it always turns out just right. It balances the rich sweetness of the Guinness cakes perfectly. I used a medium-flower piping tip to apply the frosting, and gave my cupcakes a light sprinkling of chocolate doodles.


I am very proud of how adorable and tasty they turned out! They were the perfect cute dessert for a simple and quiet celebration of my sweetheart's birthday.

 
Love you, babe! xxxxx

Saturday, 2 June 2012

White on White Cupcakes

I recently posted a recipe for basic vanilla cupcakes with cream cheese icing. They made rich, buttery cakes, but a friend of mine tried it and found the batter very thick. While this problem can be remedied by adding little splashes of milk, I tried another vanilla cupcake recipe, with a more traditionally runny batter that's easily measured in the cupcake pan with a ice cream scoop.

Not only did those new cupcakes turn out to be delicious, they also turned out to be my favorite vanilla cupcakes of all the recipes I have tried so far! The vanilla flavor is quite present, but not overpowering and the crumb is light and moist. Just heavenly!

White cupcakes according to Betty Crocker's "Big Books of Cupcakes" (for 24 cupcakes):

2 3/4 cup all-purpose flour
3 teaspoons baking powder
1/2 teaspoon salt
3/4 cup unsalted butter, room temperature
1 2/3 cup sugar
5 egg whites
2 1/2 teaspoon vanilla
1 1/4 cup milk

Preheat oven to 350 degrees, and line a muffin pan with paper liners. In a medium bowl, mix flour, baking powder and salt; set aside. In a large bowl, beat the butter on medium speed for 30 seconds. Gradually add sugar, beating well after each addition and scraping the bowl occasionally. Beat 2 minutes longer. Add egg whites, one at the time,  beating well after each addition. Beat in vanilla. On low speed, alternatively add flour mixture, about 1/3 of mixture at the time, and milk, about 1/2 at a time, beating until just blended. Divide batter in the lined baking cups, filling them about 2/3 of the way. Bake for 18 to 20 minutes, or until a cake tester inserted in the middle comes out clean. Cool in the pan for 5 minutes before transferring to a cooling rack. Wait until completely cooled to frost.


They make a lighter and fluffier cake than the previous recipe, so I decided to pair them with this yummy fluffy vanilla icing, from "Martha Stewart's Cupcakes":

1 1/2 cup (3 sticks) unsalted butter, room temperature
4 cups confectioners sugar
1/2 teaspoon vanilla extract

Beat the butter on medium speed until pale and creamy, about 2 minutes. Reduce speed to medium. Add confectioners sugar, 1/2 cup at a time, beating well after each addition and scraping down the bowl as needed. After every 2 additions, raise the speed to high and beat for 10 seconds to aerate the frosting, then return to medium. This process should take about 10 minutes. The frosting will be very pale and fluffy. Add the vanilla extract, and beat until the frosting is smooth.

Of all the vanilla icings I have tried, this one is my undisputed favorite: it's super-creamy with a great buttery taste. But most importantly, it's not too sweet. The biggest problem I've had with vanilla icings is that the taste of sugar tends to completely take over, but this icing seems to have the perfect butter/sugar proportion. The rich, silky texture is also to die for. As you can see, it pipes nicely into lovely little swirls.


I brought those in lieu of birthday cake for my little brother's 22nd birthday lunch and got raves! Probably because as basic as a vanilla cupcake with vanilla icing may sound, it definitely has this nostalgic quality to it that makes it ideal for birthdays. There is a little taste of early birthday parties to this combination that never fails to satisfy.

Happy birthday, baby bro!

Thursday, 12 April 2012

Perfectly Simple Vanilla Cupcakes

A good vanilla cupcake is the pastry equivalent of a little black dress: it's perfect for every occasion. Birthday party? Vanilla cupcakes! Baby-shower? Vanilla cupcakes! Easter lunch? Vanilla cupcakes! Girls night in? Vanilla cupcakes!

O.K., I'll admit that when PMS-ing, chocolate cupcake is more de rigueur, but for pretty much everything else, vanilla cupcakes work.

I strongly object to anyone calling vanilla cupcakes (or little black dresses) boring! When did vanilla get such a bad rep as dull and conventional? I'll take classic, creamy vanilla ice cream drizzled with a shot of limoncello or maple syrup any day over ridiculous and overly sweet flavors. Same with cupcakes: I prefer Audrey Hepburn to Lady Gaga, even in pastry-metaphors.

Classics never get old, and as Leonardo Da Vinci himself said: "Simplicity is the greatest elegance". Anyone who enjoys baking needs a basic vanilla cupcake recipe they can play with, use to test out various icing experiments, or get ready in a jiffy when unexpected reasons to pig out suddenly arise.

I sneaked this recipe off www.browneyedbaker.com, since I had such a success in February with the red velvet recipe I found on that site. I wanted a no-muss no-fuss vanilla cupcakes recipe, that I could make with stuff I already had at home (not in the mood to hunt down non-self-rising-cake flour, thank you very much, Ms. Stewart)... and I really wanted to use my new stand mixer again!!

Yes, I recently gave myself a big and shiny present, in the shape of a giant KitchenAid stand mixer. It's beautiful and so efficient that I feel completely lazy using it to bake, because I have nothing left to do besides measuring ingredients. I love it to bits and I intend to use my Easter break to try my hand at making some home-made bread!

But enough about my toy, let's get back to the cupcakes:

1½ cups all-purpose flour
1 cup granulated sugar
1½ teaspoons baking powder
½ teaspoon salt
1/2 cup (1 stick), room temperature
½ cup sour cream
1 large egg , room temperature
2 large egg yolks , room temperature
1½ teaspoons vanilla extract

Adjust oven rack to middle position; heat oven to 350 degrees. Line standard muffin tin with paper liners. Whisk together flour, sugar, baking powder, and salt in bowl of standing mixer fitted with paddle attachment. Add butter, sour cream, egg and egg yolks, and vanilla; beat at medium speed until smooth and satiny, about 30 seconds. Scrape down sides of bowl with rubber spatula and mix by hand until smooth and no flour pockets remain. Divide batter evenly among cups of prepared tin. Bake until cupcake tops are pale gold and toothpick or skewer inserted into center comes out clean, 20 to 24 minutes. Remove the cupcakes from tin and transfer to wire rack; cool cupcakes to room temperature before frosting.

As I mentioned in a previous post, I can't get enough of cream cheese frosting, so I whipped up a batch to crown my lovely classic vanilla cakes with!

1 stick (1/2 cup) butter, at room temperature
1/2 cup cream cheese, at room temperature
2½ cups powdered sugar
1 tablespoon vanilla extract

Using the whisk attachment, whip the butter and cream cheese on high speed for about 5 minutes, scraping the bowl down as necessary. Reduce the speed to low and slowly add the powdered sugar until all is incorporated. Add the vanilla and mix to combine. Increase the speed to medium high and whip for a few minutes until the frosting is light and fluffy, scraping the bowl as necessary.


A lot of my coworkers have their birthday in early April, so I baked a double batch and got 24 innocent-looking, but devilishly delicious little white cakes! The flourishes of the icing seemed decoration enough for my little creations, so I left them plain; their moist, sweet crumb was all the ornament they needed!