Tuesday, 20 December 2011

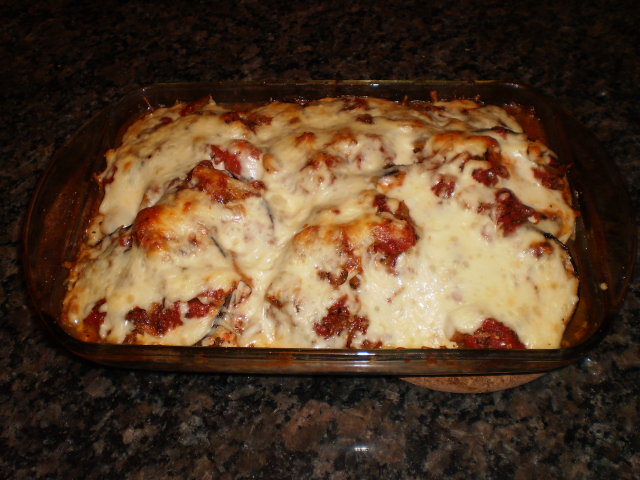
Aubergine Parmigiana (Some Assembly Required)

My love of eggplants is no secret. This recipe is one of my favorite ways of enjoying them; it also has a special place in my heart because cooking this dish led me to two very important realizations.

The first time I made eggplant parmigiana was when I was just starting to see cooking as something more than just boiling water or preheating the oven. I carefully prepared this dish and when I sat down and took a bite, it knocked my socks off. I was impressed with how delicious it was, but also by the fact that I had cooked this little plate of Heaven myself. Wow! I had never known I could do that!! I had never known this was so fun and rewarding! Eating my first home-made eggplant parmigiana taught me that not only could I cook, but I also loved it. Talk about a glorious start to my punk-housewifery!

The other thing I realized as I was stuffing my face with this glorious mess of melt-in-your-mouth veggies and cheese was that I could never be vegan. Vegetarian, maybe. But life without cheese?! Life without mozzarella, Brie, Jalsberg, goat cheese, Camembert, havarti, Gruyère? My French and Italian blood told me that would not be a life worth living. Don't get me wrong: I totally respect veganism and enjoy more than a few vegan dishes on a regular basis. But cheese is something I would never be able to give up. And a helping of eggplant parmigiana sealed the deal for good. My love affair with cheese will endure until my dying day.


There are many recipes for eggplant parmigiana out there. Some people think you should fry your eggplant, others swear by grilling. I side with the latter, not just out of concern about oil and fat, but simply because I prefer the texture. Some people also prefer to purée the tomato and onion sauce, but I like the chunky veggies bits. I leave those details to your discretion, but I find a thick sauce gives the dish a more rustic flair, which I just love. I also dig the crunch of the onion and the savory burst of tomatoes. If you want to have a smooth sauce, just pulse it with an immersion blender before layering the dish. Easy as π!

This recipe is loosely based on the one in "Jamie's Italy", and serves 4 as a vegetarian main dish, or 6 to 8 as a side-dish. It's to die for with lamb roast, but I like it just by itself, with some crusty bread to mop up the sauce and a glass of strong red wine (namely, some Dogajolo, because I'd drink that with everything Italian).

2 large eggplants
1 yellow onion, chopped
3 cloves of garlic, peeled and minced
2 tablespoons oregano
2 tablespoons Italian herbs
1 (24 ounce) can whole tomatoes
1 large handful fresh basil leaves
5 to 6 large handfuls of grated Parmesan cheese
5 to 6 large handfuls of grated Mozzarella cheese
olive oil
sea salt and ground pepper
Red wine vinegar
Breadcrumbs

Remove the stalks from the eggplant and slice them into 1 cm thick slices and sweat them in a large plate. Set aside until the have sweated a thin layer of water; pat them dry. While the eggplants are sweating, preheat 2 glugs of olive oil in a large pan over medium heat. Add the onion, garlic, oregano and Italian herbs, and cook for 10 minutes, until the onion is soft and the garlic is lightly colored. Put the tomatoes in a bowl and break them up with your hands into small chunks, then add to the pan. Give the mixture a good stir, put the lid on and let it simmer for 15 minutes.

 
While the sauce simmers, preheat a grilling pan over high heat and grill the eggplant (in batches of 4 slices) until they have nice char marks on both sides.

 
Preheat the oven at 375 degrees. By this point, the sauce should be reduced and sweet. Season it carefully with salt and pepper and a small glug of red wine vinegar, and add the basil leaves. In a large Pyrex dish, layer the ingredients as follow: one thin layer of tomato sauce, a layer of eggplant, two handfuls of Parmesan and two handfuls of Mozzarella.


Repeat until you have used up all the eggplant, and cover with a bit more sauce and what is left of the cheeses, topped with a sprinkling of bread crumbs. Place in the oven and bake for half an hour, until golden, crisp and bubbly.


Obviously, choose good-quality cheese, and your dish will be so good you'll want to marry it. The ideal is Parmgianno Reggiano and buffalo mozzarella you grate yourself. Kraft Parmesan and Petit Québec mozzarella just don't cut it; you can easily do better than that without having to step in a fancy fromagerie.

Since my baby-brother doesn't like eggplants, we almost never ate this dish at home. But now that I mastered it, I make it for company and people go crazy for it. Oh, the delights those eggplant-phobics are missing. You can make this dish with zucchinis instead of eggplants, but treat yourself to the real deal at least once. It can be eaten hot or cold, and reheats quite well. Not that you'll have leftovers, but you know…

Monday, 19 December 2011

Tikka Masala Chicken

As I mentioned before, my boyfriend loves spicy food, and he introduced me to the wonder that is curry. Of course not everyone handles spices like he does: some of us have sensitive taste buds that could be shocked into oblivion by a first encounter with an extremely hot Indian treat. Luckily, there are plenty of mild curries out there that can warm us from the inside out without making us feel like we are going to self-combust. Even when it comes to the spicier curries, I prefer to tone it done a wee bit because I love to taste the great variety of different flavors within a dish. And many yummy things are thrown in a curry; it would be a shame to drown out any of those flavors!

Curries make amazing winter food (and comfort food, for that matter), not just because of the spices, but also because they are generally really rich and full of chunks of veggies. Served with rice, they can be a complete meal, totally satisfying and very tasty. I prefer the creamier ones with chicken and the more robust blends with pork or lamb, but all the curry recipes I post are easily veganized by substituting the meat for tofu. I've veganized all my curries at one point or another, and I always loved the result. Just adjust your cooking time, as tofu doesn't need to cook as long as dense meat cubes! I'll usually make sure my pieces of tofu are nicely browned on a few sides, and let the curry simmer for 15 to 20 minutes: it does the trick.

Tikka Masala is a lovely mild curry that can make a great introduction to making Indian food at home. You need few ingredients and the method is very simple. It's a curry that is incredibly popular in Britain, so the Indian authenticity of tikka masala is as debated as the true blue Chinese origins of General Tao chicken. But hey, they both taste awesome, so let's enjoy!

As with my previously posted Kashmiri Masala, I recommend you use Patak's curry paste for this recipe. The main spices in Tikka are chile, paprika and cayenne, and the paste in wonderfully fragrant and gooey.

Use this curry when you need an elegantly presented, super-easy to make meal. It's incredible what some slivered almonds, a dollop of plain yogurt and some lemon wedges can do to make this dish gorgeous!

4 skinless, boneless chicken breasts
2 medium yellow onions
1 fresh red chile
1 thumb-size piece of fresh ginger root
1 small bunch of fresh cilantro
Peanut of vegetable oil
1 teaspoon of butter
1/2 cup Tikka Masala paste
Sea salt and ground pepper
1 (14 ounce) can diced tomatoes
1 (14 ounce) can coconut milk
1 cup natural yogurt
1 small handful of sliced almonds
1 lemon

Slice the chicken breasts lengthways into 3/4 inch strips. Peel, halve and finely slice the onions. Finely slice the chile. Peel and finely slice the ginger. Pick the cilantro leaves and set aside, then finely chop the stalks. Put a large casserole-type pan on medium heat and add a couple of glugs of peanut oil and the butter. Add the onions, chile, ginger and cilantro stalks and cook for 10 minutes, until the onions are soft and golden. Add the curry paste and the chicken strips. Stir well to coat everything in the paste, and carefully season with salt and pepper. Add the tomatoes and the coconut milk. Fill one of the empty cans with water and carefully pour it into the pan and stir again. Bring to a boil, then turn the heat down and simmer for 20 minutes with the lid on, stirring occasionally. Add water if it seems to be drying out. When the meat is cooked and tender, taste and add a bit more salt and pepper if necessary. Serve with basmati rice, a few dollops of yogurt, a sprinkling of almonds, the cilantro leaves as garnish, and lemon wedges to squeeze over.


I was out of yellow onions that night, so I used a red onion, which gave the dish a pink hue, and a slightly sweeter taste than usual, but I do love the piquant taste of red onions, so there were no complaints. Cooked in this rich and creamy sauce, the chicken strips become very tender. It's a beautiful dinner for a cold evening, and it tastes delicious reheated, so save the leftovers for the next day!

Sunday, 18 December 2011

Hot Stuff Cupcakes

Lately, I have been obsessed by the taste of dark chocolate and chili. Whether it's the Lindt Excellence Chili bar or David's Tea's Chocolate Chili Chai, bring it on! I just can't get enough of the chocolaty sweetness and the little spicy bite that creeps up on your taste buds. Divine!

It's the commonly held belief that the Mayans were the first to blend cocoa with chile, and we still get so many recipes from Mexico that blend the two flavors (I'm working on some chili al mole... stay tuned!). That was definitely a stroke of genius on their part! Most people aren't used to it, and it does take an adventurous palate to really enjoy it, but that spicy chocolate taste grows on you, and before you realized what happened, you are hooked.

As I was browsing on Cupcake Rehab (an awesome baking blog written by a fabulous lady; check it out at http://cupcakerehab.com/), a recipe for vanilla-cinnamon cupcakes with Mexican hot chocolate frosting caught my eye. I bookmarked it, got busy with stuff and kinda forgot about it... until a coworker asked if I could bake some cinnamon cupcakes for her going away party.

Insert maniacal laugh here.

Those cupcakes turned out not only to be a roaring success at the going-away party, but the frosting became my favorite chocolate frosting... like, ever! Sweet and creamy with that amazing spicy aftertaste that lingers at the back of your mouth with every bite.

If you are looking to spice up the classic vanilla-chocolate combination, this is the perfect way to go, but it is not for the faint-hearted! The spicing is not overpowering, but it is very present nonetheless. If spices are not your thing, stick to safer, times-tested flavors. But if you want to experience a whole new world of chocolate-awesomeness, get your hands on:

1 cup unsalted butter
2 cups sugar
4 large eggs
3 cups sifted all-purpose flour
1 ½ teaspoons baking powder
2 teaspoons ground cinnamon
½ teaspoon salt
1 cup whole milk
1 ½ teaspoons vanilla extract

Cream the butter in a stand mixer until smooth and light. Add sugar and continue to mix until fully incorporated and fluffy. Add 1 egg at a time, beating well after each addition. In a medium bowl sift together flour, baking powder, cinnamon, and salt. Preheat oven to 350° degrees. Combine milk and vanilla. Add portions of the flour mixture and milk mixture to the electric mixer, alternating, starting and ending with flour. Pour evenly into cupcake pans lined with paper liners, about ½ – ¾ full. Bake for 30-35 minutes or until cupcakes spring back to the touch.

Mexican hot chocolate frosting:
1 cup unsalted butter
4 to 5 cups confectioner’s sugar
¼ cup milk
½ cup cocoa powder
2 teaspoons ground cinnamon
1 teaspoon chili powder
1 teaspoon cayenne pepper
2 teaspoons vanilla extract
2 tablespoons brewed coffee

Cream butter in the bowl of an stand mixer. Add 1 cup sugar, cocoa powder, chili powder, cayenne pepper, coffee and ¼ cup milk. Mix until thoroughly combined. Add 2 cups sugar and vanilla. Mix. Add the rest of the sugar, 1 cup at a time, and mix. If needed, add ¼ cup more milk, or 1 cup sugar. Continue until consistency is satisfactory.

Once your cupcakes are cooled, frost and sprinkle with some freshly ground cinnamon.


This makes enough batter and icing for approximately 24 cupcakes. They disappeared in the blink of an eye at work and at home, so don't be afraid to make the full recipe; you won't waste any!

I want to stress the "freshly ground" aspect of the cinnamon used through the entire recipe: I know how tedious it is to ground cinnamon sticks on a microplane grater. But take my word for it, the reward of the incredibly fresh flavor is well-worth the effort (and possible injuries). When you buy ground cinnamon, half the flavor has already evaporated during the packaging process and it's just so disappointing. Microplane graters are cheap (20$ at Stokes) and really user-friendly. I didn't know I wanted one until I had mine, but now, I wonder how I used to live without it. Go get one!

The cake tastes delicate and has a light texture, complimented oh-so well by the bold icing. Next time I make this icing, it will be to frost chocolate cupcakes, and get the ultimate Mayan chocolate cupcakes. I am really looking forward to that!

Saturday, 10 December 2011

Bacon Cupcakes?! Oh yeah, baby!

Cupcakes are my péché mignon. That expression was really made for cupcakes, as it translates literally into "cute sin", though it is the French way of saying guilty pleasures. But I never feel guilty about eating cupcakes, so I'll stick to the literal translation on this one! I am actually surprised that I haven't posted a cupcake recipe here before, but since I started this blog, I had precious little occasion to bake some. As the Holidays are approaching (and as people around me have cupcake-worthy things in their lives - like new babies, going away parties, etc.) I am on a cuppy-cake baking spree for the month of December!

This is really good news to me because cupcakes are my all-time favorite thing to bake. They are just so damn cute, delicious and irresistibly comforting. And with a little creativity, you can make a unique cupcake for every occasion imaginable… I first started baking them one sad, lonely evening when I had a massive craving for something sweet. Now I own a ton of cupcake cookbooks, I follow 3 or 4 different cupcake-blogs and I collect pastry-bag tips, liners, obscure ingredients and extracts, and I have a massive stack of cupcake recipes with a "to try!" label on them. (Psst! I am so cupcake-obsessed that I own cupcake-jewelry and I have a bad-ass cupcake tattooed on the nape of my neck…)

But let me tell you why I decided to bake this very unlikely cupcake recipe.

I think we all have a bacon-crazy friend. Mine is named Sam, and though he likes all kinds of food, bacon has a special place in his heart (his birthday party theme was Epic Meal Time; this is how insane this bacon fixation is). And Sam was in need of a little cheering up. So what is a devoted friend to do for a bacon fanatic with the blues? Why, bake him some bacon cupcakes, obviously!! When I saw this recipe on Chockylit's cupcake blog, I knew I had just the thing to make Sam very happy, if only as long as he was eating the cupcakes. And I had no doubt he would eat them.

I invited Sam over, dubbed him my sous-chef and lent him an apron. The rest is history, or rather, the strange result you have when you get two crazies in a kitchen with baking supplies and booze. Oh, come on! A baking lesson wouldn't have been half the fun without beer!


It may seem weird to some to mix super-sweet stuff like chocolate-covered toffees and maple syrup with bacon, but they go surprisingly well together. In Québec, when we go to the sugar shack in the spring, we douse all kinds of breakfast meats in maple syrup and it's awesome!!

I really had no idea what these would taste like, and to tell you the truth, I was a bit apprehensive... but holy cow were they delicious! The cake was obviously very rich and chocolatey and the icing had a great sweet cheesiness and creamy texture. The bacon flavor in the cake was unusual, but freakishly addictive. One of my lovely friends who had first declined to try them ended up asking for an extra one she could take home!
I guess Sam was right and that the awesome-level of everything is heightened exponentially when you add bacon!

Here is the recipe, altered slightly from the original featured on Cupcake Bakeshop by Chockylit. I got 16 cupcakes from it and a huge amount of icing.

Toffee, chocolate and bacon cupcakes:

1/2 cup butter, room temperature
1 cup + 2 tablespoons sugar
2 large eggs, room temperature
3/4 cup flour
1/2 teaspoon baking powder
1/4 teaspoon baking soda
1/2 cup unsweetened cocoa powder
1/2 cup milk
1 teaspoon vanilla
3-1/2 slices cooked bacon, cut into chunks
1/3 cup chopped chocolate covered toffee (I used whole Mini Rolos)

Preheat oven to 350 degrees, and line a muffin pan with cupcake liners. Beat butter until softened. Add sugar and beat until light and fluffy, about 2 minutes. Add egg and beat until well combined. Measure the flour, baking powder, baking soda and cocoa powder into a small sized bowl and whisk to combine. Measure out the milk and vanilla and stir to combine. Add about a third of the dry ingredients to the butter/sugar and beat to combine. Add about a half of the milk/vanilla and beat to combine. Continue adding, alternating between dry and wet and finishing with the dry. Gently fold in the bacon and toffee chunks. Scoop batter into cupcake cups about 1/2-2/3’s full. Bake cupcakes for about 22-25 minutes or until a cake tester comes out clean. Frost with the icing and garnish with a small chuck of bacon or a chocolate covered toffee.

Maple cream cheese frosting:

2 packages cream cheese
1/2 cup butter
4 cups sifted confectioners sugar
1/4 cup maple syrup

Bring butter to room temperature by letting it sit out for 1 or 2 hours. Sift powdered sugar into a bowl or onto parchment. Beat butter and cream cheese at medium speed until creamy. Add 3 cups of the powdered sugar and half of the maple syrup. Beat until combined. Add more maple syrup and confectioners sugar until desired flavor, consistency, and sweetness. Refrigerate for 20 to 30 minutes before frosting.

This makes enough frosting for 24 to 30 cupcakes, so it can easily be halved, or saved in the fridge for a few days until you bake another batch of cupcakes to pipe it on.

I used a disposable plastic pastry bag, because I just wanted to pipe on a generous blob of icing and it worked like a charm. I topped the little guys with a Mini Rolo and they looked so cute!


Obviously, no substituting the real bacon for bacon bits! No, no, no! Use the real deal, being careful not to let it get too crispy when you cook it, because getting regularly-shaped chunks is impossible if the bacon slices are cooked too stiff. But you definitely want the smokey flavor in there, so I suggest using thickly sliced, old-fashioned bacon. President's Choice makes my favorite, but use any brand you like.

And while bacon cupcakes may not be the cure to the blues, they do make people really happy as they stuff their faces!


Monday, 5 December 2011

Carrot Soup... and Some More Carrot Soup

Carrot soup is a concept that was a really hard sell for me. It brought up images of the puréed carrots that are fed to babies and I have to admit that the thought made me queasy. I remember the stuff my mother used to prepare for my siblings when were younger, and it wasn't always pretty. I can safely say that I have outgrown baby food.

I was also afraid of how underwhelming the taste would be. Let's face it, carrot juice tastes bland and, while that may satisfy some hippies, my taste buds need a bit more stimulation than that. Don't get me wrong, I'm more than happy to eat healthy but please, make it taste good! And make it look good too!

However, since carrots are little sticks of health, packed with vitamin A, antioxidants and dietary fibers, it's really worth trying to give them back a bit of glory and preparing them in ways that are really appetizing (and a little more varied than baby carrots dipped in hummus…). I confess I got lazy in that endeavor because my chopping technique is deeply flawed. Cutting up the little orange buggers generally ends up with carrot pieces flying all over the kitchen so I usually chicken out of cutting them by grating them to use as a garnish for salads and a few Asian dishes.

So when my dear friend PL requested I post a carrot-orange-ginger soup recipe, my first thought was: "Not those damn carrots again!!". But, ginger and orange are a match made in Heaven flavor-wise and if you take the great nutritional value of carrots, combined with the vitamin C of the oranges and the wonders of the ginger, you get a winning combo as far as winter soups are concerned. It also turns out to be very low in calories and fat, so I had to concede that the idea was genius (who can say no to low-fat when winter love-handles are starting to show?) and I started working on the perfect combination of flavors.

While I hunted down a good recipe to combine those ingredients, I ran across another delicious blend of flavors I wouldn't have thought to mix with carrots: coconut milk and curry. It's obviously not as low-fat (though low-fat coconut milk is a great choice, as it won't sacrifice the taste), but the spicy kick is great and it has a lovely creamy texture.

My boyfriend and I also couldn't agree on which of the two we liked best so I tried again and again to combine the two recipes and create one ultimate carrot soup, but it was never quite right.  I finally decided to keep the two recipes in my collection and to use whichever one I had the ingredients for in the fridge when I fancied a good soup. Both are easy and quick to make, yummy and comforting. It would be criminal not to share them in the colder months of the year.

The first recipe is based on the one found in Jeanelle Mitchell's "For the Love of Soup", but modified to death. It resurrected into the most awesome wintery comfort food; something to be served to people afflicted with a cold, and to ginger-lovers!

2 tablespoons olive oil
1 large sweet onion, chopped
4 garlic cloves, chopped
4 cups carrots, peeled and chopped
1 thumb-size pieces fresh ginger, chopped
2 cups vegetables broth
1 cup orange juice
1 cup water
1 tablespoon cardamom
1 tablespoon tumeric
Sea salt and ground pepper
2 tablespoons cilantro or chives, chopped
1/2 cup sour cream or plain yogurt (optional)

In a large saucepan or stock pot, heat up the olive oil. Add the garlic, onion and carrot and sauté until the onion is soft and golden, 6 to 8 minutes. Stir in the ginger, tumeric and cardamom, and fry for another 2 to 3 minutes. Add the vegetable broth and orange juice and water and bring to a boil. Lower the heat, cover and simmer for 20 minutes, until the carrots are tender. Remove from the heat and let cool for about 5 minutes. Using an immersion blender, pulse the soup until smooth and creamy. Put back on the heat, season with salt and pepper to taste and simmer until heated. Serve with a dollop of yogurt or sour cream and a sprinkling of cilantro or chives.

Obviously, omit the yogurt or sour cream, and you have a gorgeous vegan soup. I find the garnish doesn't add or subtract to the equation, so it really is up to personal taste and to whether or not you count the calories.


The second recipe is from my dear Isa Chandra Moskowitz's "Vegan With a Vengeance". As it has a creamier texture than the previous one, it somehow feels a bit more elegant. You can save the fancier bowls for this one, but it tastes just as great in the more casual ones.

4 cups carrots, peeled and diced
1 large onion, chopped
2 tablespoons peanut or olive oil
2 cloves garlic, minced
1 to 1 1/2 tablespoon curry powder
1/2 teaspoon salt
Ground pepper
3 cups vegetable broth
1 (13 ounce) can coconut milk
1 tablespoon maple syrup

In a stock pot over medium heat, cook the carrots and onions in the oil for 7 to 10 minutes, stirring occasionally until the onions have browned. Add the garlic, curry powder, salt and a few dashes of ground pepper. Sauté for 1 more minute. Add the broth, cover and bring to a boil. Lower the heat and simmer for 10 to 12 minutes, or until the carrots are tender. Add the coconut milk and bring to a boil. Turn the heat off. Use an immersion-blender to purée the soup until it has the desired texture. Stir in the maple syrup and serve.


Double the curry powder if you want it spicy. I prefer to keep it moderate because I don't want to drown out the coconut flavor, but that's just me!

Beef them up with a slice of nice crusty bread and an uber-simple salad of mixed green or a garden salad. You can't get a healthier meal than that! Since both recipes wield 4 to 6 servings and reheat very well, I love to take those soups as lunches alongside a sandwich. You can double the quantities and freeze your left overs; they will keep for a couple of months in a sealed plastic container.

A very big thank you goes to PL, for breaking my prejudiced idea that carrot soup is boring. Now I know that a bit of original spicing takes it from "uninspiring" to "divine"!

Wednesday, 30 November 2011

Bolognese Sauce, or Why Mothers' Recipes are Timeless Classics

Since I moved out of my mother's house, I got the occasional craving for her amazing bolognese sauce with some spaghetti. When that would happen, I would face the long bus ride back to the 'burbs, sneer at everything, but go back home with a full belly and a big smile. But it was inevitable that sooner or later, I'd decide to grow up, make my own damn bolognese sauce and save myself the bus ride. In an act of rebellion, I figured I'd make a recipe that wasn't my mother's.

That was mistake numero uno.

Mistake numero dos was assuming that since I'd found a few really great recipes in Jamie Oliver's "Food Revolution", they would all be equally awesome and that his bolognese would be delicious. My mamma and my nonna never put any veggies in their sauce, but I figured "what the Hell", and went through the trouble of chopping some carrots and celery into tiny pieces and throwing them in there. He also added bacon to his sauce, but then he adds bacon to almost everything...

Despite the great variety of ingredients in the pot, the result was watery and bland. My boyfriend was also far from impressed, so I tried a few additions and subtractions, but I was forced to the following dreadful conclusion: my mother's sauce tasted a million times better. All those veggies simply don't have their place in a honest meat-sauce: save them for the salad you serve as an entrée! And bacon, well that was just Jamie being British. No Italian in his right mind puts bacon in a sauce where it's taste will get drowned with that of the beef and spices.

Of course, trying to replicate a parent's recipe is a wild goose chase, unless you inherit the pot and stove along with the recipe. You first need to accept that it will never taste exactly the same. Then you have to modify it slightly until it's delicious, albeit differently so from your mom's. This is what I came up with after many experiments with various spices: the balance of savory, oregano and basil with a hint of chili heat just works so well... and it tastes almost exactly like the stuff my mom still feeds me from time to time.

I was lucky enough to inherit my grandmother's Le Creuset 5 1/2 quart Dutchoven. It's bright orange, beautiful, in perfect condition and has been used by the women in my family for 3 generations. Good as new. My nonna made everything in that Dutchoven and I love it to bits. My bolognese doesn't taste exactly like hers, but making it in Betty-the-orange-Dutchoven gives it a nostalgic touch that adds to the taste (or maybe I suffer form psychosomatic delusions). This sauce can be served on pasta (4 to 6 helpings), used in a lasagna or to fill cannelloni. It keeps in the fridge for 4 days, and in the freezer for about a month (if stored in a good air-tight plastic container, of course).


2 medium yellow onions
4 cloves of garlic, chopped
Olive oil
1 tablespoon dried oregano
1 tablespoon dried savory
1 tablespoon dried basil
1 teaspoon chili flakes
1 pound lean ground beef (or a mix of ground beef and pork)
1 (28 ounce) can diced tomatoes
1 (14 ounce) can tomato paste
Sea salt and ground pepper
1 small bunch of fresh basil
4 ounces grated Parmesan cheese (optional)
Red wine vinegar (optional)

Peel and finely chop the onion. Preheat a large casserole-type pan (or amazing Dutchoven) on medium heat. Add a couple of glugs of olive oil, the onions, the garlic and the spices. Cook the onions until soft and slightly golden. Stir in the ground meat and cook for a few minutes, until the meat crumbles. Add the diced tomatoes and the tomato paste. Fill the tomato paste can with water and carefully add about 1/2 cup of water to the mix. Stir in a good pinch of salt and a lot of freshly ground black pepper. Mix well, and bring to a boil. Turn the heat down and simmer for 45 minutes, with the lid on, stirring occasionally. Remove the lid and simmer for another 15 minutes. Pick the basil leaves and put them aside. Remove from the heat and add a swig of red wine vinegar and half the Parmesan (if using either). Tear the bigger basil leaves and stir them in. Mix well, taste, adjust the seasoning as needed. Serve sprinkled with the rest of the Parmesan and garnish with the smaller basil leaves.


As a general rule, when I buy canned tomatoes, I get the Eden Organic brand, as they don't add any salt to their goodies. But their diced tomatoes do not have enough big chunks, which were a staple of the traditional sauce served by mom. So for this recipe only, I ignore my rule and get a big can of Les Compliments brand diced tomatoes (lowest sodium content I could find with the appropriately sized pieces of tomatoes). Feel free to use whole canned tomatoes instead of diced, but make sure you break them up well with a wooden spoon. If you can, use the tomatoes canned with a bit of basil or garlic to add a bit of extra seasoning.

If you feel bold, try the variation alla Max: instead of water, add 1 cup of red wine with your tomatoes and tomato paste, and omit the red wine vinegar at the end! It adds a richness to the taste that makes my boyfriend go crazy!

If you are a spice freak, you can definitely use a tablespoon of chili flakes instead of a teaspoon, or 1/2 a fresh red chile, finely chopped; but I would advise against adding anymore than that. The star of the show in this sauce is ground beef. It should be the main flavor you enjoy with this sauce, so be careful not to drown it in chile. Just sayin'. My aunt used to add a few drops of Tabasco to her plate, and if my grandmother or mother would catch her in the act, she'd get a sharp wooden spoon whack on the head. Don't make me do it to you!

Sunday, 27 November 2011

Pastis Chicken

As much as I am obsessed with Paris, I am also totally fascinated with Provence. This undying love started when I was about five years old, and I got my little hands on Marcel Pagnol's books about his childhood (yes, I could read at a creepily advanced level quite early, thanks to my linguist mother and school teacher grandfather: the sadists used to give me dictations for - their - fun when I was less than 3-foot high). His descriptions of the country where he grew up are so loving, evocative and vivid that I just fell head over heels in love with everything Provence-ish. I find the accent so beautiful, the wines so amazing, the cuisine irresistible… I can never get sick of looking at pictures of the lavender fields, calanques (sea-side natural formations of stunning beauty) and papal palaces. When I need a solid dose of undiluted beauty, I go to my drawing room and take out the now dog-eared Pagnol or Jean Giono books and read until I am in tears of literary ecstasy.

(If a certain Russian hottie is reading this, there is a major hint about travel plans that could be devised in the foreseeable future… Just sayin'…)

But Pagnol is hands down my favorite French writer, and I have devoured his books, plays and movies. I know his work by heart. In his pages (and in the lines of his movies), there are very frequent mentions of the typical Provençal aperitif, pastis. I was in hysterics when I realized the S.A.Q. (Quebec's liquor store chain) carries the Ricard brand of pastis, and I make sure I get a bottle every summer, as it is the ideal summer drink, light and refreshing, with a little taste of sunlight and cicadas (no, it doesn't literally taste of cicadas, but you know what I mean). It's a liquor made from anise seeds, and tastes like sweet licorice. The proper French ways to drink it is in a old-fashion glass, diluted with flat water and a few ice cubes.

I was horribly insulted when I did an internship in France and was told by people my age that pastis was a drink for "les vieux cons" (an expression which basically means "lame old men"). Screw that; I kept ordering it anyway. I love it. If that makes me lame, I can deal with it.

I dig Provençal cooking, which is the perfect hybrid between French and Italian cuisine. So many of the ingredients I love are grown and produced there: olives (and their precious oil), tomatoes, onions, artichokes, eggplants, pine nuts, lemons, apricots, almonds… They also produce amazing cheeses and wines, and the most amazing cooking herbs like savory, thyme and oregano. It's by the sea, so they have a million ways of cooking fishes, mussels, shellfish… And all their cuisine is amazingly healthy, rich in vitamins and low in fat. Sounds to me like Provence just may be Heaven for the gourmandes like myself (again, wink-wink, nudge-nudge, baby!).

I've played around with Provençal recipes several times before, but it had never crossed my mind to cook with pastis. When I found the recipe below (in the brilliant Mireille Guiliano's "French Women For All Seasons"), I almost smacked myself because I cook with wine and spirits regularly, but it had never occurred to me to use pastis in food. Dummy. All the other ingredients also got my taste buds' attention. I just had to try it, and I had the last of this year's Ricard left from the warm days (I was so good this year, I barely finished a bottle). I also love any recipe that I can cook in Betty-the-Dutchoven;  it just makes me feel awesome and old-school.

2/3 cup pastis
1/3 cup and 3 tablespoons olive oil
Sea salt and ground pepper
1 3-pound chicken, cut into 8 pieces
2 onions, peeled and sliced
4 tomatoes, diced
4 cloves garlic, minced
2 teaspoons fennel seeds
2 teaspoons dried rosemary
2/3 cup black olives, pitted and chopped
1 cup fresh basil, slivered

Mix the pastis and oil. Season with salt and pepper, to taste. Arrange the chicken pieces in one layer in a shallow dish. Drizzle with the marinade and cover the dish with plastic. Refrigerate for at least 2 hours (up to overnight). Warm the last 3 tablespoons of oil in a Dutchoven over medium heat. Add the onions and cook until softened, about 6 minutes. Add the tomatoes, garlic and fennel seeds. Continue cooking for 15 minutes, stirring occasionally. Add the chicken and the marinade to the Dutchoven. Cover and simmer over low heat for about 30 minutes. Add the olives and 1/3 of the basil. Cover and continue to cook until the chicken is tender, about 30 minutes. Season to taste with salt and pepper, and serve with rice, garnished with the rest of the basil.

 
I loved this recipe on top of wild rice (President's Choice sells an awesome blend of brown rice and wild rice that works very well with saucy chicken dishes like this one). The book also suggested noodles, but I can't really see that as anything else than messy. On the other hand, baked potatoes would absorb the delicious cooking juices. So would couscous or quinoa, of course, so don't be shy to go down that more exotic road.

Do use a whole chicken: the fat from the skin and bones will absorb much more flavor that way, and keep the meat nice and tender. I tried substituting the whole bird for 4 chicken breasts, and they turned out a bit dry. The taste of the marinade is subtle, so don't be shy to add plenty of fresh pepper, and season it more generously with the herbs if you want it very fragrant.

And of course, you can drink pastis with it, but as it is more of a pre-meal drink, I suggest picking up a well-balanced white or rosé wine. Too dry would clash with the sweetness of the pastis, and too sweet would be off with the salty olives and onions.