Sunday, 19 February 2012

Pasta Alla Norma

Pasta Alla Norma is such a spectacular Sicilian recipe that it was named after the equally spectacular Bellini opera "Norma". I am not opera connoisseur, but I am a pasta expert and this dish is definitely worth an aria of praise. It's an elegant vegetarian sauce, with typically Sicilian, bold flavors.

My love for eggplants is no secret, so combining them with pasta in a lovely sauce full of tomatoes and basil sounds to me like a stroke of pure genius. If you can't find ricotta salata, don't freak out: ordinary ricotta does the trick. You can also use Parmigiano Reggiano, but don't grate it finely; use the biggest holes of your grater to get chunky pieces, instead of a dusting. As for the pasta, penne rigatte and spaghetti are the traditional choices (but I used fusilis for the pictures cuz I think they are the cutest pasta!). Here's what you need to make this recipe for 4 hungry folks:

1 large, firm eggplant
Olive oil
1 tablespoon dried oregano
1 tablespoon chili flakes
1 small yellow onion, finely chopped
4 cloves garlic, finely sliced
1 large bunch fresh basil
1 tablespoon white wine vinegar
2 (14-ounce) cans plum tomatoes
Sea salt and ground pepper
1 package dry pasta
1 cup ricotta salata, for garnish

Cut the eggplant into quarters, lengthwise. Cut them, across the length, into finger-sized pieces. Put the eggplant pieces in a colander, sprinkle with salt and let sit for about 30 minutes. Rinse well and pat dry. Preheat a large pan over medium-high heat and add a glug of olive oil. Fry the eggplants, making sure the oil coats all the pieces well. Sprinkle with the oregano. Use tongs to turn eggplants until they are golden on all sides. Proceed with the eggplants in batches, if needed. Turn the heat to medium and add the chile, onion and garlic. Stir everything and add a swing of white wine vinegar and the canned tomatoes. Break them up with the back of a spoon so that they aren’t too chunky. Turn the heat down and simmer 10 to 15 minutes, taste and add salt and pepper as needed. Add half the basil leaves to the sauce and stir well. Cook the pasta according to package instructions until al dente, drain, then add to the sauce, adding a bit of the pasta’s cooking water if needed. Mix well to cover the pastas in sauce. Divide between serving bowls and sprinkle with the remaining basil leaves and some ricotta.


You can also cube your eggplant instead of slicing it all fancy like I did, but that really boils down to presentation of your dish. I like it when what I cook looks pretty, and if you do, it's worth the extra effort.

I've also read one recipe where the eggplant was roasted, instead of fried. I haven't tried it, but if you are looking for a way to cut the grease from the frying, this is a great option. To roast an eggplant, slice it in half lengthwise and sprinkle with salt, to sweat. Preheat your oven to 400 degrees and line a baking sheet with parchemin paper. Give the eggplant a few minutes, then rinse it and pat it dry. Brush each half thoroughly with olive oil and place them, cut side down, on the baking sheet. Roast for 1 hour. The eggplant will "collapse" and the bottom will look a bit caramelized. Let it cool until you can cut them without burning your fingers, and cut it into chunks (or slices) as desired. Throw them in a pan over medium heat and proceed with the recipe.

By the way, roasted eggplant is an awesome veggie to serve as a side-dish, straight from the oven, with a drizzle of lemon juice and a sprinkling of dried thyme.

Even if I personally think that a life without cheese is simply not worth living, here's a little tip for vegans who want to enjoy this delicious sauce: basil-tofu ricotta, straight from the pages of "Vegan with a Vengeance". It won't fool any cheese-lover's palate, but it makes a very decent substitution for the veg-heads!

1 pound firm tofu, pressed
2 teaspoons lemon juice
1 clove garlic, minced
1/4 teaspoon salt
Freshly ground black pepper
10 to 12 fresh basil leaves, finely chopped
2 teaspoons olive oil
1/4 cup nutritional yeast

In a large bowl, mush the tofu up with your hands until it is crumbly. Add the lemon juice, garlic, salt, pepper and basil. Mush with your hands again until it has the consistency of ricotta cheese; this may take up to 5 minutes. Add the olive oil, stir in with a fork. Add the nutritional yeast and mix all the ingredients well with the fork. Cover and refrigerate until ready to use. This recipe wields about 2 cups.

A chianti is the ideal wine to serve with pasta all Norma, but any dry Italian red wine can stand in.

Wednesday, 15 February 2012

The Red Velvets of Love

I don't particularly like Valentine's Day. As with most commercial holidays, the crass consumerism it's based in makes me gag, especially since love should be celebrated every day, and not just on February 14th. That and when I was in high school, working as a cashier in a drug store, I once had a customer who bought a big heart-shaped box of chocolate... and a big box of condoms at 5:30 pm on Valentine's Day... This guy became the face of the holiday for me for a long, long time... I really wanted to punch it.

Even being in love and living with ze man didn't make this bright pink circus easier to stomach. But as Mary Poppins would say, a bit of sugar makes the medicine go down, and since Valentine's Day is definitely not going away, I might as well go through it eating something sweet!

It had been a while since I had baked some cupcakes, then I did it for a friend's birthday and now I can't seem to stop! And while I was not at all willing to make pink cupcakes or anything like that (I can't deal with pink. I am sorry, I guess I have no soul... True story: when I was a baby, if my mother tried to put pink clothes on me, I would shriek until she took it off and dressed me in blue. Make of that what you will.), I figured I might as well make something occasion appropriate. I had always wanted to try making red velvet cupcakes, so I dusted off the recipe I had selected and got to work.

If you Google "red velvet cupcakes" you will get pictures of blindingly red cupcakes. That makes me nostalgic for the days when my hair was that color, but I digress... I didn't want to make those fire-engine colored cakes, because they looked way too fake for me. For those who don't know (or who think it's simply ordinary yellow cake dyed red), red velvets used to have their distinctive red hue for 2 reasons that did not include food coloring:

1) Since a lot of food stuffs were rationed during World War II,  bakers used boiled beets to enhance the color of their cakes. Beets are naturally quite sweet, and they are very, very strongly colored (see my borscht recipe... my kitchen counter looked like a crime scene). Old red velvet recipes include grated boiled beets. Using beets also meant the cakes retained moisture well, so the cakes didn't dry out.

2) Chemistry! The reaction of vinegar and buttermilk (both traditional ingredients of red velvets) reveal the red pigment of the cocoa, known as anthocyanin. With modern Dutch-processed cocoa powder, the color is less pronounced, hence the necessity for red food coloring... in moderate quantity.

I followed the "Hummingbird Bakery Cookbook" recipe (via www.browneyedbaker.com), to make 12 lovely cupcakes:

4 tablespoons unsalted butter, at room temperature
¾ cup granulated sugar
1 egg
2½ tablespoons unsweetened cocoa powder
3 tablespoons red food coloring
½ teaspoon vanilla extract
½ cup buttermilk
1 cup + 2 tablespoons all-purpose flour
½ teaspoon salt
½ teaspoon baking soda
1½ teaspoons distilled white vinegar

Preheat oven to 350 degrees. Line a cupcake pan with liners. Cream the butter and sugar until light and fluffy, about 3 minutes. Add the egg. Scrape down the bowl and beat until well incorporated. In a separate small bowl, mix together the cocoa powder, vanilla extract and red food coloring to make a thick paste (I used a bit more than 3 tablespoons of red food coloring, because my cocoa wasn't turning into a paste, so I added few drops by few drops until it got the mushy texture I wanted. Of course, if you want your red velvets to glow in the dark, that would be the point where you could go nuts with the food coloring). Add to the batter and mix until completely combined. Make sure to scrape the bottom of the bowl, so that all the batter gets color. Slowly add half of the buttermilk. Add half of the flour and mix until combined. Scrape the bowl and repeat the process with the remaining milk and flour. Beat until smooth. Add the salt, baking soda and vinegar. Beat for another couple of minutes until completely combined and smooth. Divide the batter evenly between the cupcake liners and bake for about 20 minutes, or until a thin knife or skewer inserted into the center of the largest cupcake comes out clean. Cool for 10 minutes and then remove cupcakes from the pan and place them on a cooling rack to cool completely before frosting.


The traditional frosting for red velvets is cream cheese, something I am kind of addicted to, so of course, I indulged:

1 stick (1/2 cup) butter, at room temperature
1/2 cup cream cheese, at room temperature
2½ cups powdered sugar
1 tablespoon vanilla extract

Whip the butter and cream cheese for about 5 minutes, scraping the bowl down as necessary, until well incorporated. Slowly add the powdered sugar and mix well until all is incorporated. Add the vanilla and mix to combine. Keep whipping until the frosting is light and fluffy, scraping the bowl as necessary.


I used a large flower tipped-pastry bag to pipe on pretty swirls of frosting that I then lightly sprinkled with some red decorative sugar and voilà! The red velvet cupcakes of love! Not blindingly red, just a lovely, sexy shade of mahogany.


I know it's a lot of pictures, but aren't they the cutest thing? Not to mention delicious! The cake had the perfect firm-yet-moist cupcake texture and the tiny bit of cocoa in it was rich, but not over-powering. This cream cheese frosting recipe is my favorite: the sweet taste and the tartness of the cheese are perfectly balanced, and it's creamy and gorgeous (we tend to wrestle over who gets to lick the icing bowl once the cupcakes are frosted). Needless to say that the combo is an all-star win!

You can share these with your darling, or binge eat the whole thing, but I suggest offering at least one to someone you love -  a friend, sibling, colleague; whomever you think of who can use a little sugar!

Sunday, 12 February 2012

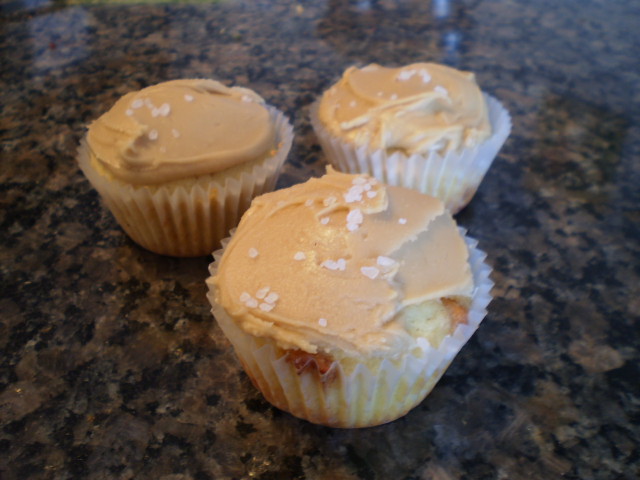
Butterscotch Cupcakes with Salty Caramel Frosting

When I was a little girl, caramel was my favorite sweet (my taste for chocolate developed when the hormones started wreaking havoc on my brain a few years later, but that's a whole other story...). My dad used to keep a bunch of tiny little Kraft caramel squares in his car's ashtray, so every time we'd hop in the car, I'd get one. Those were the days.

As usual, any excuse I can get to bake a batch of cupcakes is a good one. But I have to say I was especially pleased when my co-worker Tania selected these as her birthday cupcakes. There is something deliciously nostalgic and indulgent in the rich taste of caramel, and a sprinkling of coarse sea salt totally takes it to another level.

Cupcakes:
2 1/2 cups all-purpose flour
2 1/2 teaspoon baking powder
1/2 teaspoon salt
1 cup butter or margarine, softened
1 cup sugar
3 eggs
2 teaspoons vanilla extract
2/3 cup milk
3/4 cup butterscotch chips, coarsely chopped

Frosting:
1/2 cup butter or margarine
1 cup packed brown sugar
1/4 cup milk
2 1/2 cup confectioners sugar

Coarse salt for garnish

Preheat oven to 350 degrees. Line a muffin pan with paper liners. In a medium bowl, mix flour, baking powder and salt. Set aside. In a large bowl, beat butter, gradually add sugar, about 1/4 cup at the time, mixing well and scraping the bowl as needed. Add eggs, one at the time, beating well after each additions. Beat in the vanilla extract. Gradually mix in the flour mixture with the butter and sugar (about 1/3 of the dry ingredients at the time), adding 1/3 cup of milk along with each additions. Beat until just blended. Fold in the butterscotch chips. Fill cupcake liners 2/3 and bake for 20 to 25 minutes, until golden brown. Leave the pan to cool for 5 minutes, then transfer to a wire rack until completely cooled.

Meanwhile, in a 2-quarts sauce pan, melt the butter oven medium heat. Stir in brown sugar with whisk. Heat to boiling, stirring constantly. Stir in the milk and return to boiling. Remove from the heat; cool until lukewarm, about 30 minutes. Gradually and carefully stir in confectioners sugar until the desired texture and smoothness is reached. Frost the cupcakes with an offset spatula and sprinkle with coarse sea salt.

I am a rebel, so I didn't chop my butterscotch chips, and I over-filled my liners a wee bit. Also, I was originally vaguely horrified by the humongous amount of butter that goes in the batter... but I suppose if you can't trust Betty Crocker's "The Big Book of Cupcakes", who can you trust?

Though they tasted good, the frosting was very, very difficult to work with. It was a bit too dense to spread properly and stuck to itself rather than to the cupcakes. I think that I may have left it to cool a bit too long, and that it set prematurely. I did my best, but the result ended up looking like a cupcake Jackson Pollock would have baked. They tasted good but looked very messy. If I am to attempt this recipe again, I will carefully add milk until it is more manageable. After giving the recipe another shot, I discovered that the original instructions contained too much confectioners sugar, and that it was much easier to spread when only 2 to 2 1/2 cups were added to the butter and brown sugar mixture. It still needs to be worked quickly, and can be vigorously stirred from time to time, to keep it malleable.


I was very annoyed, because the first batch of those cupcakes were intended as a gift, and I felt bad that they looked so amateurish. But Tania was an absolute lady about it, and appreciated the effort despite the less-than-photogenic look of her little cakes. Hey, baking is like chemistry, so it goes awry every once on a while. Live and learn!

The second time I made them, they looked much cuter!


So happy birthday, Tania! I am off to find a better caramel buttercream recipe for next year!

Thursday, 9 February 2012

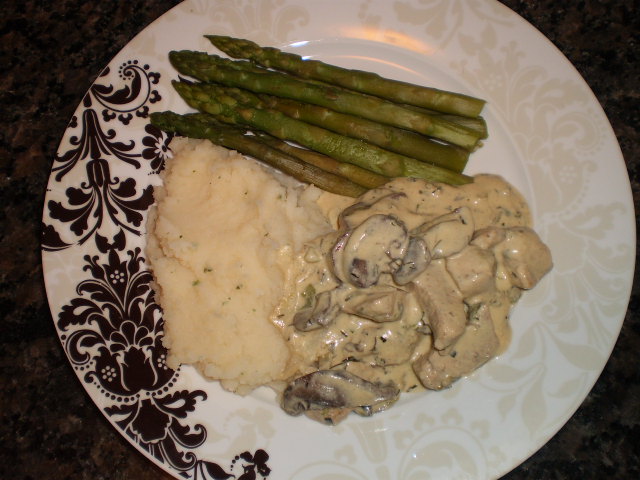
Creamy Dijon-Tarragon Chicken

I went to Paris a few years ago and fell head-over-heels in love with that city. I know it's a huge cliche, but there really isn't any place in the world quite like Paris. Most people who have been there tell me they found it noisy and smelly. I think that can be said of any big city during tourist season, but I was lucky enough to be there is May, when there were few tourists and blooming lilac trees everywhere (lilac is my favorite flower). Paris was at it's best for our first meeting! The small crooked streets, the museums, the history you can just breathe as you are walking around...

I've been longing to go back to Paris ever since my plane landed back here, and when the aching gets too strong, I have 2 cures: I either watch Woody Allen's "Midnight in Paris" (which he made just for me, even if he doesn't know it) or I cook a traditional French bistro meal.

My paternal grandfather was from Angouleme, a small town not far from Poitier. He was in the merchant navy, and during the Great War, he met a lovely French-Canadian nurse. He ended up settling down not very far from Rimouski and opened an inn. I haven't been able to get my hands on any of his recipes (what a treasure trove that would be!), but when I read Patricia Wells' recipe books (especially "Bistro Cooking" and "The Paris Cookbook"), I like to think this is the sort of stuff grand-papa Pierre would have cooked.

This recipe reminds me so much of the sort of simple yet incredibly elegant dishes I sampled in Paris. The delicate creamy sauce makes something as ordinary as a chicken breast (or supreme de poulet as French chefs call it) taste luxurious and fancy. It is ze dish to serve to impress guests or if you feel quintessentially French... or if you are just in the mood for tender and juicy chicken in a rich, tangy sauce.

1 tablespoon butter
1 tablespoon olive oil
1 small bunch scallions, finely sliced
1 package cremini mushrooms, thinly sliced
4 skinless, boneless chicken breast halves
Sea salt and ground pepper
1/3 cup dry white wine
1 cup cooking cream
2 to 4 tablespoons Dijon mustard
1 tablespoon chopped fresh tarragon

A few hours before cooking, season the chicken with sea salt and freshly cracked pepper, and spread a thin layer of Dijon mustard over the meat. Let rest until ready to cook (and please note that this step is entirely optional). Melt the butter and heat the oil in a skillet over medium-high heat. Sauté the scallions and the mushrooms in the skillet until the mushrooms release their liquid, about 5 minutes. Add the chicken breasts to the pan and brown on both sides. Reduce heat to medium, cover, and continue cooking 15 minutes, or until the juices run clear. Set the chicken aside and keep warm. Deglaze the pan with the white wine and when it has reduced a bit, stir in the cream. Mix in the mustard and tarragon. Cook and stir 5 minutes, or until thickened. Return chicken to skillet to coat with sauce. Place the chicken on plates and drizzle with remaining sauce.


I like to scallop the chicken for this recipe, as it makes it cook more evenly in the skillet. You can buy scalloped chicken at the grocery store, or simply wrap ordinary chicken breasts in a dish towel and beat them flat with a meat tenderizer (or if you are really bad-ass, with the bottom of a cast-iron pan). Obviously, this is a rich sauce, so I usually try to select smaller chicken breasts, but depending on the size of your pan, you may be only able to cook 2 chicken breasts at the time. If you are in a hurry and want to whip it up in one big batch, you can cut the meat in cubes and sauté it. It looks less impressive and elegant, but it's just as tasty!


I've also tried marinating the chicken in 2 cups of white wine mixed with the juice of 1 lemon instead of coating it in mustard. The wine always makes the chicken very tender.

One quick word about dosing the mustard: real Dijon mustard has quite a bite. Start by mixing 2 tablespoons of it in the sauce, taste it and wait a few seconds. The taste will creep up on you, so adjust it very carefully so that you don't find yourself making funny faces through the meal. The trick is to taste the sharpness of the mustard, but not let it overwhelm the sauce.

Asparagus and steamed potatoes are my favorite veggies to serve with this (they taste lovely smothered in the sauce!) but a bed of wild rice also makes a great side. Serve it with a fruity white wine; I like Les Jamelles' sauvignon blanc.

Sunday, 5 February 2012

Frankenstein Bhuna Curry

"Bhuna" is a very popular curry - so popular, in fact, that no one can quite agree on what goes in it anymore. That makes me feel pretty guilt-free about making up my own recipe after getting a jar of Patak's Bhuna curry paste and being seduced by the aroma. I read several bhuna curry recipes, and none sounded quite as yummy as the one I put together from various recipe pieces. Franken-recipe!

The idea behind a bhuna curry is more about the cooking process than about the spices, anyway. Frying spices in oil first makes them toasty and loaded with flavor. Meat (chicken and lamb being the traditional choices) is then added to the pot and cooked in it's own juices, making a relatively dry but rich tasting curry.

However, toasting the spices can be a little time consuming: using the curry paste makes the process speedier (a.k.a. weeknight dinner material!) and it's just as tasty. And since we like it hot in my kitchen, I loaded my version with a few extra spices!

Olive oil
3 or 4 garlic cloves, chopped
2 yellow onions, chopped
3 to 5 scallions, finely sliced
1 thumb-size piece of fresh ginger, peeled and minced
1/2 fresh chile, finely chopped
1 green bell pepper, sliced
1 package mushrooms, sliced
2 chicken breasts, cut into finger-sized strips
1 (14 ounce) can crushed tomatoes
2 heaping tablespoons Patak's Bhuna curry paste
1/2 cup dry white wine
1 lemon, juiced
1 cup plain yogurt (optional)

Preheat a few glugs of olive oil in a large casserole-type pan over medium-heat. Add the garlic, onion, scallions, ginger and chile and fry until the onions are soft, 5 to 8 minutes. Add the curry paste. Mix with the other ingredients to cover everything with the spices and fry for another 3 minutes. Add the green bell pepper and cook for a couple of minutes, then add the mushrooms and cook for another 2 or 3 minutes. Add the chicken strips and stir for about 5 minutes, until the meat is browned. Add the crushed tomatoes, white wine and half of the lemon juice. Mix well, and bring to a boil. Turn the heat down and simmer for 25 minutes, until the chicken is tender and cooked through. Let simmer uncovered for the last 5 minutes. Remove the pan from the heat and stir in the rest of the lemon juice and the yogurt (or spoon a tablespoon or two of yogurt over the curry on your plate). Serve over basmati rice, with extra lemon wedges for squeezing over.


You'll get yourself a fresh, tangy and spicy curry with a thick, sauce-like texture that may be a pleasant surprise if you are used to the stew-type curries. The contrasting texture of the veggies and chicken is awesome. If you fancy using lamb instead of chicken, substitute the 2 chicken breasts for 1/2 pound of lamb stewing cubes, and simmer your curry for 45 minutes, instead of 25.

I must apologize to the vegetarians: this curry is not as tofu-friendly as I expected, as tofu has no natural cooking juice. If meat is a big no-no in your kitchen, cut 1 block of extra-firm tofu in small cubes or triangles and use diced tomatoes instead of crushed. Fry the tofu with the veggies until it's crispy on a few sides, proceed with the recipe and let the curry simmer for 20 minutes. It won't be quite as saucy, but you won't miss out on the flavor.

Tuesday, 31 January 2012

Pasta Con Broccoli

I have a short-term memory disorder when it comes to this dish. Every time I set out to whip up some pasta con broccoli, I find myself thinking "oh, this is gonna be a boring meal!" until I eat my first bite... and then I can barely restrain myself from licking the pot.

Life without pasta would not be worth living. I don't think one needs an Italian mom to agree with me. But sometimes, thick red sauces can be a bit repetitive. Deliciously repetitive, granted, but spicing things up never hurt anyone, did it? This sauce is an easily over-looked wallflower of a recipe, but it's low-fat, piquant and healthy.


 Broccoli and garlic lovers will go nuts for a plate of these pasta (one of my coworkers attempted to steal my lunch the last time I brought some to work - office workers can be savages). It's perfect for weeknight dinners, because it takes about 30 minutes from start to finish: turn the heat on for your pasta water as soon as your start your sauce and everything should be ready at the same time.

From "Appetite for Reduction", spiced tweaked:
1/2 pound dry pasta (linguini and rigatoni are my faves)
2 teaspoons olive oil
6 to 8 garlic cloves, minced
1 tablespoon chili flakes
1 tablespoon dried thyme
1 cup vegetable broth
1/2 cup dry white wine
1/2 teaspoon salt
1 head of broccoli, tops cut into small florets, stalks thinly sliced
2 tablespoons balsamic vinegar
Several pinches of ground pepper

Bring a large pot of salted water to a boil and cook the pasta according to the package’s instructions. Preheat a large skillet over medium heat and sauté the garlic, chili flakes and thyme in the oil for a minute or two, then stir in the vegetable broth, wine and salt. Add the broccoli, turn up the heat to bring to a simmer and cover the pan. Cook for 8 to 13 minutes, depending on how soft you want the broccoli to get, stirring occasionally. When the pasta is done cooking, drain and add to the pan, using a pasta spoon to toss them around for 3 more minutes, making sure everything gets coated. Mix in the balsamic vinegar. Serve with a generous pinch of black pepper, and make sure to spoon the leftover garlic from the pan on the plates.


This dish's simplicity gives it all it's charm. It makes a nice, filling-yet-light lunch that you can enjoy at room temperature. But if you eat this dish at home, drink the rest of the white wine with your pasta, and don't forget some crusty bread to clean out your plate.

Saturday, 28 January 2012

My World-Famous Spicy Thai Peanut Butter Chicken

This is another one of my home-made Chinese take-outs! I've been making this one for years, because I am a peanut butter fiend. And honestly, what's more awesome than a creamy, spicy, rich Hunan sauce on a stir-fry or on some dumplings?

I may have a severe addiction to that spicy peanut-buttery taste, so I began to experiment with the flavors until I got the following stir-fry sauce. It's probably highly inauthentic, but it's a universal hit: my boyfriend loves it, coworkers have been known to beg for the recipe and my brother requests it constantly.

This is one of those cases where one can say: "authentic - shmauthentic"! This dish is a lovely comfort-food, rich, creamy and spicy. The sauce can be as thick or as liquid as you want; just add more broth or water. If it separates, as peanut butter tends to do, just stir until it gets nice and smooth again. Lime is not mandatory, but it gives the sauce a fruity zing that I just can't resist.

2 skinless, boneless chicken breasts, cut into finger-sized strips
2 small yellow onions, diced
2 cloves of garlic, finely chopped
8 tablespoons creamy peanut butter
Shriracha sauce, to taste
1 to 2 cups vegetable stock or water
1 or 2 limes, juiced (optional)
Peanut oil
2 tablespoon chili flakes
1 tablespoon ground cardamom
Sea salt and ground pepper
Toasted peanuts

In a large bowl, put the peanut butter and slowly pour the broth or water, gradually mixing it with the peanut butter. Add the lime juice, if using. Blend well until the mixture is creamy. Add more water if needed, until you get a thick, smooth sauce that pours easily from a wooden spoon. Add the Shriracha 1 tablespoon at a time, mix well and taste to make sure it doesn’t get too spicy. Preheat a casserole-type pan over medium heat. Add a glug of oil to the pan and sauté the garlic for a few minutes, until it is golden. Add the onions and fry for 5 to 6 minutes, until they are soft. Add the chicken to the pan and cook another 10 minutes, until the chicken is cooked and slightly golden. Pour the sauce over the chicken and blend well to coat everything. Mix in the chili flakes, cardamom and add salt and pepper to taste. Bring to a boil, then lower the heat, cover the pan and let simmer for 10 to 15 minutes. When the chicken is tender and cooked through, remove from the heat and add a handful of toasted peanuts to the pan. Mix well and serve with jasmine rice and steamed vegetables.


I sometimes mix it up by adding some shitake mushrooms along with the chicken (regular button or cremini mushrooms work well, too). You can add any veggies you like in a stir-fry: bell peppers, baby corn... You can also substitute the chicken for some tofu! Use 1 block of extra-firm tofu, diced, and stir-fry it until crispy and voila! The chewy texture of the tofu goes so well with the thick sauce.

As the rich texture of the sauce hints, this isn't a low-fat dish, whether you use chicken or tofu, so keep it for those days when you need to give yourself a finger-lickin' good treat!